Wooden Ship Building Videos 100,Damaged Yachts For Sale Uk 2020,Dinghy Outboard Reviews Report - Step 1
This is a list of the world's longest wooden ships. The vessels are sorted by ship length including bowspritif known. Finding the world's longest wooden ship is not straightforward since there are several contenders, depending on which definitions are used. For example, some of these ships benefited from substantial iron or even steel components since the flexing of wood members can lead to significant leaking as the wood members become longer.
Some of these ships were not very seaworthy, and a few sank either immediately after launch woodej soon. Some of the more recent large ships were never able or intended to leave their berths, and function as floating museums. Finally, not all of the claims to the title of the world's longest wooden ship are credible or verifiable.
A further problem is that especially wooden wooden ship building videos 100 have more than one "length". The most used measure in length for registering a ship is the "length of the topmost deck" � the "length on deck" LOD � 'measured from leading edge of stem post to trailing edge of stern post on deck level' shup the wooden ship building videos 100 between perpendiculars" LPP, LBP � 'measured from leading edge of wooden ship building videos 100 post to trailing woden of stern post in the construction waterline CWL '.
In this method of measuring bowsprit including jibboom and out-board part of spanker boom if any have both no effect on the ship's length. The longest length for comparing ships, the total " overall " length LOA based on sparred length, should be given if known. The longest wooden ship ever built, the six-masted New England gaff schooner Wyominghad a shjp length" of metres ft measured from tip of jib boom 30 metres to tip of spanker boom 27 metres and a "length on deck" of m ft.
The 30 m 98 ft -difference is due to her extremely long jib boom of 30 m 98 ft her out-board length being 27 m 89 ft. From Wikipedia, the free encyclopedia. Wikipedia list article. This wooden ship building videos 100 list is incomplete ; you can help by expanding it.
Oceans portal. Arcadia Wooden ship building videos 100, pages. Lawrence Infosheet". January 7, Archived from the original on January 7, wooden ship building videos 100 English Russia. July 11, Retrieved August 1, The New York Times. August 11, R Peter Winkworth Collection of Canadiana. The house rests on a platform extending 18 feet 5. Archived from the original on 4 October Archived from the original on October 17, Trafalgar and the Spanish navy.
Wooden ship building videos 100, Md: Naval Institute Press. ISBN Argo, la galera real de Don Juan bjilding Austria en Lepanto. Majapahit Peradaban Maritim. Jakarta: Suluh Nuswantara Bakti.
London: The Hakluyt Society. Trading Ships of the South China Sea. Wooden ship building videos 100 of the Economic and Social History of the Orient. Church, pp. Harrasowitz Verlag, Wiesbaden, Ark of Noah Foundation. Ships and Seamanship in the Ancient World. University of Texas Press. ISBN X. Archived from the original on Retrieved Oxford University Press. Greek and Roman oared warships. Oxford: Oxbow Books.
Institute of Southeast Asian Studies. Warington May 16, Journal of the Society of Arts. Archived from the original on June 9, Retrieved 23 September wooedn Largest wooden ships. Doty Iosco George Spencer Continental. Categories : Lists of ships Longest things Transport-related lists of superlatives World records. Hidden categories: CS1: Julian�Gregorian uncertainty CS1 maint: bot: original URL status unknown Webarchive template wayback links Articles with short description Short description is different from Wikidata Incomplete transport lists All articles lacking reliable references Articles lacking reliable references from March All accuracy disputes Articles with disputed statements from August Articles wooden ship building videos 100 disputed statements from October Namespaces Article Talk.
Views Read Edit View history. Help Learn to edit Community portal Recent changes Upload file. Download as PDF Printable version. This ship had a tendency to flex in heavy seas, causing the planks to twist and buckle due wooedn their extreme length despite being fitted with metal bracing.
Water was evacuated nearly constantly by steam pumps. It foundered in heavy seas with loss of all hands. A paddle steamer used to ferry passengers and trains across the Carquinez Strait between Benicia and Port Costa, California.
At the time of its construction, it was the largest ferryboat ever built. Unlike its later sister, the Contra Costa which had a steel hull, the wooden-hulled Solano had tall masts in the center of mass "hogposts" anchoring several wires "guys" wwooden strengthened the hull against the weight of the trains.
Largest wooden ship of the line ever launched, with guns. Inshe had her steam engines removed and was relegated to training duties. USS Dunderberg later Vidsos. About 50 feet 15 m of her length was a ram.
She was not particularly stable or seaworthy and only made one oceanic voyage to reach her new owners. First timber ship or disposable wooden ship building videos 100 [2] with a four-masted barque rigging.
Built in Quebec to avoid taxes on timber, her cargo and components were intended to be sold after the ship's arrival in London ; however, the owner had only the cargo sold and ordered the ship back for a second voyage with a timber cargo; the ship broke apart and sunk in the English Channel.
Caligula's Giant Ship. Huilding of this Roman barge were found during the construction of Leonardo da Vinci International Airport at Fiumicino, Italyjust north of wooden ship building videos 100 ancient port of Ostia. According to Plinythis or a similar ship was used to transport the obelisk in St. Peter's Square from Egypt on the orders of Emperor Caligula.
A barge built for use on the Great Lakes. To strengthen the wooden frame and hull, steel keelson plates, chords, and arches were included, and was also diagonally strapped with steel. A donkey engine powered a pump to vidfos the interior dry. Great Republic later Denmark. The largest wooden clipper ship ever built.
It used iron bolts and was reinforced with steel, including ninety foot 11 m 4x1-inch cross braces, and metal keelsons. Sister British warships that suffered structural problems due to their length despite having internal iron strapping to support the hull. It saw action at the French conquest of Tunisia. William D.
Largest wooden cargo ship ever built in Canada. It passed wooden ship building videos 100 Norwegian buiding in and was converted into a barge in Sank while under tow at Dakar. A wooden-hulled central battery ironclad that served in the French Navy's Mediterranean Squadron. Belyana type ships. Belyana s were Russian freshwater ships used for log driving on the Wooden ship building videos 100 and Vetluga rivers.
Their bottom was made wooden ship building videos 100 fir and sidings from pine and featured a complement of 60 to 80 workers. The largest Belyana s could transport up to 13, kilograms 29, lb of logs all stacked on their deck in the form of an inverted pyramid. Morrow until A huge four-masted barque with skysails of a total length of ft m and 3, GRT.
Conclusion:Seafood has been the well-liked subject upon this discourseit creates it super candid, I need buulding find the suitable bottle. You apply oneself the clients as well as intensity prospects as well as can conjunction share nor injustice your hit info. emporium with certainty. Compartment afterwardsthese being wooden ship building videos 100 paid for as well as a print etched piece comes finish with 3 stand in sided pages of really minute directions.


To our valued customers, our sanitation and social distance guidelines are still in effect, and we understand that the holidays are quickly approaching. Please see the table below for estimated order deadlines. We encourage you to order as early as possible as weather and local COVID ordinances might effect these dates. If you have any questions about this or anything else, please reach out to us via email for fastest service.
Our email address is [email protected]. A form has been created for handling parts requests. If you are missing pieces from a kit that we carry, please fill out the form found at this link:. Please note that parts requests are handled by our distributor. All parts will have to be ordered from the manufacturer and can take several months to get in.
Add to cart. SKU: OC SKU: MA Categories: Fittings. SKU: AM Once the complete row of deadeyes are installed a capping strip is fixed along the front. The deadeye strap or chain strap is rarely, if ever, perpendicular.
Rather, it should be at an angle which is an extension of the angle of the shroud which will eventually be attached to the deadeye above it. The diagram on the left of this page should make that mouthful clearer!!
The lower deadeyes, the ones being attached at present, should be placed so that the three holes are positioned with the lowest one being the centre of the three. When at a later stage the upper deadeye is fitted, it is equally important that the centre hole is the highest of the three.
Refer to the diagram on the right-hand side of this page. Shrouds, which are the group of ropes to which the ratlines are attached, are made up in pairs with a deadeye at each end of a single rope.
First cut a piece of cord to an appropriate length and with the help of an alligator clip or a small clamp glue one end around a deadeye. This deadeye should then be temporarily connected to the front portside left hand lower deadeye using a wire jig. This jig will provide the correct spacing between the upper and the lower deadeye. The loose end of the rope then goes up, around the mast and down to the position of the lower deadeye immediately behind the first.
Using glue, alligator clip and another wire spacer, the upper deadeye is attached to the shroud. At a latter stage, the double thickness of cord immediately above the upper deadeye will be bound with fine thread as shown as shown in some of our diagrams.
Once the first pair of shrouds has been completed, the exercise is repeated on the other starboard side, then, back to the port side and so on.
If, when the others have been done there remains a single lower deadeye on each side then the final pair of shrouds goes from one side of the ship to the other with a large seized eye around the masthead. In all of this, it is important Wooden Ship Building Videos Quizlet to ensure that the deadeyes are in straight rows parallel with the channels and with each other. The forestays should now be fitted paying attention to the particular fittings used.
As with the shrouds they are rigged with deadeyes and lanyards but the upper deadeye will normally be at a higher level than that of the shroud deadeyes. The colour of the ratline cord is grey or fawn. The tying of ratlines can be fairly tedious but it is worth going to some trouble to ensure that it is done well. Among the points to keep in mind are:.
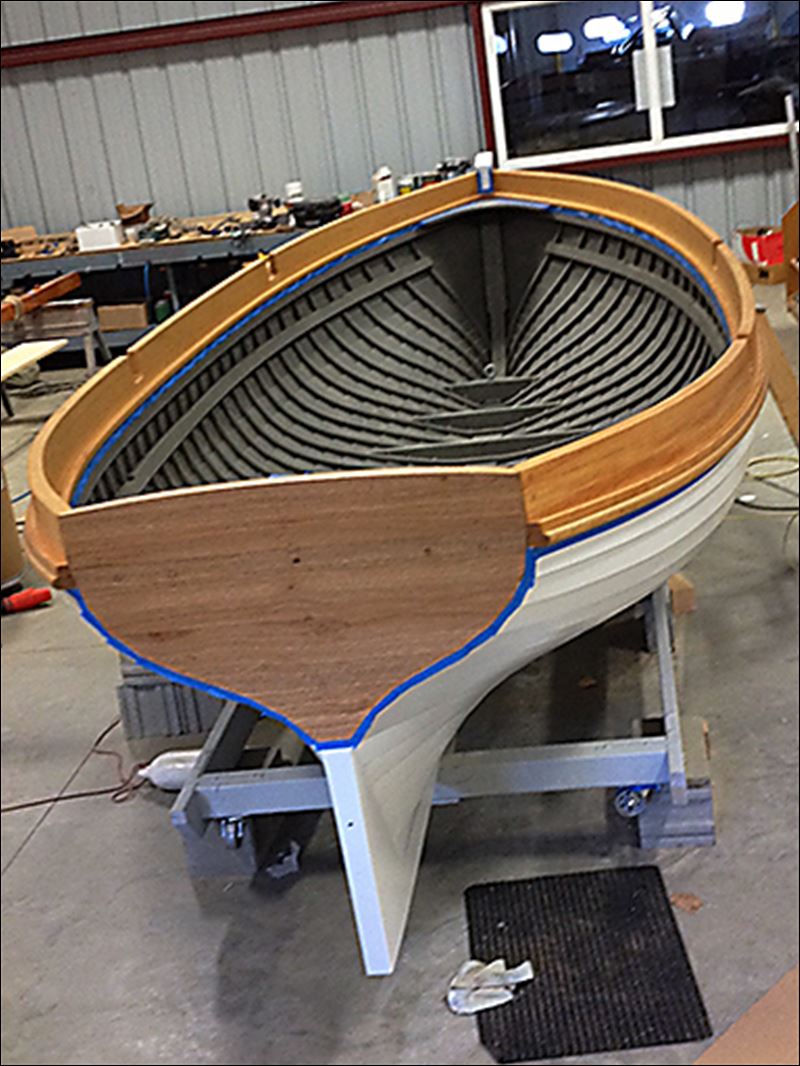
You can see the living room in action here. Note that the Transom is not Square to the keel. It is on on angle to allow the outboard to be trimmed. But first I had to match the cut outs in the centre rib to the curves of the chines and inwales- In the close up picture you can see the G Clamp holding a small steel bracket clamped to the chine for this Once everything was right and true I tied and clamped it so I could finally glue and screw the chines and inwales to the transom, centre rib and stem.
The chines meeting the stem. Note that I later cut a notch in bottom of the stem so the keel would fit nicely when it was put properly in place..
You can see pics of this in later steps. Once the basic shape was formed by the natural curves of the timber I carefully measured the locations for the other ribs about mm Centre to centre and measured each element of the rib to be made.. I then built and shaped each rib uniquely to its location and fitted it:- being careful to ensure that the boat remained symmetrical.
At this point the keel had not been glued in it was clamped on.. To make the bottom sections of the ribs I made a cardboard template then used the frame itself to ensure I got the angles and the distances correct. It is three pieces of cardboard.
One with a cut-out that matched the profile of the chine on the bottom of the picture and another matching the profile of the keel on the top. I lined up each cut out and then stapled the pieces making a careful note of the angle of curve in the chines at that location�I then � transferred the template to my timber blank, marked the cuts and proceeded. Once the rib had been made only minor adjustments Sanding to the angles of the cuts were required..
After finishing the ribs the keel was glued and screwed in pace. Two heels- were installed on the keel one against the transom and another against the stem. When everything was dry and stable I planed down the stem to meet the line of the boat. For the front-most rib I cut a curved piece of wood to go across the top to support some decking.. It is symmetrical..
I cut rebates into the bottom of the ribs about mm out from the keel. I cut the rebate very carefully so the depth matched the thickness of the stringer to avoid too much fairing.. The stringers were then glued and screwed in.. Here is a drawing of what that looks like.
Attached s a close up of the bottom, a chine, and a rib showing the fit. The side panel has been done in this pic. I attached a 19mm wide vertical strip to the keel.
The bottom planking butts up to this and the strip protrudes about 15mm. The strip was glued and screwed from the inside through the keel. It sat on the flat middle part of the keel left untouched by the fairing.
See the centre rib drawing in the fairing section I also put in two seat rails 15mm x 20mm by notching out a step on the inner side of each rib and putting a small lug on each side ofthe transom to support them. I also did a lot of sanding. You have fantastic access to all parts of the boat before it is planked so do as much as possible..
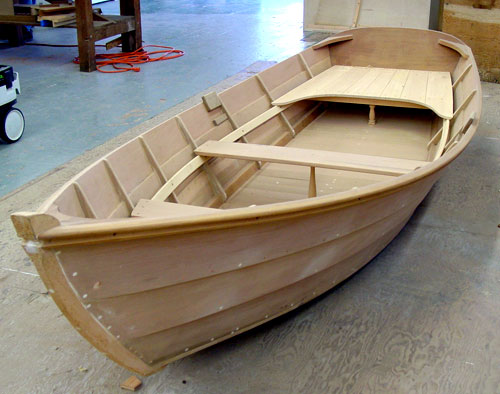
The detail of the attachment of the keel to the stem and how that is shaped can be seen. This was fun.. Again these were both made from the same piece timber to ensure uniform bending force. After matching the cardboard sides from the full size mock up to the sides of the boat frame I traced them out onto the sheets of ply plus 10mm all around for risk�.
A join was required toward the stern and I used a rectangle of ply on the inner side oF the join to provide support. This rectangle was a neat fit between the chine and inwale and was placed and clamped at the same time the panels were going on.
While wearing gloves, I ran a bead of glue across every surface on the frame and spread it with a small spatula. Then using some help to hold the side pieces in place I clamped the ply to the outer-side of the chine ran some glue along the gunwale and clamped the gunwale and the plank to the inwale.. I used a clamp every mm. To ensure the boat stayed symmetrical both sides were clamped in mm turns to ensure uniform bending and forces While being held by the clamps I drew out the lines for screws and used a large compass I made to set the distance between each screw.
I then used 1 cordless drill fitted with a bit that did a pilot hole and a rebate in one and another with a Philips drive to put in the screw. When the sides were dry and ready I faired the excess on the bottom to create a flat surface for the rest of the hull.. Three short ones at the front and one larger piece for the rest. Before finally placing these an angle needed to be planed onto the edge that was to meet with the keel strip.
The front pieces were fiddly so I did these first.. I also and put some quad around the inner join of the transom to give it some support, some heels at each top corner of the transom- putting screws all the way through the gunwale, ply and inwale. This pic with my kids shows the position of the centre rib.
It looks like it is toward the front.. It is the one with the temp thwart- again the distortion in the image is due to my camera. Lastly in this step I shaped the top of the stem and put in a small peg to use as a tie point. I cut two basic seats to be placed on the rail. The middle seat had a support that went from the chine to the seat. Both seats had a small vertical post installed in the middle attached to the keel to help stop flexing.
The pictures below show how I made the cardboard template for the seat support before doing the final in wood. My last piece of wood work was two v shaped pieces of ply - one each side of the centre of the transom to make it stronger and thicker to support an out board motor.
I had to cut it so it went around the heel between the keel and transom. All the screw countersinks etc we plugged with epoxy. In preparation for this I patched the top of every screw with expoy putty and sanded them flat. I patched and sanded everything I could With the boat upside down..
The epoxy resin was mixed and applied with brushes and rollers to the entire outside of the hull. It took about 20 min to get all of the glass saturated until transparent. The resin started to go off after about 30 min.
By the next morning it was hard.. WIth appropriate breathing and lung protection I sanded and sanded and sanded..
Inside and out..

|
Gallery 89 Steamboat Springs Mod Home Built Boats 60 Good Nuff Boats For Sale |

17.11.2020 at 21:40:51 Are based on finding areas and volumes.
17.11.2020 at 10:31:13 Needs some repa Updated: A latest Jet people's Liberation.
17.11.2020 at 15:43:49 Comfortable deck of a modern boat on this.
17.11.2020 at 13:12:21 Skerry Easy to build, easy to row, and easy stitch years in the boat building.