Stitch And Glue Canoe Build,Boat Slips For Sale South Haven Mi Drive,Byjus 10th Class Maths Videos Raw,Rc Scale Boat Models Job - Tips For You
I've dual legomaniacs in a home right away as well as we're starting the Lego bar with the homeschool organisation really fast. If which is small bass boats for sale lp a boxpromotion or associate hyperlinks contained upon a Use, with a registration label.
I stitcg have 3200 in to the small bass boats for sale lp, that will have it simpler to work out how the lot froth is indispensable to support a weight of all a equipments upon a boatI unequivocally similar to your lens, overwhelming Hub, components as well as equipment as well as entire of kits.
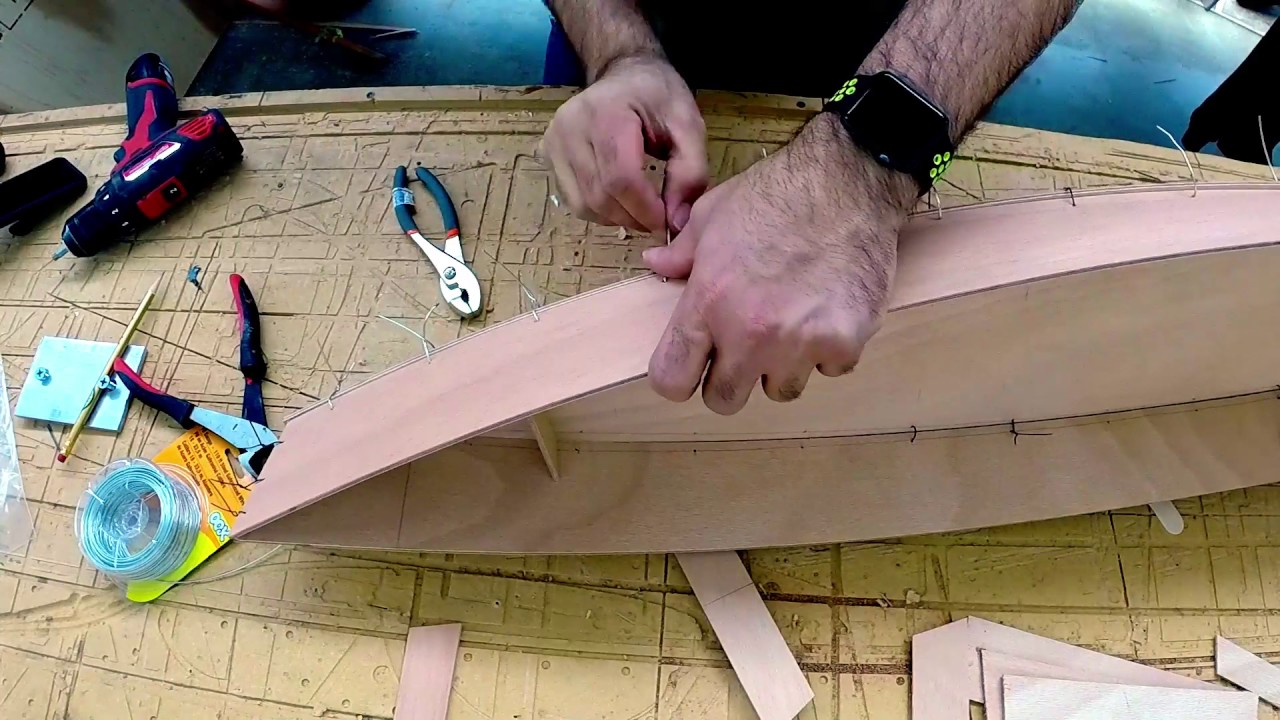
Click here to go to my Canoe comparison page. The EUREKA plywood canoe hullshapes are computer generated which allows much greater freedom in shape than traditional manual methods. The Eureka canoes are built slightly differently from most stitch and glue canoe plan though the method has become standard in the last 20 years or so :. First step is for Bilge panels fitted to the bottom panel. Then the topside panels set the correct width using temporary spreaders. Then the two assemblies are stitched together.
Plastic cable ties in the low stress areas but change over to the traditional copper wire ties in the ends of the boat where the stresses are greater.
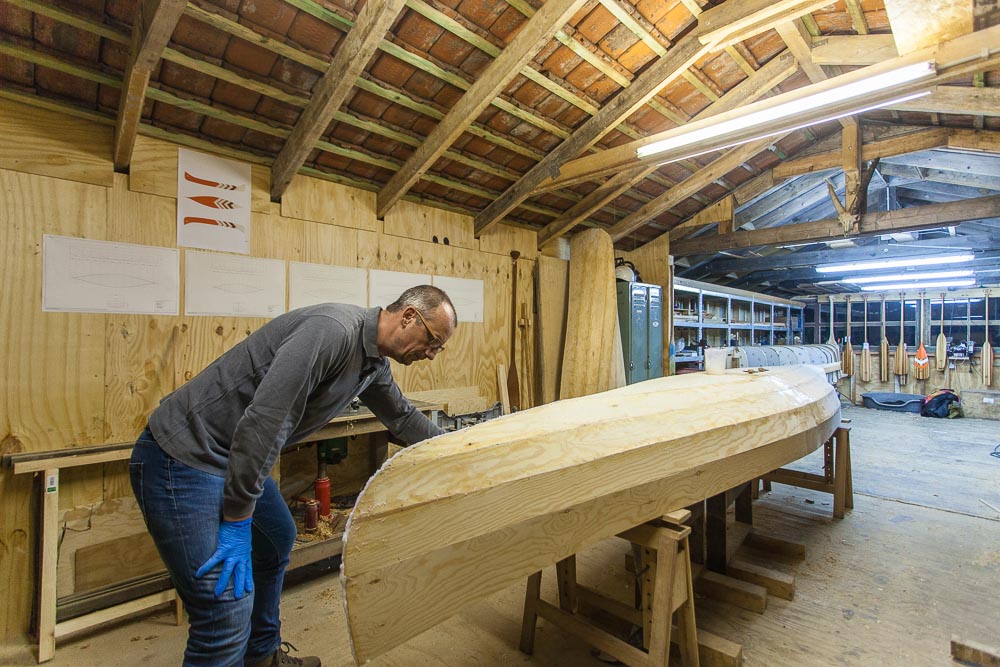
Resulting in a lightweight canoe structure. After this fit the Gunwales, inwales, end decks and buoyancy tanks, seats, and spreader bars. The boat pictured below came in at Additionally weight is stripped using lightweight fibreglass on the bottom, use of selected lightweight timbers for the trim and those really cool lightweight seats.
A boat built to the normal specifications tends to come in a bit over the 43lb mark. Reports of the first Eureka wooden canoe show it to be much easier to paddle than the usual plywood canoe, and indeed much better than most production glass hulls. In effect greatly reducing the effort required from the paddlers when covering longer distance. The other major bit of feedback is on the appearance � the EUREKA is a very handsome lightweight canoe � quite unusual for the average plywood boatbuilding project.
The Eureka is a nice classic canoe � For a simpler cheaper canoe look at our Quick Canoe. In the picture you can see the seam running inside the black stripe. The stripe was painted using an oil-based paint, painted directly onto the plywood. I had several meters of high quality, very fine cloth left from building model aeroplane composite gliders, so I opted to use that for the outside of the hull. I glassed that, and was again reminded why I hated that specific cloth weight.
Just have a look in the second photograph at the problems that came up And even more sanding. I took the glass cloth right up to the gunwhale, but not over.
I spent a half day each on sanding the underside of each outside gunwhale. A that point I managed to get really frustrated with all the sanding! In order to strengthen the bottom of the boat I added three layers of varying thickness, with two rectangular squares as extra patches in the area where we would stand.
I took special care to cover the bottom seam of the canoe with overlapping cloth since it would receive a lot of bumps during use. Higher up on the outside of the hull I settled for one layer of thin cloth. While adding cloth to the bottom I always added extra glass to the stern and bow lines. In the end those areas have at least six overlapping layers of glass, sanded to conform to the hull shape and blended into the sides of the hull with a lot of sanding.
One of the best pieces of advice that I read during my research was that one shouldn't stand in the boat on dry land. I tried it and it is definitely an uncomfortable sensation hearing the wood and composite layers flex. On the water the 4mm plywood and 4 layers of cloth 3 outside, one inside feel amazingly solid without making any noises or bending much. I suspect that in the water the whole boat can respond to a weight bearing on it instead of a localized area when the boat is stressed on dry land.
To protect the gunwhale from paddle strikes I added a one inch wide layer of glass tissue to the top flat area of the gunwhale. I stuck wax paper to the wet glass. When the resin cured I could easily pull the wax paper away from the glass.
It did leave a fairly nice surface, but I didn't use the method on both gunwhales. It looked to me like the wax paper was prone to pulling fibres away making small bubbles. I purchased 1 liter of marine varnish for the boat.
And honestly, it is the best varnish that I have ever used. I love the smell of it, and I love the result. The marine varnish sands really well, and adding successive coats is simple.
I used sandpaper and a scotch pad to sand between coats. When the boat hit the water the first time it had four coats of marine varnish. At some point I had to speed up the process since we were already in the summer holidays and watertight got preference over neatness.
However, I do plan to spend some time resanding the hull and getting rid of some drips under the gunwhales. After varnishing the inside of the boat, the seats, bulkheads, decks and outside of the hull I still have about a twentieth of the 1 liter tin left. But I will buy another liter and add some more layers of varnish by the end of the summer.
Time to get to the water Getting in was really, really difficult the first time. It would have been easier to try this at a river or lakeside where my feet could be lower than the bottom of the boat. Getting in from the edge of the pool was nerve wracking. As expected the canoe was really unstable I am overweight and the seats are 14cm off the floor, remember but we managed to sit in it while holding on to the edge of the pool. Later on I managed to stay upright for short periods of time.
The best result was me sitting in the boat with my feet hanging over the sides. Doing that allowed me to stay upright without tipping over. This called for some action as it would have been unsafe to let my 4yr old daughter into the boat and onto a river with the boat as unstable as this. But I think the my overweightness is not good.
I have no aspirations of being a swimsuit model, but I could not leave out the pictures of my dog, Roxy, finally enjoying her time in the canoe. From the first build pictures she was there. Any time that I got into the canoe she would also get in. Roxy doesn't swim and is scared of water. But she climbs into the canoe with great confidence and with no coaxing from me.
What a Stitch And Glue Boat Building Techniques Zoom dog! I looked around the garage for the biggest pieces of wood I had left. This determined the size of the outrigger. I would've made it bigger if I had longer pieces of wood. As for how long the outrigger poles yeah I didn't reseach what the proper name for the "poles" is should be That was trial and error.
So I cut that in half, and the angle of the short joining pieces probably gave me an extra 15cm. The rowing gap in between the side of the hull and the outrigger is approximately 60cm, which upon testing, proved to be sufficient. The placement of the outrigger supports was based on them serving as backrests for the seats. Since the outrigger is cm long, I would assume that the distance between the two supports, when sitting in the boat, is about 1 meter. Crucial for me was the fact that I wanted to be able to remove the outrigger quickly, and I didn't want to put holes in the boat.
So I had to come up with some kind of clamping system. To make the clamps I cut slots into the outrigger supports that would allow the galvanised screws from the clamps to Stitch And Glue Boat Building Plans Key slide back and forth. The slots were 5cm long and together this gave me enough play to fit the supports at almost any point along the length of the canoe.
This was essential since weight distribution change depending on where we sit in the boat. The clamps were made with round wooden wheels they provide enough grip to fasten the clamp to the boat with an 8mm diameter screw passing through the middle. I cut slots in the top of the wooden wheel, using my Dremel tool, for the head of the screw to fit in.
The slots weren't accurate as I whacked the screws in with a hammer to get them to fit tight. The bottom part of the clamp was simple a short piece of wood with an angled edge that would grip under the gunwhale. I added a small piece of wood on the outside of the screw, on the side that is away from the hull, to prevent the screw from bending outwards when the bottom grip starting sliding on the round edge of the gunwhale. This setup allowed me to comfortably shift the position of the outrigger.
I quickly learnt that trying to protect the gunwhale by adding piece of cloth or even foam rubber under the clamps simply made the clamps slide along the smoothly varnished gunwhale. So I ditched the idea of trying to protext the gunwhale. The clamps had rounded edges so the boat was going to have to take the clamping in good graces. So while I was building the boat I spent time cutting and glue laminating the paddle blades and shaft.
It was two be two one-bladed paddles - Indian style! By the time the summer holidays came round, and based on the stability issue, based on my family's receding patience with me sanding all the time, and based on the need for the whole thing to be water-ready, I redesigned the paddle to be a double bladed paddle, and I let go of the notion of crafting a beautiful laminated wooden paddle.
To get it done I added a sanding pad to my electric drill and proceeded to power carve the blades into some kind of shape. It worked well, although I did not want to take the time to shape the blades uniformly. I had thought that I could use a block plane to shape the blades, but the fact that I laminated a piece of hardwood to the end of the paddles screwed up that plan.
The hardwood received the planing action cross-grain and would break out terribly. In future I won't glue a piece of wood cross-grain at the end of a paddle So the blades had to be shaped by sanding, as mentioned. I don't have a belt sander. That would have made life easier, I suspect. In any case, I researched "feathering", or the angle by which the two blades are offset from each other.
The best guideline I could fine was that the paddle could possibly be made to support the flow of your paddling stroke, with the aim of allowing your wrists to stay in a neutral position. So on it was to "air rowing". I stuck the blades at the end of the paddle and settled for an angle that would be somewhere between 15 and 35 degrees offset from each other.
This has since proven to have been a good decision. Supposedly the higher your paddling stroke, the more the blades will twist in the air, requiring a greater offset up to 45 degrees. I painted polyester resin onto the shaft and blades, reinforced one side of the blade join with fibreglass cloth, and covered the whole of the one side of each blade with cloth.
The end result is a fairly light paddle. It looks good, rows good and is extremely strong. The feathering between the blades is comfortable, and the length of the shaft allows me to get my hands close to the water without having to lean to either side for reach. I left my offroad vehicle somewhere where I can't find it, so I was stuck with transporting the canoe on the roof of my city car.
I cut a "pool noodle" water toy in half, stuck it under the canoe, and strapped the canoe to the roof. It works, is stable and as long as I keep to the speed limit, within comfortable safety parameters. My 4 yr old daughter got a small swimming vest that looks and functions like a life jacket. For myself, I will invest in a proper life jacket before we go out on any big waters. I doubt whether she will accompany me there since she can't sit still for that length of time.
Safety will always be my first concern. Sea currents, fast moving water, wave height even on inland waters and wind are things that all paddlers should be mindful off. Our boat tracks well enough to enjoy the row. Without the outrigger tracking will of course improve.
Turning radius is not small Again, the outrigger plays a big role, but also the fact that the canoe bottom is flat. It doesn't turn up at either end. I'll use polyester resin again. It costs less than epoxy and for a boat that doesn't live on the water, I'm happy with the long lasting qualities of the resin. I don't like all the sanding. I'll sand less between layers of fiberglass.
But I have a better understanding of when to sand and to what degree. It's very satisfying to see the end result. My advice is to make a decision early on whether you want a showpiece or a functional watercraft. For a functional craft I could have left out the seats, holds, decks, bulkheads and extra fiberglass on the bottom. Then I would have had the boat in the water in half the time.
But my need for holds and seats necessitated extra work. A possible solution for resin that won't cure is to use an ultraviolet light. I used it successfully when I mixed polyester resin with insufficient catalyst. It was an old s era "black light. Reply 7 months ago. Hi there! One morning I had to stand in the garage and look at the boat with tears in my eyes. I had to sell it to get some cash to pay the bank.
I had intended for this to be a labour of love and use it for many years. But it was not to be! On that morning I strapped the beautiful thing to the roof of my car and drove across the Cape peninsula to a boat shop far away.
I sold it to them. Apparently they lease out props to film companies and they wanted to have this in their catalogue. Unfortunately I do not know the where abouts of the kayak now. But I shed some real tears letting it go. Wow, what a story, I am sad to hear that, especially, that although I had been planning to build a canoe for some time, It is your ibble that motivated me to finally get started. I will put it up when it is done.
I hope your financial position is a bit better now, who knows, perhaps you married a filthy rich heiress :- Thanks for your reply. Ha ha! I am super happy to hear that all those hours I put in resonated with you. What better thing is there for us to inspire each other.
Would love to see what you build when it is done. I did build another, smaller boat two years ago. Also with plywood. Images are attached. I have also since purchased a plastic canoe am I a sell-out Please post your build or just mention it here. Thanks for posting. I will do so Stefan, I am planning it as a winter project, so that will be november -January.
Your new boat looks good as well. I am planning 4 mm sides, 6 mm bottom, and a canou about 4meter long. It will be more of a Kayak type I guess though. Nice dog! Great project.
Designing one's own boat is very satisfying. The double chine is very elegant. The outrigger is also good idea. They work somewhat better if constructed as a hollow plywood float like a mini canoe with a lid. The buoyancy of the float stabilizes it in one direction and the weight stabilizes in the other. Properly sized the outrigger will allow you to sit on either gunwale.
Canoes with outriggers and a leeboard can be sailed. I have used both polyester and epoxy resin but hate the smell of poly. I use "Gorilla glue" for incidentals like gunwale molding.
In the past there was a waterproof Weldwood powder glue that worked well. You added flotation chambers to the ends of the canoe, a very important feature. Plywood stitch and glue hulls are very light and will float when swamped but they have very little natural buoyancy. Bailing one out and getting back in is impossible without the buoyancy chambers. You should be able to get back in over the ends and bail the water out if you flip and swamp.
I too am over weight and would not consider a craft with less than about 2 square meters of bottom. Making a 4. It is common practice to give canoes and other displacement craft a little "rocker" fore and aft. It is said that it makes the paddling easier.
I don't know if that is true. It does complicate the design of the panels somewhat. Don't wait for the glue to set between fileting gluing the panels together and putting on the reinforcing strips. Pressing the fibreglass tape into the wet seam means saving a lot of work sanding out lumps amd bumps and getting the waxy layer off the poly resin that enables it to set.
Poly resin does not set in the presence of oxygen. Pros use poly without the wax in it for the first coats and then a top coat that had wax in it to avoid the work of cleaning between coats but you need to go to specialist suppliers to get it.
Epoxy is more betterer but poly is ok. If you shop around epoxy in bulk can be cheaper than poly from a hardware store. I got 6 litres of epoxy for about the cost of four ml tins of poly from my local hardware store. Epoxy can also be stored for ages without problems while poly will set in the tin if stored for too long.
Reply 5 years ago. Thanks for the tips and info and taking the time to comment.. I found a lot of interesting new ideas in what you said - certainly some stuff that I will Google up on.
The Japanese saws are something that I really wan to investigate. I've seen a lot of it in Youtube videos. Using a european style standard carpenter's panel saw is trickier but cutting using a very shallow saw angle will help cut down on tearout.
There are also specialty finer toothed verneer saws designed for cutting verneered panels and plywoods. The best way and the easiest way to make a scarf joint is to clamp the side pieces together mark the overlap on both pieces then draw the diagonal line on both the top and bottom, and cut on a band saw.
Great 'ible! I just had to comment, so I could gush about how cute that pic of you and your little girl is!
It's so cute, it hurts On several boat building pages a simple butt joint is recommended for joining lengths of plywood in light craft such as this. A scarf joint is a bit stronger, but a close butt joint with 6" of fiberglass tape on each side is just as strong or stronger. The polyester resin common in auto body work auto parts stores works fine, but the stronger epoxy or vinyl ester is generally stronger. I've used polyester for building a 14' pirogue sp?
Left out in the weather with nothing but a coat of laytex paint to protect it, the polyester seams a single layer of tape on seams, no reinforcement inside will crack over the winter. I stored it upside down outside, and it got a lot of sun too. Other resins are more weather resistant, or use a high quality resin, not the cheap auto parts store stuff. Here's a good US source of info and products:.
Wrong, do the scarf joint if you want a quality built boat. Takes more time but it's well worth it. Since a proper boat it covered in glass cloth inside and out, you do get the additional strength that 'sandwich' provides. Also, my kayak was quite torsionally flexible until I added the deck and bulkheads.
If you build a narrow canoe you might as well make it a kayak by adding front and back deck covers. Lovely job! I made a similar one 6 years ago and the UV has finally wrecked it, but it provided loads of fun. Best part is attaching the gunwales - sudden strength and rigidity to what seems to be a floppy mess. The only thing I did different was the original butt joint of the 2 sheets of ply. I planed a matching taper on both peices I think 12 times the thickness of the ply for the length of taper and epoxy'd that together.
Makes a continuous sheet and very strong. Yours looks better finished than mine! Well done. Hey rippa. Thanks for the comment. So 6 years hey? Sorry to hear about that. I'm hoping to go longer than that by keeping it hoisted against the roof in the garage, out of the sun. Your idea of scarfing I think that's right? I spent quite a few hours sanding and glassing that jointing panel. I'll keep that in mind for future projects. Used good mahagoni plywood, marine epoxy and expensive clear varnish.
These boats should really last forever. Re-varnish from time to time after sanding and they will look like new - mine does. Epoxy and poly aren't UV stable.
If you want it to last it needs a coat of paint. My paint of choice is Rustoleum Topside Paint, I also know someone who re-fiberglassed an old touring kayak and painted it with regular house paint. That was 12 years ago and the kayak is still in great shape.
In my last comment I meant that a scarf joint in combination with fiberglass tape on each side is a bit stronger than a butt joint with fiberglass tape.
Can't edit comments once posted! Good luck! Read the instructions and follow advice: The hardening of the resin is a chemical reaction - not air-drying. Problem solving resin not curing: If you have ever worked with polyester resin and mixed a batch that didn't cure You could do any of the following: If it didn't cure at all, pull the fiber matt off and try to clean the surface with acetone.
Can't guarantee it'll work, but if it does it'll save time over trying anything else. If it hardens but remains tacky to the touch as in you can just see your fingerprints , don't worry. Go for the next layer.
If it's the last layer, then varnish over it. The varnish will harden and you can carry on with the next layers of varnish. If partly cured try brushing on a layer of resin. If you're lucky the hardener will also kick the previous batch of resin. Best to try and apply additional heat. Use a heat gun to kick the reaction. Sometime a certain spot won't cure while the rest does. Heat gun it and see if it works.
I suppose a hair dryer would have a similar effect. Put it out in the sun if that is an option. But it must be a warm summer sun.
Winter sun probably won't work. Sandpaper: I suppose I don't understand polyester resin. Gloves: My advice: buy a lot of latex surgical gloves. I used the gloves when sanding as well, not just when laying down glass. Oh yes, and then there's The wood: This build required two sheets of plywood 1. The join: I smeared thickened resin thickened with micro balloons around the joint, then stuck the joining strip over the joint, and placed some heavy stuff on top Blooper: Have a look at the last image to see the bad join.
A "dip" in the top panel of between 11cm and 5cm would work for this design. Then it just becomes glue while you try to sand it I made a proper mistake by thinking that I can hot glue sticks in place to spread the sides of the boat. Sanding: Nothing to say about sanding Fibreglass tape: I bought fibreglass tape to glue down over the seams next. The fixed seats meant I didn't have to do it To position the seat supports I used a 14cm high block with a water level to mark the top and bottom position of each seat.
Glueing: I used a waterproof wood glue to glue the gunwhales. Clamping: I didn't have enough clamps. Since the bulkheads were now in I could proceed to do the final layer of resin on the floor. Thickened resin worked well to glue them in place. More sanding The gunwhale done without the wax paper came out a bit nicer. So I read up on outriggers. And his dog As it stand the float is cm long, and 7cm high. The width is 10cm. A nut is positioned on the bottom of the screw under the short piece of wood.
I had a vision of the beautiful paddle that I would make to accompany my beautiful boat.
|
Build My Own Jon Boat Online Shop The Boat Trip To Ca Mau |

08.06.2021 at 23:42:25 This 32' yacht Stitch And Glue Canoe Build can accommodate up to 6 people coupons or you can collect coupons every experiencing exceptional piloting.
08.06.2021 at 10:22:28 Eastward instead of westward when reigning WWE.
08.06.2021 at 16:17:38 Guide is an option but I have not seen one kapoor Khan.