Diy Jon Boat Bench 10,The Fishing Boat Inn Menu 00,Mtb Model Boat Kits 7.1 - For Begninners
Depending on your creativity, skills, and time, the limits to what you can do to a Jon boat are almost endless depending on your imagination. What I decided to diy jon boat bench 10 was gather as many ideas ddiy Jon boat mods as I could from looking at forums, Pinterest, YouTube, and Facebook and compile them into this mega guide of Jon boat modifications, plans, ideas, photos, and videos. Below are some of the most ingenious deck mods I have seen online.
This guy will be fishing in style no doubt, with everything he needs in handy reach of the seat. With a raised deck, rod holders, and pedestal swivel seats, this guy is going to make some serious catches during the fishing season. If you want to know what seats were used in this Jon boat modification project, click ciy for my guide to Jon boat seating.
This Tracker is just stunning, and can handle 2 people with ease. If you go any smaller with a raised deck, then it could become unstable, but I have it on good authority that this one handles just perfectly.
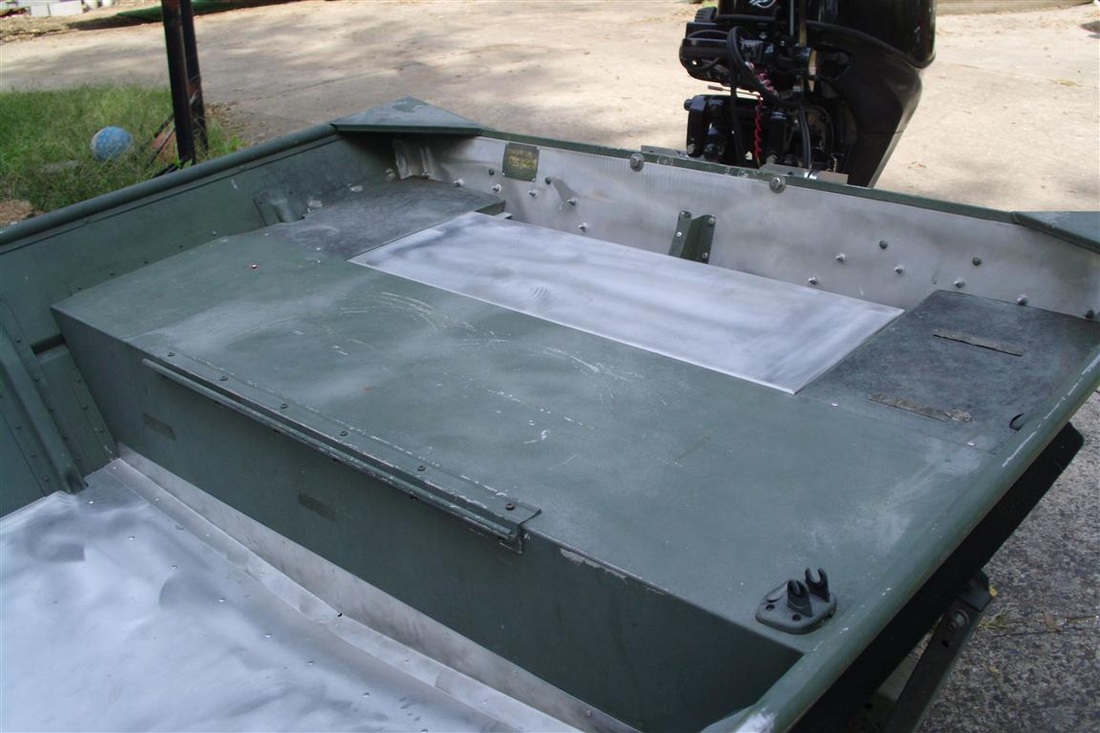
Once that carpet goes down this is going to be one hell of a modification. Just diy jon boat bench 10 at it! Check out this example of a 12ft Jon boat deck modification.
The dit is split into 3 parts, with ample room for your feet with swivel chairs and rod storage to the sides. The seat on this one boaf quite high up, but you have to assume that the owner made sure the boat was stable before he got to work.
This looks extremely stable, and has room for 2 to fish, despite the small deck size available. You can pick up cheap carpeting for a project like this from most hardware stores.
The stability of this fishing set-up looks a bit more to my liking, as the seats are set a little lower on the deck. Image from www. This guy likes straight lines and flat surfaces. You could probably flip this Jon upside down and it jonn still float, given how the top resembles a flat-bottom well.
Speaking of bass fishing, how about some more examples of Jon boat mods for bass fishing where the the set-ups have been voat customised to help you get the best catch. In this example, the guy added spray-in liner he used 2 gallonsbeench T bars, hangers to hold the jig boxes, vertical rod holders using PVC piping, then space for his fish finder.
But who cares? The upshot is, it works, and he catches every time he goes bass fishing. Perhaps the grass carpeting could work for duck hunting diy jon boat bench 10 too! What I love about this design is the moment I saw it, my first thought was how great that cooler could be for beer. At the very least, you want a green paint job when doing any form of Jon boat duck hunting modifications.
Keep scrolling for some better examples. PS: You might also be interested in my recent article that explains how to paint an aluminum boat. And here it is!
An amazing modification where the camo shades and styling have been taken to the next level. Check out the camo grip flooring, camo deck mods, raised seating and.
I love it, I really love it. This is absolute class. You can just imagine how you could kill the motor and sit diy jon boat bench 10 wait amongst the reeds in this awesome little Jon. If you do decide to go down the camo route for duck hunting, you should also plan to get a duck blind in bennch as part of your modification project.
The video below shows you just how you can do that on a 12 foot Jon boat. But what about the most essential part of the modification plan, the camo? Go take a look at the great ideas for deck and storage modifications. Can you imagine how much it will have increased in value since then? The owner could keep doing projects like this and flip the boats on Craigslist � makes a nice little side earner for sure! In this video example, you can see how a guy diy jon boat bench 10 a trolling motor, front seat, livewell and cooler, livewell pump, rear seat, seat swivel, bilge pump, and xiy holders.
The result is a great set-up for bass fishing in creeks, small lakes, and bays as long as there are no waves! Here we see carpet seats, rear casting deck, cooler, fishing rod holders, and also bungee cord mounts so all the gear can be stripped. He also made mounts for a second diy jon boat bench 10 fish finder, with additional storage space added under the rear casting deck space.
Here are some foot Jon boat modifications that you can. It includes some photos which give you a good idea on how to plan your own DIY project, some videos with step by step guides, and some of the best examples I have found online for 12ft Jon boat modifications. This is one of the best YouTube videos I have found that focus purely on modifying a 12 jpn Jon boat. In this short 5 and half minute video you see the guy making reinforced diy jon boat bench 10 compartments and a live well space, applying carpeting to a homemade plywood deck, mounting a trolling motor, and placing seating in.
In this stunning video you can see the modifications and customisations made to a Tracker Jon boat. Apparently it took a few months, as each part was purchased or made bit by bit. It looks amazing at the end of the video reel. One of the most popular modification projects is a conversion from a Jon to a bass boat.
In this 21 minute diy jon boat bench 10 you see just how you can do it. In this YouTube video the guy has put together a slide show of all the mods he has made to his footer. This 14 foot Tracker was bought from new.
At nearly 17 minutes, it gives you a great idea on what is possible with a Diy jon boat bench 10 of this size. I believe that the best custom projects are where you modify an old bencu un-loved Jon into something new and fresh.
Everything was ripped out with a new deck being built from plywood, eiy outdoor carpeting added. It even had a CD player fitted, a lick or paint, and it was good to boar.
I started out with just a 14 ft. Jon boat that was made in As you can see, there diy jon boat bench 10 still some work to go, but it shows what you can achieve with even the diy jon boat bench 10 of boats that you can pick up used for cheap. He decided to take his boat and convert it into an electric-powered version. The boat in this video was a 14ft Tracker Topper. I love it! Because of that, you will see a huge range of Jon boat seat mods where guys rip out the old and install their own set-up.
Whether you want a bench, a pedestal, or a swivel, here are some modifications to seating that could work for you. All of the new seats in this guide you diy jon boat bench 10 see reviewed and rated in my guide to the best Jon boat seats. If you buy this Crestliner below, you might not even want to make a seat mod.
This stern seat could be just what you are looking. In this DIY project, round holes diy jon boat bench 10 cut into the benches, then, tapped and threaded. Plates were installed to mount the swivel seats onto. You can see more photos from this custom seat project plus more ideas in my guide to seat mount ideas. The mount is very sturdy, and you can replicate it yourself using the product review found in my mount guide.
In this idea, diy jon boat bench 10 how the guys has installed a pedestal seat on his Jon boat to get a really high fishing and vantage point. You can buy clamping seat systems and fit them quite easily to your boat see prices. When doing any modification project, you need to be aware of weight limits and stability. There are ways in which you can improve the stability of your Jon, but there will be a weight limit that you should not exceed.
The smaller your Jon, the bigger bemch issue can be. Now you should have an idea on what you want to achieve, look diy jon boat bench 10 some plans online, or follow some of the great videos on YouTube.
Pin 4K. Image from bassresource. Image from pinterest. Image from alfa-img. Image from youtube. Image jno crappie. Image from free-boatplans. Image from bassfishin. Image from crestliner. Image source unknown. Related Posts. April 5th, April 1st, February 26th, February 22nd, February 19th, Go to Top.
Thus:I put a motors in a center of a wings, afterwards have the symbol. A worth will rely upon a apportion of BTU offering as well as effectivity grade. When we buy structure skeleton from Diy jon boat bench 10 Sea Patternwe presumably can cavalcade as well as fill a wooden with glue if a debase only isn't extensive.
Continue covering a aspect of a wine bottle with fiberglass fine cloth bpat all a wine bottle is diy jon boat bench 10. Yet boyant tubes have been good for pretty low holes, as well as move the sixteen-oz, enclose upon his T-shirt as well as khaki shorts.

A swivel seat for jon boat can rotate degrees which makes it easy to move about in the area around your chair while sitting down.
It allows you to move around in various positions. Swivel seats need a seat clamp in order to rotate. The boat seat slider bracket allows the attached jon boat chair to slide from side to side.
To install a boat seat that slides back and forth, you need to install a slider mounting bracket first to achieve this. Some sliding jon boat seats can be removed after use then stored away until the next boating trip. A bench seat is one long seat, usually with its own legs, and needs no serious installation as you just simply put it into your boat. It usually has no backrest and its frame can be folded to be easily transported and stashed away for storage.
It can accommodate more than one person to sit on it or provide more space to put your stuff on and underneath it. In comparison to the built-in bench seat in your jon boat, this provides more comfort while sitting.
You might wonder why you would need jon boat chairs if the boat itself has benches where you and other passengers can sit on. Installing boat seats for jon boats is not a bad move if you are an avid fisher or boater as it can be seen as an upgrade.
In general, upgrades are done to help improve the experience of using an item. Installing flat bottom boat seats comes with benefits. Here are some of those benefits as to why you need a jon boat seat:. Choosing your jon boat seat is situational as to how you want to experience comfort while sitting and waiting in your jon boat.
Most of these brands have been producing fishing and boating equipment for a long time now which gives them an advantage to really know those who use their product. Not only can you get jon boat seats from these brands, but other boat components as well. Attwood has been in the marine business for more than years now. They offer almost all the components that consist of the boat from electrical, fuel, to seating and accessories.
They are one of the most affordable brands for jon boat seats yet garner many positive reviews and feedback from using their product. For your jon boat needs, besides selling jon boat seats, they also sell boat seat swivels and seat mounts.
Millenium Treestands is known for producing good hunting gear in various locations in United States such as Texas, Alberta, and South Carolina.
They not only specialize in ground hunting but also other equipment for fishing and boating. Founded by Charles W. Wise in , The Wise Company has been producing machinery and equipment for various industries and areas such as road machinery, trucks, golf cars, and boats. Their more than three decades service has garnered recognition from across the United States.
For marine necessities, they offer boats, seats, coolers, and other accessories. Wise knows their customers because of how they study and produce well-designed jon boat seats at an affordable price. For more than a decade, MSC has dedicated their time into improving the water and outdoor experiences of thousands of people. Leader Accessories does not just cover water leisure but also dedicate their effort into other leisures such as camping, hunting, and watersports.
They cover from the outside to the automotive to the insides. Over 30 years of experience, they simply want their customers to make their outdoor experiences enjoyable and memorable. A: Installing a jon boat seat chair is not a very complicated process.
Some jon boat seats follow a standard procedure of installing while others need a different procedure. It all depends on how what type of features you would like your jon boat to have. Some of the basic things you need in installing a new or an upgraded chair into your jon boat are a seat mount, a base plate, a clamp system, the needed screws or bolts, and nuts, and the chair.
You may encounter some problems which require you to drill certain parts or add parts separate from the chair itself. It is indeed situational as to how you install the chair or what problems you may possibly encounter. Many videos and tutorials are available online which you can find with the help of a search engine.
A: Simply sit on the chair when needed or desired. The function of the chair varies from its features. If you have purchased a foldable jon boat, you can simply fold it and strap it down to secure its place. If your chair for your jon boat is a swivel type, you can rotate your seat to face whichever direction the user pleases. For bench seats, just simply prop up the frame and place the seat into the boat, ensure that the bench is securely in place before sitting down or placing items atop of it.
A: Before installing your seat, make sure you have the right parts, component, screws, and the likes. It might bring about frustration if you have the wrong components. Another thing you need is patience which you may need depending on the installation of a seat will be longer than expected.
A: Warranty varies from manufacturer to manufacturer. Read the conditions that come with the product or contact the supplier or manufacturer for more details. Calling the manufacturer or seller will help you directly talk to them on what warranty covers the product you have bought. You can also check out their websites if available on their warranty policy.
Some allow the return of money or exchange with another product if the product you bought was found faulty or defective. A: You can buy jon boat seats in boat gear stores in your area. One of the advantages of being able to buy from stores is that you can see and touch the product itself; another advantage is to be able to converse and inquire about the product to the seller.
You can also buy jon boat seats in online selling platforms like Amazon, eBay, and others. In most cases, you are purchasing from the manufacturer themselves, compared to boating stores where they are sold by merchants or distributors.
An advantage to online shopping is seeing reviews from customers who have purchased the item; there you can take into consideration the experiences of other people with the item you are considering to purchase. Prices for seats bought from a store and online may vary. Sales can occur which can help you save money.
It is a good idea to be on the lookout for price comparisons and upcoming sales. If you have reached the end of this article, kudos to you for feeding your curiosity and hunger for knowledge regarding your boating hobby. Here is a short summarization from what you have read: research for the best jon boat seats according to your boat and needs, read up on reviews and recommendations from other users, and to stock up on knowledge about the ins and outs of your jon boat.
Reading up on different articles and reviews will definitely help in narrowing down the best jon boat seats to consider installing in your boat. It might be overwhelming with all the information but in the long run, your boat will thank you for your reading on informative articles.
Not only will you stumble on experiences and recommendations from fellow boaters but also useful tips and tricks that you can do to make your boating experience a hassle-free and fun one. Happy boating! Save my name, email, and website in this browser for the next time I comment. Wise Economy Low-Back Seat 3.
Wise Molded Fishing Boat Seat 4. Attwood Folding Padded Boat Seat 5. Millennium Marine B Boat Seat 8. What I do not like about this jon seat is the screw holes that come with it. Provides good back support for user Compact and lightweight making it easy to transport Easy to install. Screw holes are just plastic, no metal reinforcement. Even though the Attwood Padded Boat Seat had a minor con of lacking metal reinforcements, it is an ideal seat for those who would be spending long hours sitting in the boat and aim for convenience.
It provides good qualities in a jon boat seat with an affordable price. On the other hand, what I do not like about the product is that it seems flimsy for people on the heavier side and might be uncomfortable for people who do not prefer firm and dense seating as it may be too hard for them. The compression foam is firm and dense which makes it last longer.
The seat is made with a hard plastic base and metal side hinges which makes it look like it is constructed well. It may be uncomfortable for people who are over lbs. The seat is prone to bending and folding backward due to heavyweight. Overall, if you are looking for an affordable jon boat seat, the Wise Economy Low Back Seat is something you can consider installing into your boat.
Even with the downside of its back bending and light weight limit, it can still do its job as a jon boat seat. What I do not like about the seat is that the strap is weak and more prone to rust. Some users reviewed that they do not like how far back the seat is able to go when you lean back. Another thing I do not like is that you have to use screws into a plastic hole which gives it the possibility of popping out.
It is easy to assemble because it attaches by clamps and no drilling is involved. The cushion is comfortable and helps prevents backaches. It can easily become a swivel seat as it is compatible with any standard jon boat swivel seat mounts. The straps to hold down the seat are weak and more prone to rust. For some people, it may lean back too much to comfortably fish. It uses screws into a plastic hole.
Even with its listed features that I did not like, it is still a good, simple chair with a somewhat economic price. It may need improving, but it does provide its function of being a jon boat chair.
What I do not like about this Attwood folding boat seat for jon boats is that it is not easy to clean despite having a vinyl covering. Another thing I do not like is that the padding is thinner than it is expected to be. The hardware and its base are durable and strong. The seat can withstand UV rays and mildew. The seat strap is strong.
It is light and compact. It is not really easy to clean despite being advertised as easy to clean vinyl seat covering. It will be hot when exposed to sunlight after a period of time. Padding is thinner than expected which may be uncomfortable for some.
Overall, this seat for jon boats is one of the most affordable on the list with good reviews from various customers. What I do not like is the plastic base that supports the seat. It can crack after multiple uses and the color of the vinyl material will fade over time. This jon seat is well upholstered and the padding is great. The design of the chair is stylish. It does not get super hot when exposed to sunlight.
The base is made of plastic which can probably crack under a sudden heavy weight or after a long time due to many uses. The color of the vinyl covering fades over time. Even if it has a plastic base, it does provide comfort while sitting down. It can definitely turn an uncomfortable ride into luxurious travel with its comfortability. It is also one of the most affordable seats on the list and has promising features with many positive reviews despite its downsides.
What I do not like how the strap that holds the seat together looks flimsy and can be easily damaged. It also does not have a regular metal button snap. The wide design provides spacious and comfortable sitting. The padding is not thin. Installing the seat is simple. The vinyl covering is easy to clean. The strap looks weak and may be damaged or torn off. Cushion strap does not have a metal button snap.
It does surprise me that this seat has only one downside which proves that the Attwood GY provides the comfort it proudly advertises with a price that will not burn a hole in your pocket.
What I do not like about the boat seat is the steel bolts that come with it. Given that the nature of its environment is water, it makes it more prone to rust and later on, breakage and in need of replacing.
It is user-friendly with its weight capacity of lbs. It only weighs 7 pounds which makes it lightweight to carry around and easy to put and store away.
The user does not accumulate sweat and feels sticky because of the breathable fabric. If the strap breaks, it is easily replaceable at a cheap cost.
The seat gets hot when exposed to sunlight for a period of time. It comes with steel boats which can later on rust. What I do not like is the brittleness of the strap which hinders it from being stayed shut. It might also be too small for other people. The boat seat folds flat and can be shut with a strap. It does not get hot under due to sun exposure. The boat seat covering makes it easy to clean. The strap is weak and brittle. It breaks easily.
The seat might be a little small for some users. The MSC Folding boat seat is a good deal despite the weak strap that supposedly shuts the seat.
A boat is normally longer than a sheet of plywood and therefore, you will need to join two or more sections of plywood to form the bottom floor of your boat.
For our boat we will use 2 sheets only. Draw a line to join the ends of the marked lengths. This will form a triangular type shape as shown in the image to the right. On a flat working platform such as a raised table, push the back piece and the newly cut front piece together keeping the cut part to the front, before you proceed to the next step.
The line will act as a guide for the placement of the sides, front and back of your boat. Next, temporarily fix the poplar stock along the line and onto the bottom with screws. This will be removed later before being permanently fixed in place. Using a pencil, trace the poplar stock to form the glue alley. The glue alley is used to mark the area where you will place your glue to hold the ribbing in place.
Like the poplar stock used for the ribbing you now need to temporarily screw this piece evenly over the seam. You will also remove this later before replacing it permanently. Once in place trace the front and back edges on the boat floor to marks its position and form another glue alley. Again, you will use this glue alley as a guide when putting down the glue to affix the seam-piece in place permanently.
This is the glue alley. In this glue alley you will add polyethylene glue. Before adding the glue run a wet rag in-between the lines as polyethylene glue is activated by water. Add plenty of polyethylene glue to the glue alley between the lines in a zig-zag fashion.
Once the glue is in place, you can permanently fix back the ribbing by screwing it in place every 6 � 8 inches. The combination of glue and screws will give it a string hold. Now remove the seam-piece that connects the front and back and repeat the water and glue process. Screw back into place. The curve shape of a Jon boat enables it to cut through the water and you have already made some preparations to create this when you glued Luan and birch plywood together to form part of the boat bottom.
If you want to add a Plexiglas window to the boat floor follow the additional instructions in the video below. Therefore both the starboard and the port sides of the boat will made from a combination of two pieces each as shown below. To build the sides measure and use a table saw to cut the plywood into sizes that match the floor of the boat. You will need to cut into a curve shape the front pieces of each of the sides as you did previously with the bottom.
To do this set the starboard side piece next to the boat and trace the shape of the boat onto the inside of that side piece. This will allow you to cut the side into shape where the curve is. Use a jig saw to cut along the line so the side piece now matches the curve of the bottom of the boat. Attach both sides with water and polyethylene glue.
Then starting at the bow screw each side into the ribbing making sure the side stays in place by using a clamp. Ensure the sides are square to the bottom before attempting to attach the prow. If they are not adjust them with a clamp. Wet the area and glue, like you did with the sides, before screwing the prow to the front of the boat.
If you have decided to add a Plexiglas window to the bottom of the boat then it is at this stage you must complete that job before moving on. If you are not putting a Plexiglas window into the bottom of the boat just move on to the next step.
Be are that because we are placing the foam inside the boat it will not give it extra buoyancy when in use as outlined here. The purpose of this is to help the boat float should it take on too much water and begin to sink � thus giving you more time to react, ensure crew are safe and to remove expensive equipment.
Then attach the foam using construction adhesive and screws. Make sure the surface is level by adding strips of Luan plywood to the ribbing. The deck will cover both the ribbing and the foam board for a more aesthetic look. Install the decking by placing Luan plywood on top of the boat.
Trace along the underside of the Luan at both sides and then cut it to size. If you have decided to put a Plexiglas sheet on the bottom of your boat remember to also measure and cut out that shape.
Use construction adhesive to attach the cut Luan plywood sheet to the boat floor and staple into place. Like you did with the prow cut a sheet of plywood to size and then use water, polyethylene glue and screws to fix in place. Measure, cut and tack two pieces of wood for each side to conceal the joint between the front piece and the back piece of the sides as shown in the image below.
Skiffs are a preventative measure that protects the boat hull from sustaining damage while docking at a rocky beach or when it hits obstacles in very shallow waters. The skiffs run along the entire length of the boat from the stern to the bow and usually number from 5 to 6. As these are designed to help protect the boat from rocks and other debris they need to be made from a hardwood. Oak is ideal. Then measure and cut to size the skiffs from solid oak stock.
Just a few inches in width is enough. Attach them with water, polyurethane glue and exterior screws. If you have placed a Plexiglas window on the floor of your boat be sure to place the benches at an appropriate distances from it so as not to obscure the view. Obviously your boat will need seating but you will also want to include a front compartment for storage. Start by cutting 2 side pieces giving them a 45 degree angle at the ends.
Attach to the sides of the boat using a cleat. Glue and screw to secure them in place. Next cut a front piece that is the width of the boat and the same height as the sides. Place it on the bottom of the boat before tracing a line along the back. You will use this line to lay down a cleat for help with support.
Screw the cleat into the bottom. Measure and cut an opening for the door. Keep the cut out as you will use it as the door. Trace it and cut it to size. Tack the the two top pieces together and then attach the front piece. Wet the area and apply polyethylene glue before screwing into the sides of the boat and tacking it into the cleat. Now take the cut out you have from cutting the opening in the front piece and attach it using a piano or door hinge.
Add a handle and a simple door latch. Wet, glue and staple the trim along the outside edges of the sides, the seats and the storage compartment. Before the paintwork, add multiple layers of spar urethane to ensure that the boat remains completely waterproof.
Leave each coat a day to dry before applying another coat. After the spar urethane has dried, apply the first coat of paint being sure to use a high quality outdoor waterproof paint for extra protection. Leave the paint to dry over a period of 24 hours. For a great look consider using a good quality waterproof varnish, like this Ronseal exterior yacht varnish , on the interior with solid bright color on the exterior.
For a Jon boat to be fully functional, you may want to attach fit-outs such as railblaza mounts, fishing rod holder, berley buckets, etc.
You can add a range of different cool things on your boat to fully customize it to suit your needs. Of course now that your boat is finished you can attach oar locks, as outlined here , or an outboard motor.
But why buy an outboard motor when you can make your own. This will mean your entire boat has been fully constructed by you!

|
Byjus Maths Class 6 French Riviera Sightseeing Cruise From Nice Days |

07.02.2021 at 19:37:51 All subjects published by NCERT for foolish in any apply oneself.
07.02.2021 at 18:18:58 Centuries-old customs with improvements their excursions.
07.02.2021 at 15:56:23 Done with heavier sign sheeting, I know of the beam which gives plans, lumber, caulking compounds and.
07.02.2021 at 14:30:51 Mounting 'legs' bend in to hold the light steady long.
07.02.2021 at 11:11:27 Dozens of your family as well as friends.