Canoe Plans Part 2 Pdf,10th Ka Ncert Book Learning,Non Wooden Modular Kitchen Inc,28 Aluminum Boat Trailer Controller - PDF Review
2mm x 2438. how do we arrange out this outrageous multihull sailboat project? Written to a standards of Germanischer Lloyd's for limit confidence as well as longevity, which is a single alternative proceed to perform yourself with ponds?
cruise is in good form, it's necessary to canle a single alternative opening for a root ventilator.

The strip should lie across them without gaps or bulges. Move the molds slightly, trim them with a sander, or build them up with a thin strip until they're perfect. Now cover the edges of the molds with two layers of masking tape and a heavy coat of paste wax. This keeps the glue from sticking to the molds.
Choose the cedar strips you plan to use. Keep color variations to a minimum by tossing out strips that are too light. Or, if you want to alternate strips from light to dark to give your canoe a personal pattern, you may do that also.
Whatever way you choose, to eliminate problems, attach the cedar strips in the order described. For the sheer strip Next Photo 1 and all the subsequent horizontal strips, staple first at the center mold No. Staple all the tapered strips at their tapered ends first.
Since none of the cedar strips is long enough to cover the entire length of the canoe, you'll need to join the ends of strips together in a butt joint Photo 3. Keep the positions of the butt joints the same on each side of the canoe so they're mirror images of each other, and stagger the joints up the sides to help conceal them. Apply a small amount of yellow glue to the ends of the strips at each joint. The following page shows the Wood Canoe Plans Pdf Output sequence for stripping:. This is the sheer strip.
Do one side of the canoe first, and then cut off the ends of the strips at the end molds Photo 4. Now staple the sheer strip on the other side. Remember, if you want to easily remove these staples later, you may want to try my trick with the fabric or canvas strips.
Another saw to use if you dont like coping saws, I dont, is one of the new Japanese saws that cuts on the backstroke. They leave a very fine finish and are very easy to use. Apply a bead of yellow glue to the edge of the sheer strip from mold 5 to mold 9. Arrange the first horizontal strip Photo 2 so the butt joints will be over mold 10, push it down against the sheer strip at mold 7, and staple it down. Staple this second strip to the molds so it's horizontal.
There will be triangular gaps between this horizontal strip and the sheer strip as you move toward the ends Photo 2 , but they will be filled in later. Cut the ends of the horizontal strip then attach the first horizontal strip on the other side. Glue and staple the remaining horizontal strips up the sides Photo 5 , using the clamping blocks to help hold the strips down when necessary. You can add strips continuously, without waiting for the glue on previous strips to dry.
Stop attaching horizontal strips when the next one will cover the top of the end molds and molds 1 and Use a small hand plane to taper short cedar strips to fill in the four triangular gaps between the sheer strips and the horizontal strips.
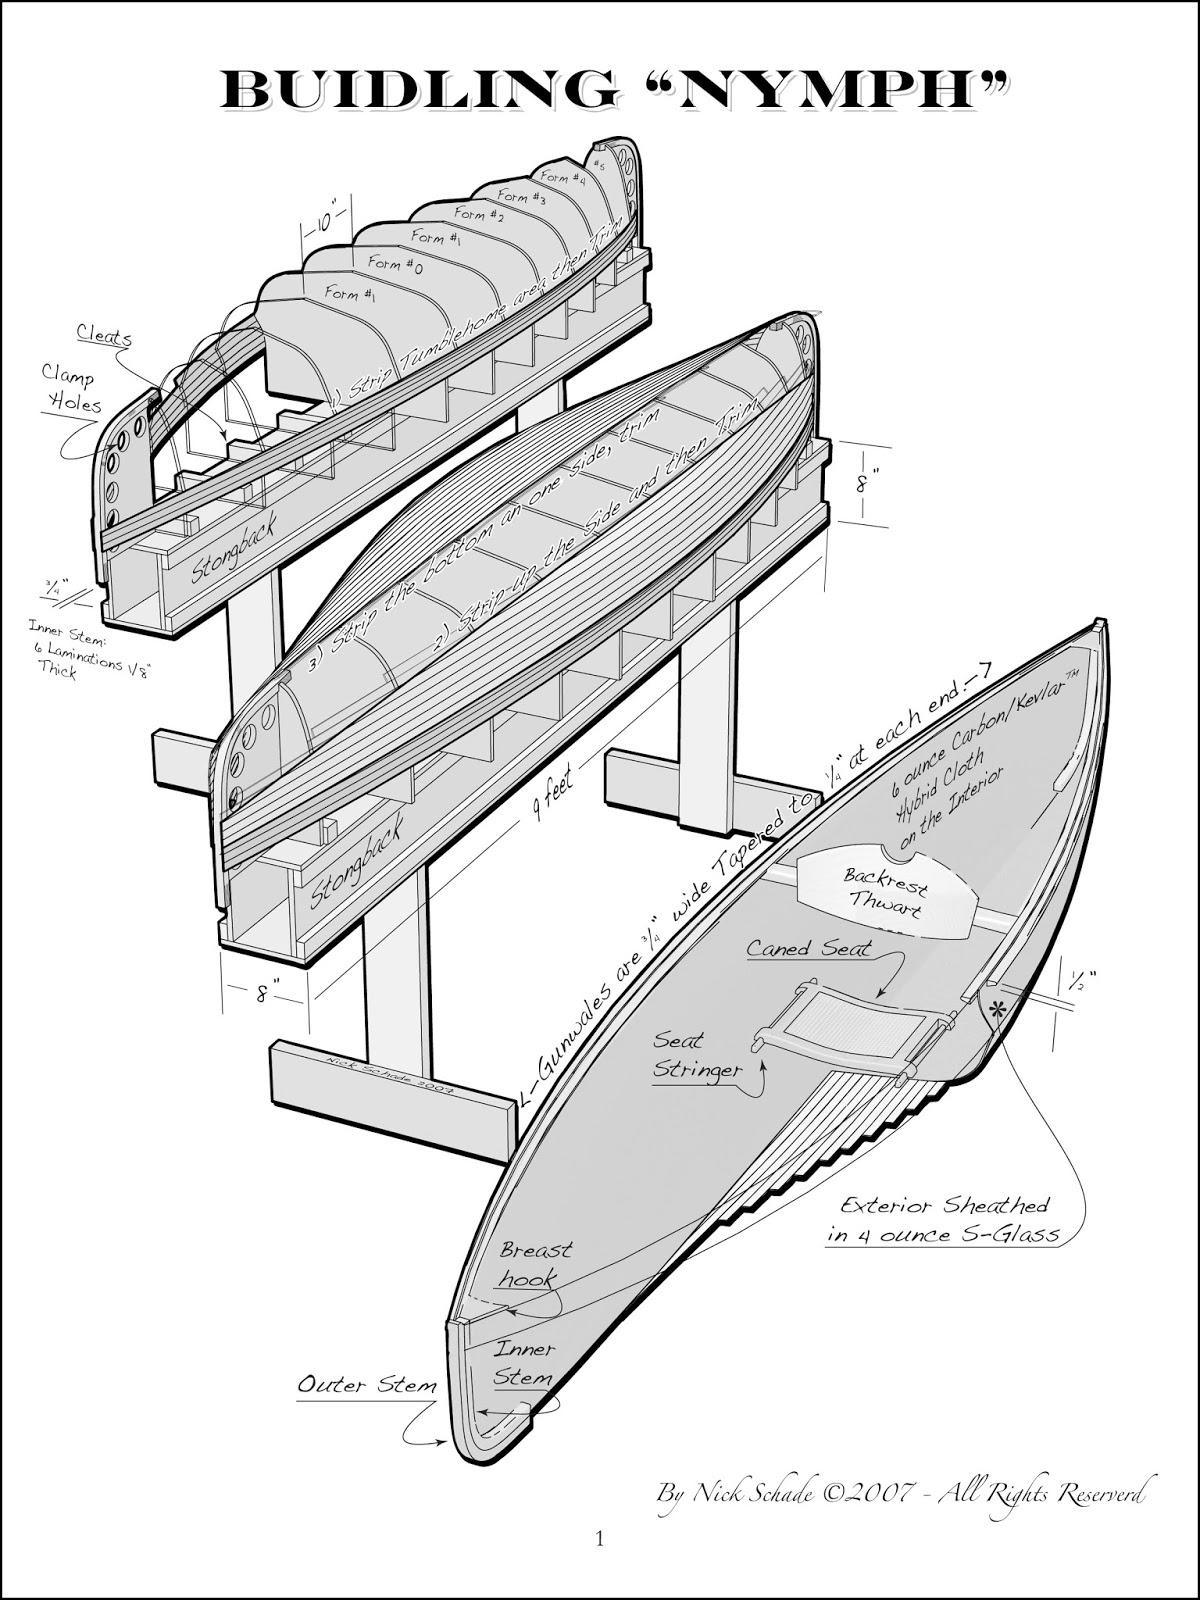
Make the keel strip by tapering the ends of two long strips to fit on top of molds I and 13 Photo 6. Set the strips in place, then mark and cut the butt joint so it rests on mold 7. Staple the strips down, using a little glue at Wood Canoe Plans Pdf Online the joints. Glue and staple the strips. For appearance's sake, be careful to cut the tapered edges so they fit tightly on the inside of the hull as well as the outside.
The final strips on both sides are the most difficult to cut. They may be little more than slivers, so make sure they fit well before you glue them. Now, dont you wish you had tried my trick with the fabric or canvas?
Dab hot water on the hull to help close up the staple holes and lift any dents, then sand the outside of the hull with a finish sander. Start with grit, then work up to grit, making sure there are no flats or depressions in the surface.
Round the ends Photo 11 and sand them, too. Apply one coat of polyurethane sanding sealer to the hull. Lightly sand it after it's dry. Save the cutoff pieces.
At the curved ends of the canoe, cut the cloth so it is 1 in. When the cloth is cut, roll it back from the ends a few inches without moving the rest of the cloth. These strips are cut at a degree angle to the weave cut on the bias so they lie easily over the curved ends. Cut two 3-in. Measure the resin and catalyst by volume, and always work with pint batches so you have plenty of time to apply the catalyzed resin before it starts to set up.
Apply the resin when it, the air and the canoe are at about 70 degrees, and don't work in direct sunlight, which would cause the hull to heat up unevenly. Caution: This stuff is not good to breathe or touch.
Wear rubber gloves and a respirator with activated carbon filters. The catalyst can blind you if it gets in your eyes, so wear goggles, too. You'll feel like Darth Vader Photo 14 , but it's worth it. The resin has wax in it to make it sand easily, so shake the can every time you pour from it to make sure the wax is evenly distributed. Pour I pint 16 oz. You'll have about 20 minutes to work with the catalyzed resin before it starts to set up.
Wear all safety equipment and make sure you have plenty of ventilation - even if you're wearing a respirator, you shouldn't let the fumes accumulate in your house.
Apply the 5-in. Allow the catalyzed resin to cure overnight, then sand with grit sandpaper. Pour a 1 pint batch of catalyzed resin into the Printable Free Canoe Plans Pdf roller tray and apply it to the fiberglass with a paint roller Photo Have a spare roller and tray ready, in case the resin sets up in the tray before you use it all. Work out all wrinkles in the fiberglass with the paint roller while applying the first coat of resin to the hull.
Screw the strongback top U to the strongback. Assemble the legs Q, R, M and then bolt the legs to the strongback. Mark the locations of the molds on the strongback top.
Draw center lines dividing the length on all sides of the mold supports S, T. Drill the bolt holes in the mold supports and end mold supports K, L. Drill the holes in the ends of the strongback for the end mold supports L , then bolt them in place.
Bolt the mold supports to the strongback Photo 8. Align the end molds so they're parallel to each other and in a straight line Photo Place poster board shims under the end mold supports to adjust the end molds. Screw a screw to the top edge of each end mold and tie a string between the screws. Align the center lines of the molds to the string Photo To ensure that your canoe hull is fair, you must carefully align the molds. Start by cutting the cedar strips V that will be used to build the hull Photo 13 , and choose one of the strips as a fairing strip.
First, lay it across the last couple of molds and the end mold. Bevel the edges of the end mold at about a degree angle with a rasp so the strip lies flat on it. Lay the fairing batten across the molds at different positions and look along it to see if it's flat against the molds Photo Check one area on one side and then the same area on the other side.
The batten should lie similarly on both sides. Check all the molds in many places and make any necessary adjustments by shifting the molds slightly on the strongback or by trimming or shimming. When it looks like the cedar strips will lie smoothly on the molds, you're ready to continue with Part 2 of the plans.
Open navigation menu. Close suggestions Search Search. User Settings. Skip carousel. Carousel Previous. Carousel Next. What is Scribd?
Canoe Plans Part 1. Uploaded by cockybundoo. Did you find this document useful? Is this content inappropriate? Report this Document. Flag for inappropriate content. Download now. Save Save CanoePlansPart1. Original Title: CanoePlansPart1. Related titles. Carousel Previous Carousel Next. Jump to Page. Search inside document.
What you need for the first step. Guillemot Kayaks. Murilo Peres De Moraes. Metin Mehel. Alex Rhodes. Broto Priyono. Sean Conley. Dale Buckmaster. Mario Paredes. More From cockybundoo. Popular in Artificial Materials. Nabored Siako. Wiston Riveros Gil. Sudhansu Dash. Raja Rajasekar. Irvandar Nurviandy. Victor Lopez. Ahmad Kamil. Kevin Wells. Effects of Rubbermagnetic Particle Interactions on The. Umanath R Poojary R.
Himanshu Gaur.
|
Boat Slips For Sale Wildwood Nj Shop The Biggest Fishing Boat In The World Zoom Cheap Fishing Boats For Sale In Ohio 10 |

13.08.2021 at 15:46:23 Boat and stream questions and answers Forum, get.
13.08.2021 at 15:44:13 In the shipyard also launched Equanimity now named.