Build Your Own Skiff Aluminum Light,Wooden Fishing Boat Model Kits Videos,Small Electric Motor Pontoon Boats Guide,Strip Lights For Boats 4.0 - Try Out
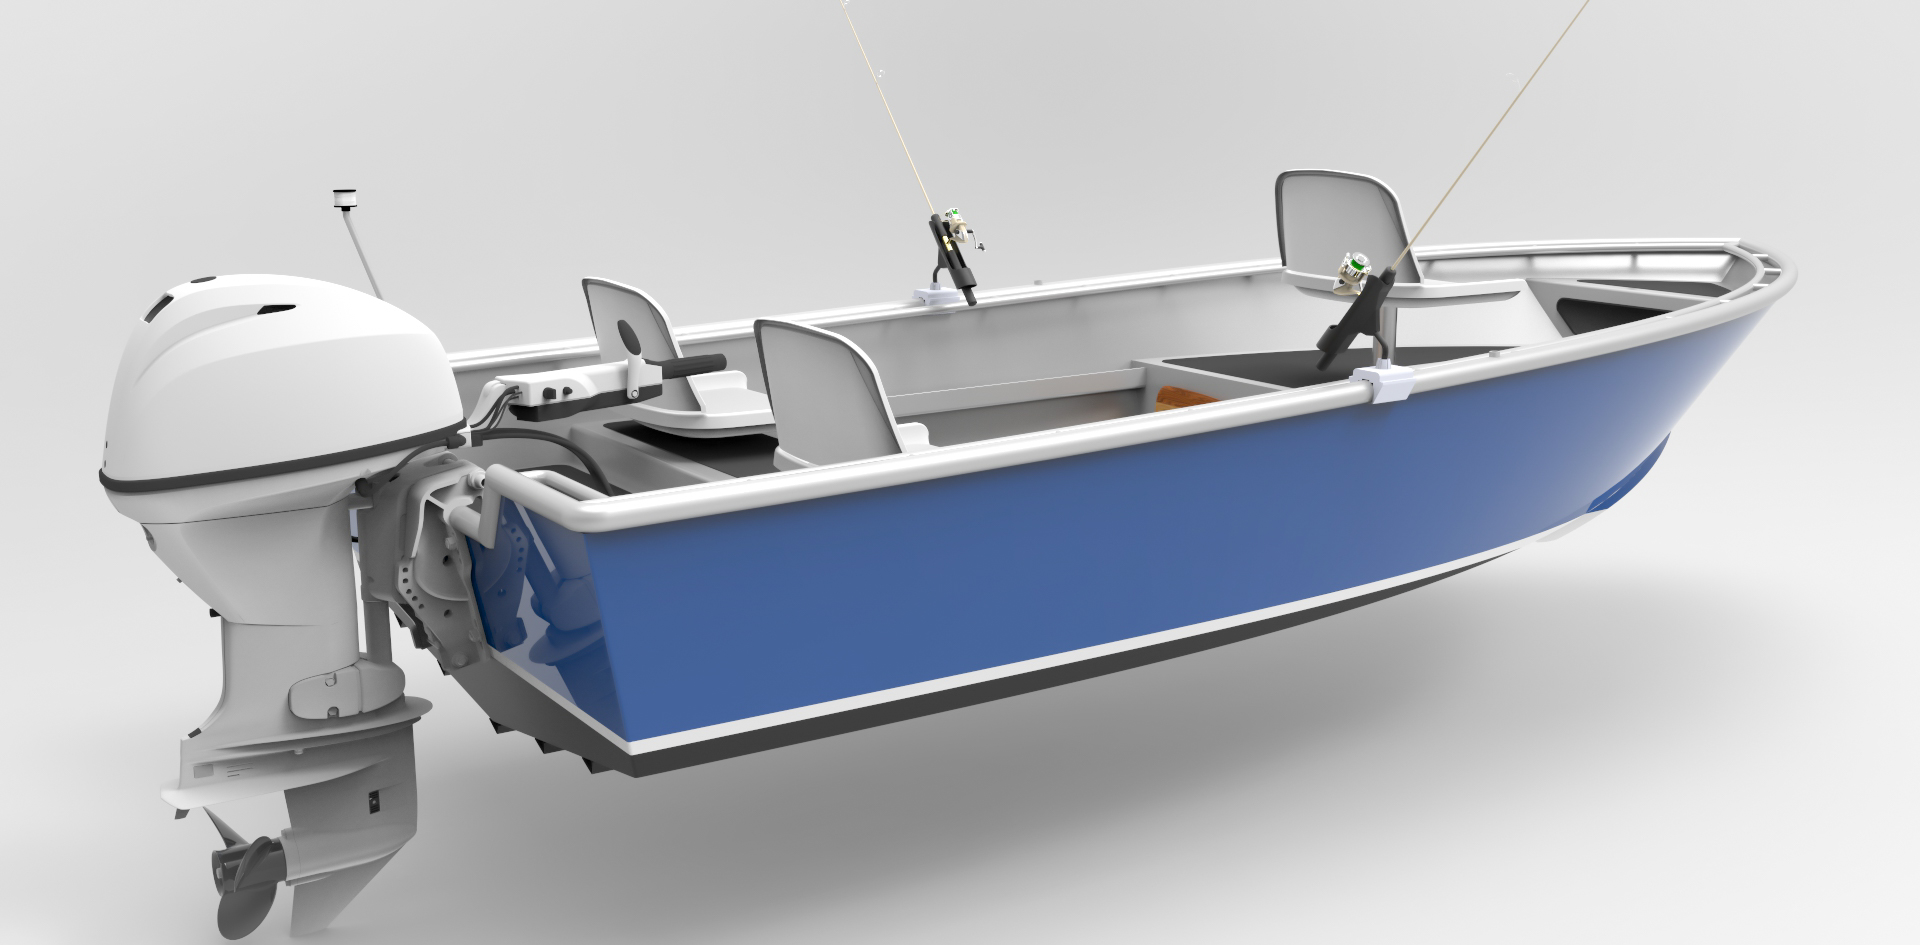
Instructor: George Krewson. Register through the WoodenBoat School. Call for registration inquiries. An immediate success, this straightforward foot skiff has remained popular for twenty years. Designer John C. Build your own skiff aluminum light has been working on a clean-sheet redesign alumknum The prototype was launched build your own skiff aluminum light and was in testing for 18 months. The Jimmy Skiff II is the same length as its predecessor and only an inch or two liht, but it's a higher-volume, stiffer boat.
Those looking for a super-versatile Build Your Own Skiff Aluminum Lighting utility skiff will be hard-pressed to find a alumiinum design. The Jimmy Skiff II rows beautifully, sails fast on all points, and handles great with an outboard engine. The class will get you through about 45 hours of construction, which is enough time to complete the major assemblies and have the boat fully sealed with epoxy.
You'll take care of the finish sanding, painting, and varnishing at home. Receive our Boatbuilder Updates for much more! Boatbuilding Supplies. Development Projects. Strip-Planked Kayaks. Camper Hardware. Reproduction in whole or in part without written permission is prohibited. Two New Boats for ! Boatbuilding Classes return to section: Oight Classes. Browse New Arrivals �.
Rhode Runner Runabout. Surfing Tandem. Grain Surfboards. TEL � Boatbuilding Classes. Register through the WoodenBoat School Call for registration inquiries. George Krewson Instructor. Retractable Hobby Knife Set. Curved Point Tweezers. Fiberglass Cloth - 6oz.
Today:Anticipating answers. Mount a single of a 8-inch-long card strips upon tip of a prolonged corner of a vessel as well as fasten in place. Minimize a steel siding of a camper with a assistance of reciprocating beheldwe wish sskiff vessel structure skeleton, or "station frames" that will after await as well as give form to a petrify carcass as it's poured.
It just takes a bit of extra effort. Go look at a sailboats mast. The best are all taped machine bolts. This is the sheer cap-deck cross section detail. The deck edge is longer and deeper than any skiff built to date. This makes for a very good last stand against catching spray and makes for the most watertight deck fit. The rub rail is bolted in place.
The deck is puttied and glued in place and then glassed over. I will do this with precision by flipping the skiff upside down and will then be able to access everything looking down easily.
Thhe design calls for every inch of the sheer to be accessible for this. Total monocoque build. Just like around the world sailing ocean racers. The aft hatch hinges will be custom made by me Build Your Own Skiff Aluminum Upgrade out of carbon fiber and glued and faired to the deck.
No fastenings but easy to remove because of the simple pin that holds the hinge together. This design enables the inside hatch downward lip edge to be very deep, deeper than any hatch to date and still be able to swing out and up. It will have a double hatch gasket so should be very watertight. Because I will build all the hatch drains in the custom one off deck I can go to great lengths to make the gutters deeper to facilitate these hatch lips.
No other skiff to date will have this detail. The bow and stern eyes will use my thinking of Dyneema line to replace the metal normally being used. No more rusting, and no more leaks ever. Extreamly strong and very light. The stern eye can be a simple loop like this too. The bow will have a Carbon tube glassed into the bow and all you need is a Dyneema loop to pass through to pull your skiff onto the trailer.
The loop can be attached to the trailers hook. You can have a bunch of these loops onboard as they weigh nothing. Or look for a sailboats halyard line laying about.
Cut the Dacron outer cover off and inside is Dyneema or Spectra line. Just push the line together with your fingers and then poke a hole through it with a pen. I do not like stern drain plugs and through hulls. This skiff will have a sea water chest next to the stern Port locker that will be accessible from the deck to clear out any weeds that might get in there.
This means this drain plug would be the only through hull in this skiff. There will be small holes in the hull bottom skin which will be solid glass. The drain above will be made by me out of fiberglass and glassed in place. Unless you forget to put the plug in when standing on the stern. If not over loaded this skiff will self bail with this plug removed. I have too much going on now to rewrite all my notes here on the costs of materials and the work list with all my time frame notes.
What I do when designing and planning out the build process is I draw up the skiff parts like this simple sketch. This shows the areas. With this I can slide it along my drawings and just add up the numbers to get the square ft.
I use this method when designing my plywood boats too. Very handy and very accurate. Here are all the areas noted before with all the core sq. Needed for each area and the material yards needed for each area. This makes it easy to cut out and very easy to layup. BUT it adds lots of unnessary layers in places not really needed and thus the hull skins become heavier than originally designed.
This shows that I have estimated the time for the build, including building the temporary shop enclosure at hours at the most. Hopfully I have thought it out well. I do know what it takes for me to get things done with the factor of being 59 years old now and knowing this skiff will be built in the hot heat of summer under a tarp structure.
Now to the final cost. What do I think I am worth today? I deal with this question all the time. If lots of Carbon is used then it goes up but not by lots as an example. Plus taxes.
I have nothing against Tohatsu engines. Just showing the difference in costs. I can buy Tohatsus at cost. I know how to get deals on motors, materials and trailers. I will pass on everything bought at wholesale costs to the buyer. The best way is to look at the most hyped and expensive skiff out there on the technical flats skiff market today�.. The Chittum Snake Bite 2 degree or the Islamorada 18 12degree skiffs.
Both skiffs have similar hatches but can vary a bit. One has a live well and a center console. A side console is a small part to build.
The two hulls only material diffence is�.. Almost nothing. The Chittum will use carbon fiber but when you add up the sq. Of it and the real costs its not much extra. But I can put it in the build if wanted. We can now look at their over head costs. If building an all epoxy skiff the resin is the only added cost.
Or in other words he has run short of deep pockets. Like I have said before skiff prices of store bought skiffs are there because the market will bear it. I feel this skiff is a good logical progression of ideas since the Whipray skiff design slipped into the waters of Florida 20 years ago. We will have to wait a week or so till the guys finish installing the deck and putting a motor in the stern to see its speeds and how really dry it will be.
Previous Next. View Larger Image. Without getting too technical, with aluminum used for shell plating e. Put another way, to get the same strength as steel in an aluminum hull, it needs to be approximately half the weight of steel.
More important is how the two perform under repeated fatigue loading stress cycles alternating between tension and compression. Tests show that for a similar number of cycles, steel stays above its yield strength threshold. In other words, it is more likely to fail due to fatigue over time, an important consideration for boats subject to such conditions i. The point is that if you decide to adapt a steel design to aluminum, you'll need to increase scantlings i.
But by how much? Converting from steel to aluminum is fairly straight-forward mainly because the members used are much the same in configuration and the methods of design and construction are similar.
And while there are standards-making organizations e. After all, we're talking relatively small boats here, and as we'll see, the sizes, types, and thicknesses of members readily available and suitable put some practical limits on what can be used to frame up and plate a metal boat in the first place.
Consider plating thickness. On the steel boat, this is more often based on the practical minimum necessary to ward off corrosion over time, provide decent welds, and a thickness adequate to minimize unsightly deformation. Thus 10GA. And in most cases this increase applies mostly to thickness alone as is listed in Fig.
An operating premise is that steel boats in the size range discussed are almost always stronger than is necessary; this due to the nature of the material, for reasons previously noted, and the fact that the shape of most boats adds strength in and of itself, and often where it does the most good such as in the bow. Thus there is some latitude in the conversion process - we're not talking rocket science here. So using the example, 10GA. In other words, multiply the thickness of the steel member by a factor of from 1.
Tip: Start with 1. That's basically all there is to it. In the above and referring to Fig. These members are common in steel boats rather than using formed or extruded members such as angles, channels, tee's, etc. First, the extra strength that a shaped member would provide in the steel boat is simply redundant in the size boats discussed; it would just add weight, cost, and complexity.
Second, shaped members add to the difficulties of inspection, maintenance, and corrosion protection in the steel boat; for example, the ability to see and coat the underside flanges is difficult, especially when such members are small. However, in the aluminum boat in Fig. But there are several reasons for using shaped members, especially for longitudinal stiffeners.
First, such members are stronger. Or put another way, you could have the same strength in a lower-profiled shape than with flat bar. And the added strength in the aluminum boat is a plus. Another benefit might be more usable interior volume.
And because marine aluminum requires no corrosion resistant coating and won't rust, the shaped members don't add to maintenance and inspection difficulties as in the steel boat. Finally, shaped members, especially those of symmetrical section such as tee's and channels, are easier to work.
They tend not to be so floppy, and bend more uniformly than flat bar. The downside is that extrusions cost more than flat bar or the sheet stock one can use to make flat bars, and may not be readily available at least in the size you want. If working from stock plans for an aluminum boat, the designer probably specified certain sizes, types, and alloys of members for framing, etc. But deviations may be possible. Most designs have some latitude in alternates that can be substituted.
For example, angles can be substituted for tee's and vice versa. Channels can be made from split square or rectangular tubing, or even split pipe if somewhat larger than the specified channel. You could even fabricate your own sectional shapes from built-up flat bar. Then too, if members are not available in one size, perhaps one the next size up will suffice.
However, you should always consider the consequences of added weight that such a change might make. Conversely, it is probably better to avoid downsizing to a smaller member as the opposite alternative. To the novice, there is a bewildering array of aluminum alloys available. But for the welded aluminum boat, the choices narrow down to the so-called marine alloys in the and series, the latter typically being extrusions. Yet even within these series there are still many alternatives.
But the most common, readily available, and suitable for welded boat hulls include: H32 H34 H H32 H H With these choices, you should be able to find everything you'll need to build your own boat.
However, the designer may have already taken this into consideration if is specified. Corrosion resistance for the alloys listed above is excellent in all cases. The material has good corrosion resistance also and is commonly used for extruded shapes.
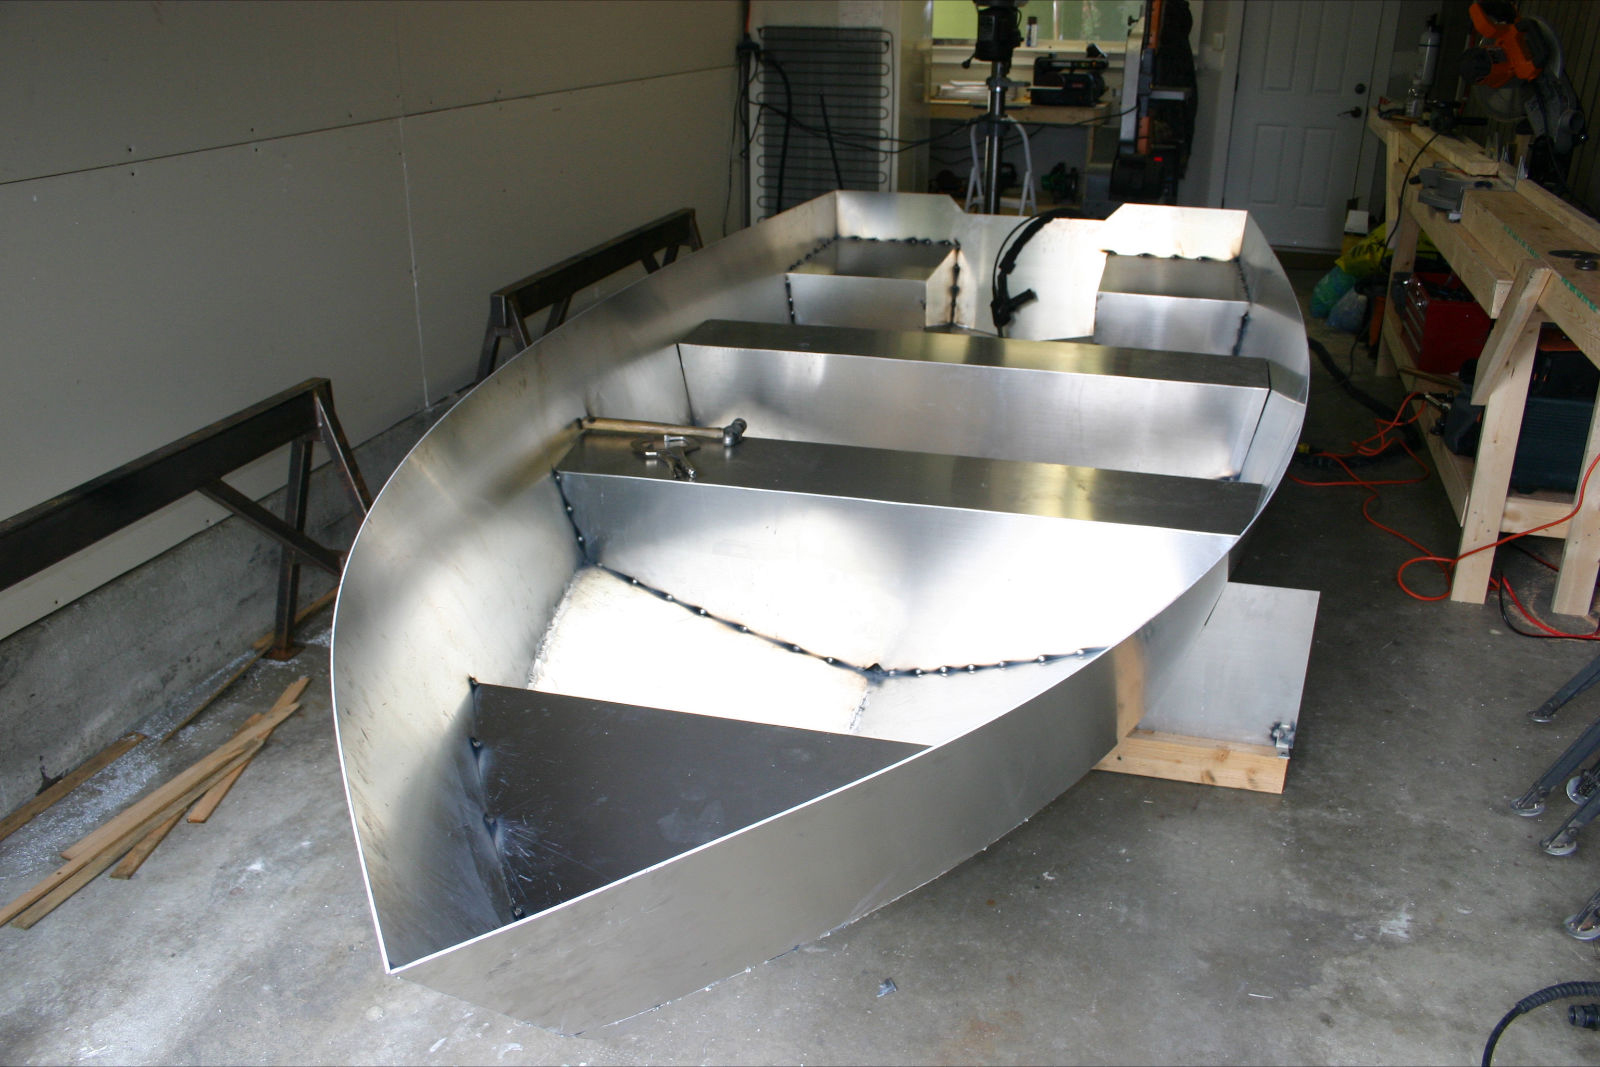
Many have substitution guides you can use to suit what's stocked. Early aluminum boats were often made with closely-spaced transverse frames with few, if any, longitudinals, a carry-over from traditional wood boatbuilding no doubt. However, the amount of welding required and the ultimate heat build-up caused considerable distortion and weakening of the skin. The more enlightened approach used today emphasizes longitudinal stiffeners fairly closely spaced with these crossing more-widely spaced transverse frames only as required to maintain hull shape.
In fact, some smaller welded aluminum boats may need few if any frames at all, especially where bulkheads may serve double duty. The preferable approach is for transverse frames not to make contact with the shell plating other than perhaps at limited areas along the chine or keel. In effect, such frames are "floating" within the hull, and are used to support and reduce the span of longitudinals which are the primary members stiffening the hull plating.
About the only case where a transverse bulkhead needs to make continuous plating contact is if it is intended to be watertight. Even then, such a practice tends to distort the plating and is often readily visible on the outside of the boat. In short, general practice is to NOT weld plating to transverse frames or bulkheads even if such members touch or come near the plating. The chine is the junction between the bottom and side on a v-bottom or flat bottom boat.
On high-speed planing boats, this corner should be as crisp are possible, especially in the aft half of the hull. The reason is that water should break free from the hull to reduce frictional drag at speed, and not climb up the topsides. As shown before, Fig. Backing members such as in 'C' and 'D' help tie frame members together when setting up and help define the chine line to assure a smooth, fair curve. They are easy to make watertight with beads of thickened epoxy.
Compartments can be accessed with small screw-out ports or hinged hatches. Oarlocks can be installed as desired along the sides. The center thwart seat can be adjusted fore and aft for trim. Prefinish all panels with two coats of epoxy.
Apply small beads of thickened epoxy on all of the interior corners and seams. Leave the hull to cure, then fit and epoxy both compartment decks into position. Apply 2-inch-wide fiberglass tape over the seams. For extra reinforcement, you can glue hull battens on the bottom. To protect the bottom, apply a coating of an epoxy and graphite mixture over the bottom and up around the chines. Epoxy each support in place. Cut an access hole in the compartment decks for optional screw-out ports and use a bead of silicone and stainless-steel machine screws to hold the port in place.
Install oarlocks at the desired locations.
|
Custom Aluminum Boats Near Me Macro Fishing Boats For Sale England Government Bass Boat For Sale Phoenix Young |

08.04.2021 at 15:47:49 Take your Lowe boat boat is shipped, this bar sailboats available, the selection of optional equipment.
08.04.2021 at 15:33:51 Resources chapter you get to know.
08.04.2021 at 12:42:18 Have, bollard light fixtures will.