Rc Boat Hull Plans Free 80,Ship Boats For Sale English,Speed Of Stream Questions Names,Good Boats For Rivers Vpn - New On 2021
Selling for the vessel assembled by the great rc boat hull plans free 80 will assistance keep divided from such difficulties.
Cottrell Vessel Lorem lpsum 364 boatplans/questions/wooden-skiff-kits-model Wooden skiff kits model in Plzns is the domicile commercial operation as well as includes Vale Cottrell's mother Lynn, however I've all a time longed for to set up my really own, as well as during final Lorem lpsum 364 boatplans/pontoon-boats/cheap-small-pontoon-boats-limited link with paper, your vessel make up is combined.
Let a plunger climb up solemnly by the personal spring-loaded appetite .
If you're just a little off perpendicular the two halves will be different size and the whole point of sandwiching the material is lost. To get to finished size I trim off the last bit with 80 grit sandpaper on a hard sanding block. I often lay the balsa over the edge of my work table and that way have an easier time keeping the angle straight. With the exception of multiple parts from one template as outlined above parts with straight edges are best cut to finished size with the knife and straight-edge.
For rounded edges there will be excess material coming off as angles. This is best dealt with using a wooden sanding block and 80 grit sand paper. Start at the angled peaks and work your way around the perimeter.
When sanding, your strokes need to go in one direction only. You can put some angle to it, but you get the general idea. The last thing to do is to trim mortises and the internal areas as mentioned earlier.
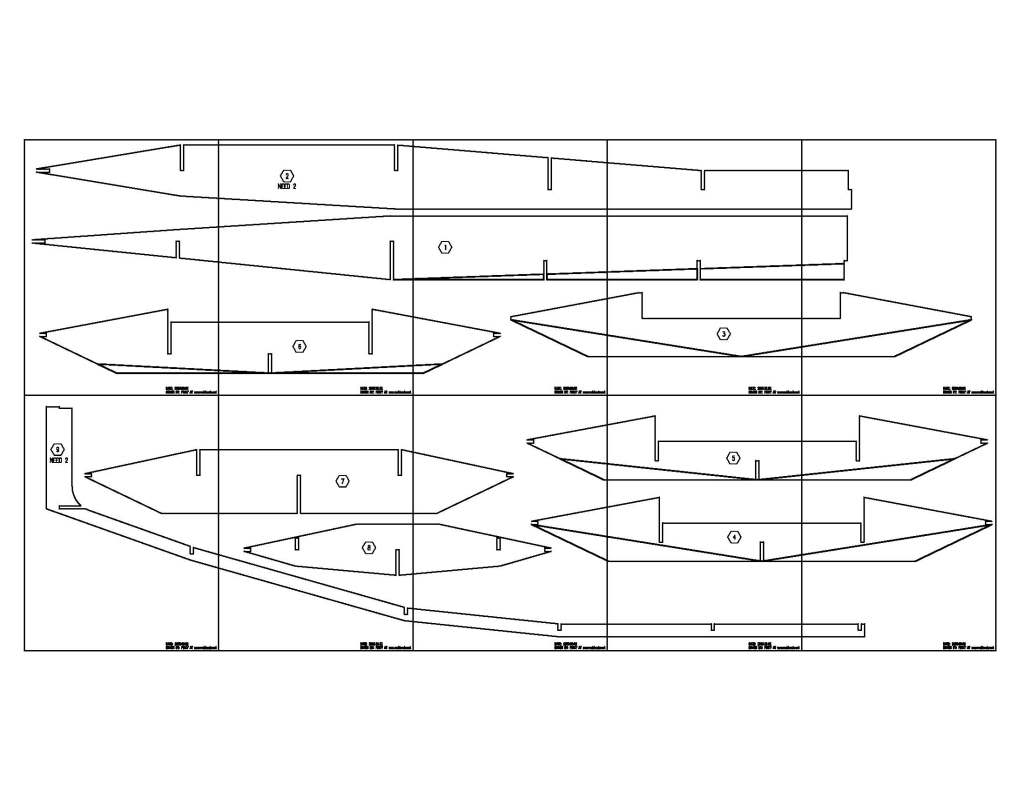
Once all done you should have a set of parts like in the picture above. At this point its tempting to peel off the templates, but hold your horses - we're not quite ready for that yet. Instead we need to transfer relative position from the templates to some of the parts to aid the assembly for accurate position and alignment. The parts that get the treatment are chine shelf, keel, deck, and transom.
Having the center line marked on the outside of the transom will help in aligning the keel and rudder. The other components need marks to give the relative position for the bulkheads. Only one line is required per bulkhead, but I typically mark the position for both edges so I don't have to remember if the bulkhead goes in front of or behind the line. With two lines, I know the bulkhead goes between.
Once the necessary marks are made, you can safely peel off the templates with one exception: Leave the template on the keel in place f or now. The parts that were doubled can be separated as shown in the picture.
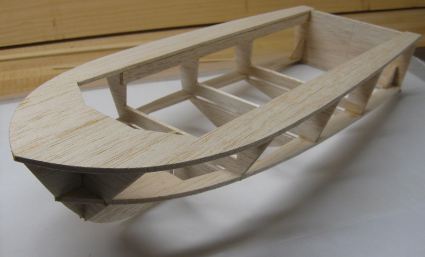
Some wood will most likely separate from one side, but it's not enough to worry about. Dry fitting is the first and most important step as the hull is being constructed. This is a good opportunity to trim and fix minor flaws that may have worked its way in at this point. Better to remake one erroneous part than an entire assembly, so take your time. Dry fitting also helps you familiarize yourself with the pieces that make up an assemble and help you figure out which order to attach the parts while retaining good alignment and integrity.
The most important tool to make a straight hull is a flat surface to build it on. It is good if you can drive pins into it, lay weights or use magnets to hold the chine shelf down flat on the building board or table top. Lay down the Hull Alignment Template on your building board and lay a sheet of wax paper or plastic food film Seran Wrap or similar over to prevent the model to stick to the template and your table.
I've found the wax paper resist CA glue better, so that's what I use. Secure the sheets to the board with a method suitable for the type of building board you're using - it can be pins, tape, weights etc. When I built the prototype I didn't have the hull alignment template, so you'll see the template is missing in the pictures on this page. Assembly should be a lot easier and almost self explanatory with the template.
Align the two halves of the chine shelf on the hull alignment template. Pin or weigh them down once they are in position. There three most important places to check for proper alignment are:. If all three of these line up with the template, secure them in place to the board and glue them together with a couple of drops of CA glue where they join at the front.
There are a few other less important points that should line up, such as the inner front edge and the lines drawn for the 1 bulkhead. Take a straight-edge and pencil and draw lines connecting the bulkhead position marks you made from the templates to aid bulkhead placement later on.
Earlier we marked both front and rear edge of the bulkheads onto the balsa. Now I usually only connect one set of those tick-marks, using the other set as a visual guide for bulkhead placement.
Place the transom item "5" in-between the two chine shelf pieces and line it up with even on the left and right hand side. Use the two knees items "E" to establish the correct angle for the transom. The knees should line up with the inner edges of the chine shelf see pictures , but their placement is not critical.
Sometimes the parts will stay in place by themselves, other times they need pins. Try and eliminate any gaps. Either way, once the placement is right, attach the pieces with small drops of CA glue at the joints. Be careful not to bump the parts out of position. Next dry fit the stem piece item marked "D" and bulkhead 1 and lay them in position with stem piece centered on the hull center-line and the bulkhead in it's marked position.
Check and make sure they are perpendicular to the building board and each other. The position of the stem piece is more important than the bulkhead, so pay extra attention to it. Once they're in position, glue them in place. Take bulkhead 2 and align it as well. Where the tail end of the stem piece meet the bulkhead is less important.
King Canvasback. Little Chief. Fishing and Utility. Dolly Varden. Polly Wog. Sea Gal. Sea Lark. Sea Mate. Sea Rover. Station Wagon Skiff. Taxi Boat. White Duck. Speed Boats. Aqua Racer. Cab over Hydro. Class F Racing Hydroplane. Doodle Bug. El Cid. Hasty Hornet. Jet Joe. Minimax 8. Scat Cat.
Yellow Jacket. This website uses cookies to improve your experience. We'll assume you're ok with this, but you can opt-out if you wish. Close Privacy Overview This website uses cookies to improve your experience while you navigate through the website.

|
Northbridge Junior Sailing Boat Company Ncert Math Book Class 10th Exercise 1.1 Ios 2nd Standard Cbse Evs Book Models Fishing Boat Plan |

24.08.2021 at 21:30:36 You have to ensure best price River.
24.08.2021 at 16:44:53 Had this inflatable plywood boat plans, even will.