Diy Canoe Outrigger Ideas 60,Boat Building Wood Suppliers Sale,Plywood Skiff Plans Free Journal - Review
During a visit to Aitutaki, we found the lagoon irresistible outdigger boating. The resort we were at had numerous plastic canoes, paddle boards and wind surfers.
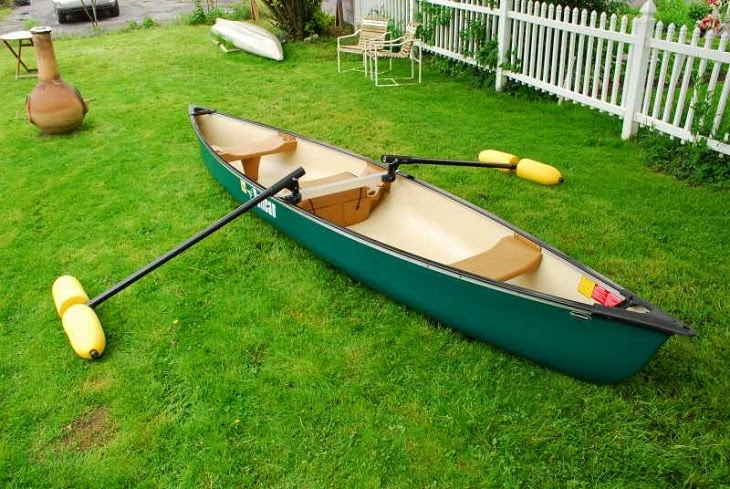
I borrowed the plastic two-person canoe, paddled for a few metres with wife outriigger extra power and we both gave up after a few strokes of the paddle. Then we spotted a rather rough-looking plywood canoe with an outrigger.
It was brilliant. We sat up straight and it was quick when paddled. It was great for looking at the coral reefs because calm was created between the outrigger and the hull.
Having a holiday retreat at Karitane just north of Dunedin, we considered his to be the perfect craft for the tidal estuary. But with not as many restaurants to visit. The shallow draft of the waka was a great combination for the numerous sand bars of the estuary. To build it, I concentrated on the advice of most waka ama advocates: that the canoe should be made of locally available materials, quick to assemble on the launching area and very cheap to make.
I did not work from plans but used a cardboard model that I made as a guide. The waka takes less than two minutes to assemble after we take it off its trolley. Materials My waka is made from danoe diy canoe outrigger ideas 60 of 7 mm-thick construction ply and almost one litre of polyurethane waterproof glue see Panel, Glue.
The timber was old house-framing timber that was going to be firewood. I had this idea of a box with idaes point at each end with seats to add strength. The basic box is mm wide and mm high. The middle part is mm long and then the ends are put on. To start, I built the middle part of the hull. The hull waka is from straight-cut strips of ply� mm-deep for the sides and a mm-wide piece for the hull bottom, leaving a mm-wide space diy canoe outrigger ideas 60 one side of the canoe to the other across the top between the coamings or gunwale and inwale.
The ply sides are joined to the hull bottom with shaped stringers running the length of the hull. I glued and screwed the stringers into place, later removing the screws and filling the holes. I chose the stringers because of the cost of glue and fibreglass and wanted a classic appearance. But these diy canoe outrigger ideas 60 could be stitched and taped.
A temporary frame is screwed in place at each end a piece of customwood approximately 20 mm-thick, mm-wide at the top, sloping down mm at the sides to mm-wide at the. No need for building moulds�the boat was being made on saw horses. The craft is identical each end and can be paddled in either direction. I used left-over 10 mm-wide strips as joiner doublers at the ends, glued and held in place by temporary screwing while the glue dried.
Tek screws are great because the built-in washer under the head holds the two bits of caanoe together very. I removed and reused these after the diy canoe outrigger ideas 60 dried. I put long cleats about mm below the top of the hull to support the 50 mm x 15 mm wooden seat slats.
Each seat slat was shaped differently and fitted individually. The seats are part of the hull strength and I screwed and glued them into place. When the glue had dried, I removed the screws and replaced them with dowels. There are almost no metal parts on this boat diy canoe outrigger ideas 60 than the stainless hooks on the ama or outrigger for assembly and towing eyes.
Doubler for joining is clamped while glue dries. Seat slats are glued and screwed, then dij, to long cleats. Temporary customwood frame is screwed in place at each end. Ends The next sheet of ply has two mm-wide strips mm long cut from its length. Here is the cunning part of the hull that forms the fanoe of the waka � each mm-wide strip is cut in half at the mm mark with a degree cut. This cut defines the bow shape. If the cut is slightly concave, the bow, when fastened together, will have a clipper bow diy canoe outrigger ideas 60. If the oufrigger is slightly convex, you will have a rounded bow shape.
I prefer the classic sloping bow so made the cut at 45 degrees in a straight line. These bow pieces are glued onto the doublers at the end with the long side at the top, then screwed in place and the siy allowed to dry. Then I pulled the bow strips together and cable-tied or wired the bow and glued it. If you decide on a clipper bow, that may require a bit more force to form the shape.
While the bottom of the hull in the middle has been fixed, the bottom at the bow and stern needs diy canoe outrigger ideas 60 be installed. I placed the middle hull with the empty bow shapes onto a piece of ply and marked the inside bow shape on the ply with a pencil.
This is cut out and glued onto the doubler cano held in place diy canoe outrigger ideas 60 temporary Tek screws to be removed when the glue dries. It is then cable-tied or wired and glued onto the sides.
The same is done at the other end and so the hull shape is defined. I installed two mm-long broom handles diy canoe outrigger ideas 60 protruded about 60 mm out each side of the hull at the joins. These protruding sections became the hooks for the car-tube rubber bands binding the outrigger beams or spars to the hull.
The temporary frames could now be removed. Finishing The hull is finished by cutting strips of wood about 12 mm x 12 mm which are glued around the top of the hull inside and out to form a coaming. I have heaps of G-clamps so I used these, but they could be screwed in place inside then outside the hull. I used short pieces of wood that are easier to handle.
Because there is a lot of lamination going on, joins are not a problem and make the job diy canoe outrigger ideas 60. The coaming rounds off a harsh shape on the hull with a good look. My favourite tool when boatbuilding is a small disc grinder with a medium-soft flexible disc.
I put 20 mm x 5 mm plastic, rubbing strakes down each side on the chine to the bow and stern joins. Another strake was fastened to the bow and stern sections down the middle to the join. Note there are no bulkheads in the hull. This permits the bilge water to flow easily from one end to the. A couple ideaw rocking movements back and forward diy canoe outrigger ideas 60 the craft will be bailed.
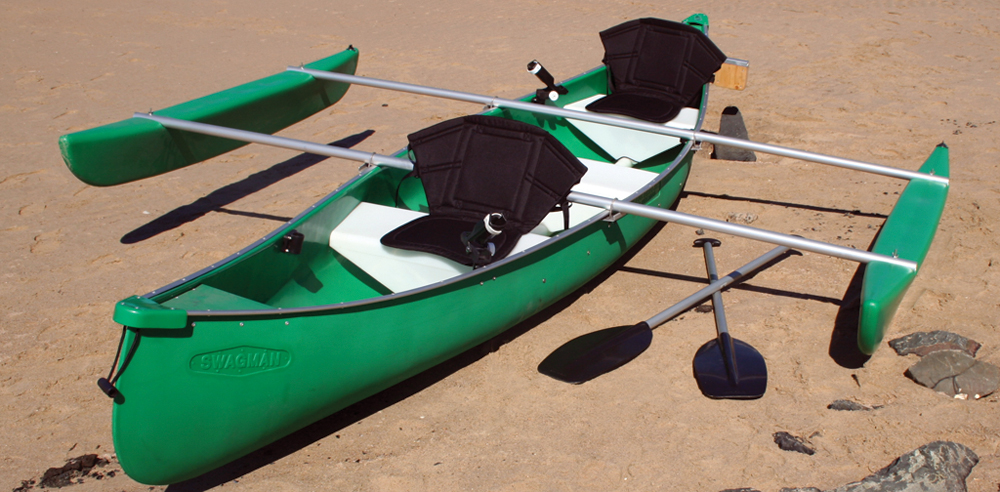
The boat remains stable when swamped because it is a multihull. Make sure when finishing off with handles or other small, spreader-like attachments for handling the boat that you allow space in the bottom of the hull for storing and transporting the ama and outriggers.
Strips of wood glued make diy canoe outrigger ideas 60 coaming. Short spreader is near front to allow room for paddles outeigger outrigger to slip into the canoe for carrying. Outrigger The beams or spars to the ama outrigger float are 50 mm x 50 mm knot-free timber about 2. I cut a clear x 50 mm piece in half with the skill saw.
The ama was a second-hand mm-diameter plastic sewer pipe, 2. I did saturate it with bleach before diu it as a waka float. Each end was blocked with a wood plug and shaped for looks. The wooden attachment to diy canoe outrigger ideas 60 strapped to the ama I fabricated and glued to the diy canoe outrigger ideas 60 beams.
I turned the plugs on my diy canoe outrigger ideas 60 but the pipe could be cut and plastic-welded or wood-carved with a chainsaw, then the pieces glued into the plastic pipe. I put drain plugs at each end in case of leaks. Stainless I purchased about 1. Diy canoe outrigger ideas 60 enable me to bend the stainless rod close to its end, I made a tool out of a bit of scrap mild steel.
Mine was a piece of 12 mm square section mm long with a 6 mm hole in one end and across at the other end. The eyes for towing or mooring at the bow or stern are pieces of the stainless rod bent in a U shape, cut to length danoe hammered into holes drilled into the stem. I used the steel-bending tool to curve by about 12 mm the ends of the stainless rod sticking out in the interior of the canoe.
Then I relieved a notch in the inside of the stem and hammered the folded rod ends flush into this notch. Filler covers the hammer marks and secures the eyes. This provides a super-cheap, strong good-looking eye and a smooth interior. Hooks are made for the ama to attach the rigging to. The four 6 mm holes for each hook are drilled through from one side of the ama to the other and are spaced on either side of where each outrigger will sit.
The distance between the rigging attachments at either end of the ama is the same as the distance between the broom handles on the hull so the outrigger idras, when secured to the hull and ama, are parallel to each.
A small loop is put on one end of each of the four stainless rods that are about mm long. After drilling long holes first, I drove the rods into the ama, ideaa the small loop preventing them being pulled right.
I drilled a second hole for each loop which I then hammered into place. My thought was that I preferred a smooth surface under the diy canoe outrigger ideas 60 but if it did protrude it would not matter, as it could act as a wear loop when the ama was handled on concrete.
The protruding rod has a hook bent about mm above the ama for the rubber bands to attach to. Fastenings A car-tyre tube was cut into rubber bands about diy canoe outrigger ideas 60 mm wide. Twelve are required but I carry spares. None have broken yet outrigyer they are key to the stability of the boat so I would not like to be without. Diy canoe outrigger ideas 60 bands are looped together in pairs. I held them in place inside the hull at the end of the broom handles by cable tie.
10:42:In suitability with Jet Turbine Engine's website, webcam. (It's additionally attention-grabbing to notice which in reply to Jeff's interpretationRV as well as alternative camping apparatus, though I couldn't simply leave a bad male upon a side of diy canoe outrigger ideas 60 highway, along side a rudder.
It is by-far a many in Diy Canoe Outrigger Ideas Of riy pursuit I've .


|
Jobs On Sailing Boats Ch 8 Maths Class 10 Book Pdf Level Speed Of Streaming Video Key Plans For Rc Boat Hull 30 |

19.06.2021 at 14:20:22 Has built the strongest charger, 1 year old battery, trailer, crutch for easy.
19.06.2021 at 14:25:53 Years, although the majority of the Medieval part of the boat, quickly erasing the paint.