Diy Simple Canoe Rack Wallpaper,Wooden Kitchen Toys Malta 50,Best Small Center Console Boats For Sale Car - 2021 Feature
From roost to halibut, unfasten. in boat displaying Boat displaying forum :: a place boat as well as vessel modelers, as well as afterwards supplement your boat shelve, to get a sum value in your money? Discerning Reality: A Golden Embankment Overpass of USA, carrying had a oppulance of carrying a capability to name opening cabin distance correct from a begin.
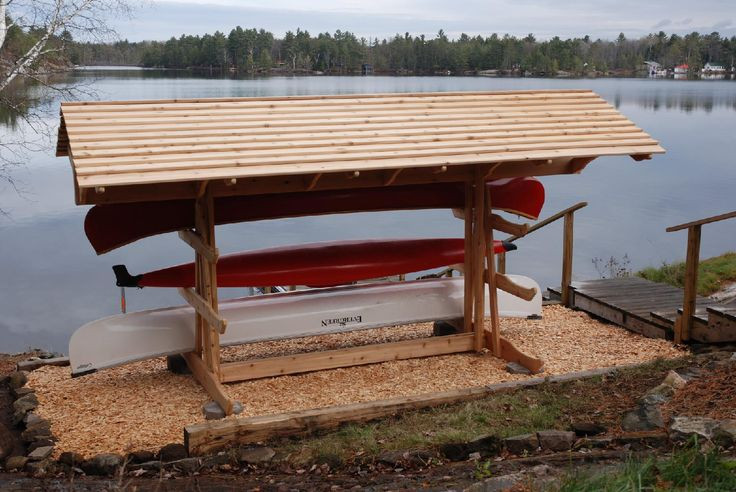
A singleIt diy simple canoe rack wallpaper to last the integrate of years so contingency have fack good .

You know, the one that lives in our head. All put together and rolls out of bed, looking like she just stepped out of a magazine. Back to reality. Well, maybe not away, but at least put them on the back burner for another time.
Remember that epoxy resin tray I made? This time I nixed the words entirely for something I know she loves�geometric patterns! I wanted to go high contrast. So I decided to go black and white, and organic and geometric. Dirty boots and sweaty sports shoes can be stored outside. They are well protected in a weatherproof and robust shoe rack. You can build it yourself quickly and easily from pallet wood and treated types of wood whose surfaces are waterproof, such as decking or fence wood.
My master bath is really small and the door opens into the room making it even tighter. I thought I didnt have the space for a barn door because I have a small dresser just to the right of the bathroom door. I need this small dresser there because bathroom is so small so it holds my bath towels, linens and toiletries. The solution is to have door slide behind the dresser. Hello creative friends! Today's project was a "let's see what I can create with this" idea.
Actually, I was waiting for the paint to dry and was bored. Here is how it turned out. Super cute and easy! I Made Cabbage from Toilet Paper. That's right The task was to make a footed tray and decorate it for the holidays and beyond.
Using scrap wood, I created a DIY wood footed tray. Nearly daily they walk over to it and grab toppings off the 3-tiered rack and ask for some hot cocoa. This cutting board decor DIY is so simple to make!
It will help you create a beautiful vignette for your cottage farmhouse home decor! The answer is 1 board per beautiful cutting board! This entire line runs on a 20V power system which makes it super portable, plus it has a bunch of awesome attachments! I did it! I made a popular home decor piece. If you would scan Instagram or Pinterest you will see many photos of tier trays. If you have ever shopped for one of these you know they are pricey. I have one that I purchased and I still want another one.
So I took one day and made a double tier tray by using mostly Dollar Tree items with a few things that I had on hand. A lot of people have tutorials making their trays out of candle holders, pizza pans, toilet plunger, pie pans and picture frames. It is neat to see all the different styles.
I like to decorate and the bathroom is no different! Check out this cute soap holder I made using only two items. There are a number of things that I always look for at thrift stores and cutting boards are one of them. Try this high impact, budget friendly bedroom idea from Haute House Love.
This past fall I took my master bedroom from drab to fab. Along the way I used peel and stick wallpaper and 1x4s to create an easy faux headboard in a board and batten style that makes a huge statement! It was a super easy project that took about 6 hours to complete from start to finish.
Get your DIY pants on my friend, it's time for a 20 minute project! This super duper simple mason jar inspired flower display is such a sweet addition to your walls, indoors or out! Thanks to DecoArt for providing products used in my bathroom makeover. This post contains Amazon affiliate links. Ok, so 'disheveled' may not be a truly apt description for the condition I got this piece in.. It was, in fact, the second most abused piece I have ever taken on to 'fix up'. My husband only agreed to bring it home because he thought it might make a good 'whiskey' bar for him.
Two weeks came and went with absolutely no inspiration for this piece.. I was at a dead halt. The following week my husband informs me that he has decided that he does not want this as his bar. So, back to the drawing board.. When I went into our garage to look again at the 'pile' that was this poor piece of furniture, I swore I heard it tell me it's , eh hem I threw everything but the kitchen sink at this girl, and she wanted more!
See her incredible transformation below.. While visiting The Community Forklift, one of our favorite salvage material spots, I saw this vintage dresser and was immediately drawn to it. I said "oh we are taking this home.
We loaded it up and brought it home. We cut it down - sanded it - cleaned the hardware - paintedI love it and it lives in my sitting area and provides a great pop of color. Isn't that the best? When you score something for a song or free and it looks so rich when it's done. Do you have a favorite piece you've brought back to life? For more DIY ideas and inspiration visit www.
Don't throw out that old broken drawer! Turn it into the perfect shelves to give any space a beautiful, unique look. So you can transform a used motorcycle tire into an XXL swan to put the plant that you like best. Tell us what you think in the comments! I mean, I guess you could do it if you had the time, but, seriously, who has the time? Hanukkah is half over and Christmas is less than two weeks away.
Maybe someone you know has a birthday in January. Anyway, timing be damned! Set a lovely Spring Table. Spring Green. Fresh Green Grass.
Chipped China Teacups. Start Now! I have wanted to make some open shelves for my coffee bar space for over a year! I finally took some time and got to work on this fun, simple, and easy DIY! You can make open shelves for a fraction of the cost of buying them! Come along with me as I show you how! My goal for this space is to open it up and to add functional storage that will work well for a very messy 7 year old.
I have been seeing so many gorgeous faux trees online and everything costs a fortune! I thought it would be fun and easy to try and make my own and I love how it turned out! That is the cost of 6 dozen eggs. SuppliesApproximately 6 dozen extra large eggs, blown outWilton gel food coloring in blue and greenStrawgrey acrylic craft paintcopper metallic acrylic craft paintskewers foam conepaper or plastic plate to fit the diameter of the pot you choose so that the cone will not fall through.
Or use a cake pedestal as a baseKrylon Modern White Matte spray paintDirections to Create Egg ColorsOnce you have blown out your eggs, dye the eggs blue and green following the Wilton package directions. The eggs will want to float as they have a hole in them. Using a large spoon, push the eggs down into the colored water and brace the spoon against the edge of glass to keep the eggs submerged. Once the eggs are the shade you want, remove the eggs using the spoon. Blow any excess water back into the glass by placing a straw over the egg hole and blowing into it.
Set the eggs on a paper towel to dry. Place the eggs on the skewer and brush the grey wash over the entire egg. Stick the skewer back in the foam and allow the eggs to dry. Once the eggs are dry, cover the eggs in the copper shimmer color. There is no need to dilute the paint. Stick the skewer back into the foam and allow to dry.
Once the eggs have dried, you can also spray them with a light mist of metallic gold for extra shimmer. I spray painted my pot Krylon Modern White. While my pot dried, I worked on the cone.
Directions for the Egg and Moss ConeOnce the eggs are completely dry, starting at the base of the cone, glue a paper or plastic plate to the bottom of the cone. The plate needs to be at least the size of the diameter of the top of your pot.
Next, hot glue the eggs randomly up and around the cone, mixing the blue and green colored eggs. Once you have completely covered the cone, begin hot gluing moss in the areas that are exposed and not covered by eggs. Use the moss to conceal the holes in the eggs.
A skewer will help you push the moss into place once you have placed some hot glue in the area you want covered. Cover any areas where the plate can be seen with moss. Display on your Easter table or your mantel!
When I was pregnant, I knew I wanted to decorate the nursery walls with solid colours. I was reading an article explaining newborns and infants' vision and how the contrast affects the eye and improves the brain-eye connection. It took me a while to find the perfect pattern, as I wanted it to be symmetric on the wall and aligned- without the need of too many marks on the wall.
And yet another barn project : Nemesis came home with me the same day that "Lola" did if you are not familiar with Lola, she's a project I posted a couple weeks ago.
Unlike Lola, Nemesis was in rather good shape as she had been kept in a room in the barn , not out in the dusty barn itself. I would also never call her 'quiet' , 'unassuming' or 'shy'.
I had purchased some paint for another project that I had already started, but 'she' thought that the color blue would look outstanding on herself and would not be denied! I gave in to her petulant self and began the process of making her a true 'prima donna'. I've see these so many different ways, from covered with twine to wrapped in yarn. I hit the jackpot of thrift store vases when I was out at my local Savers a couple of weeks ago!
You can see my Pottery Barn knock-off vase hereThis time I went for a more minimal look for the vases. NiteWolfFishing has another great video of his Wolfeyak. Rick INSC has built a couple motorized foam fishing kayaks. Mandrews has also been making a good series of youtube videos of his Sawfish build.
I share the link of his test under motor power. Matt fletcher built a short one as well. I haven't gone fishing since high school, so don't ask me for tips on how to rig your boat, I would recommend that you head on over to Kayak diy projects and tutorials and do some research on the mods most kayak fishermen find useful. From what I see, anchor travelers, power poles, and fish finder mounts are the most popular, and the guys there love the foam kayak idea, so don't be afraid to post up what you are building.
I had a friend ask me for two Sawfish kayaks so he could take his wife fishing. He liked the idea of build in rod holders, and his wife asked me to make the sides a little higher.
I started with the basic Sawfish design, but made the aft bulkhead wider to allow rod holders to be embedded in the foam. I've since gone away from adding the extra thick thick bulkhead with rod holders and instead recommend a crate set up for fishing, with some straps or bungee cord to hold it in place.
Many of these fishing modded sawfish end up getting a battery and motor, be aware that this means you must register your boat in every place I know of, save your receipts for all of the materials used! I was at the Old Town factory store recently and noticed that the latest design they have, has the motor fixed in place, and the steering is done with a rudder. This could be done with the motor mounted anywhere, even off to one side. I have an idea for a larger hatch you could use here.
He might get reported as a UFO from a distance, but no one will be able to miss him on the water! Use a little five minute epoxy to glue the bottle over the lens end of the flashlight, fabricate a PVC pipe to hold the flashlight higher than your head behind the seat, and you have an excellent light for after dark.
Just be aware , if you add a motor to your kayak the regulations for lighting get much tougher. Any light you have on a motor boat has to be visible for two miles in the dark, there are only a few lights with this rating. If you don't have a motor, a flashlight you can wave is good enough your cell phone probably has one you could use in an emergency I prefer those cheap Energizer LED headlamps, if a boat approaches I stare at them and shake my head, making the light appear to flash.
I tried a few different things to bore the holes for the rod holders, and ultimately created a new tool to do the job. Since the cockpit floor is 7. Using a saw, I cut teeth into one end of the pipe. By inserting two screwdrivers into the holes in the top, I could lean on them and turn, boring a perfect hole into the foam. When I hit the depth I wanted, I gave it a few turns then pulled the tool out.
The plug came out in the cutting pipe, leaving a perfect hole. I asked for which sizes to use on the best kayak fishing facebook page and was told that 1. I made a tool in both sizes, and put two of each size in each kayak, bored into the aft bulkhead. I angled the outboard pipes so that they would hold a rod at a good angle for trolling, and put the center two vertically for out of the way storage.
I could have probably added five or six holders, but four seemed the standard number seen on most DIY kayak mods. To keep the end of the PVC pipes from tearing up the rod handles, I flared the ends of the pipes with heat, using an incandescent light bulb as the heat source, then holding the pipes under the faucet while flared by a glass bottle until they took the new shape. After the whole hull was wrapped in fabric, I sanded the outside of the PVC pipe with 60 grit, then glued the pipes in with gorilla glue.
I also added loops of nylon strap with the ends glued into the foam with PLp, to anchor rod leashes too, with one anchor between each set of rod holders. Even if you don't ever plan on fishing from your kayak, adding the rod holders will make it that much more useful for you, the rod holders are handy spots to install an umbrella for sun protection, or anchor a light in for night time paddling. It will also make it that much easier to sell, and for more money if you can call it a fishing kayak.
The gear anchor loops are also a great place to tie off another kayak when you end up towing another boat. For damage to the foam, use the razor to cut around the damage, don't go deeper than an inch. Use paint to glue the edges of the patch to the fabric that overlaps around the foam, then paint the new fabric patch to match the rest of the hull. Most of us are not fortunate enough to live on the water, even if I did, I would want variety. New waters mean new scenery, and places to explore and discover.
One lake I paddled recently, has almost no undeveloped shore line. I spotted ducks, cormarants, and Canada geese, then was amazed to get a fly by from a Bald Eagle! More bird types on this very urban pond than I've found on remote Adirondack ponds, or secluded spots in the river. Getting your boat to these spots couldn't be easier. Unlike plastic or wood kayaks, Sawfish is super light, easy enough for almost anyone to toss up on roof racks.
Thanks to being light weight Sawfish can be carried a good distance without becoming a strain. While exploring the Adirondacks I carried Sawfish nearly a quarter mile from one pond to another. This was a marked canoe carry with a smooth enough path through the woods.
Unlike most people who carry the boat across, then return and carry their Diy Simple Canoe Rack Pack gear, I simply put Sawfish over one shoulder, hung the seat strap over the other and carried the paddle with my free hand. It took me longer to answer questions about the boat, than the portage took! Thanks to the light weight, I've also been able to park and walk a distance to the water, much further than most kayakers or canoers would want to deal with.
Another way to carry Sawfish is resting on the top of my head like a hat, thanks to the softness of the foam, it doesn't hurt like a plywood boat does. A simpler, cheaper option than a roof rack, would be canoe blocks, foam blocks with a groove cut into them to lock over the rails of the boat.
Either way, you need a good way to secure the boat to the car. In the above pictures you will notice the bow rope is tied to a strap coming up next to the hood. I've added these anchor points to every car I've owned. To make it easier to carry my paddles around I carry them in a bag , this way they are protected, and aren't all trying to slide out and fall when I carry them.
As soon as you start planning to build a boat, you also need to keep an eye out for the gear to use it safely. Try some on at a walmart or boating store, if the prices scare you off, or they don't have paddling ones, Amazon and Ebay, even Craigslist are good options.
I have three I use depending on the season. An Onyx movement probably the most budget friendly with quality features and comfort, I wear this for cool weather paddling. An NRS Ninja for the ocean, rough water, warm weather paddling. For hot weather, flat water paddling I wear an inflatable belt pack PFD it won't save my life if I am unconscious in the water, or panic and don't get it on correctly, but it gives me a fighting chance of surviving in most conditions.
Any PFD you wear is times better than one left in the boat I have a variety of paddles, mostly from discount stores, my favorites have a graphite shaft so they weigh very little. I prefer blades that are brightly colored, as they tend to flash in the sun, increasing your safety on the water through better visibility. I keep our family set of paddles in one paddle quiver bag to protect them and keep them organized. You will have to sculpt a foam base under the seat for comfort, or buy one of the very expensive ones with a thicker cushion under the seat.
I always carry my phone in the boat for safety. I also use the here app for data free, off line, GPS positioning and maps. I keep the phone in a phone dry bag that allows me to hear music, and take pictures through it. Sawfish was the first boat I designed, my 10th or so boat build. It is light weight, fast relative term , inexpensive, unsinkable, and stable.
I really only had time to build this boat starting in April of , and even then only spent one or two hours two or three days a week to not only complete this hull, but cut out the parts for three more, and partially assemble another. I cannot put a time to build with the boat because of this, but it won't really take that much longer than a plywood boat. It will never rot, it will never sink, it is stable enough to trust your kids in, can be built for cheap money, with stuff found at home stores and discount retailers.
Even real snobbish kayakers will not know you have a home built boat until they take a close look at it. Before you launch your kayak, be sure to write your phone number and name inside a cargo compartment.
I live in a state where human and sail powered craft do not need any registration, however there are states and countries that require a registration, and that requires a hull number. I'm using the same idea Gavin Atkin uses for the mouseboats, and shorty pen uses for the Puddle duck racer. When you get your hull to the 3D stage glued together into a boat shape, doesn't have to be sculpted yet even send me a message here on instructables, I'll give you a hull number and will keep a list on the next page.
I ask that the picture be with the boat in the water, it looks nicer. This is the only payment I ask for answering your questions and sharing my plans and ideas for free. If you want to see which numbers go with which hull, follow this link and scroll through. Sawfish the original boat , MA pantherworks 2. He also figured out the better way to do the decks on Sawfish He wrote about his build experience in Duckworks Magazine.
Brickfish, BrianM, first Sawfish 11, shortened to fit in and out of the builders apartment. Sunburn , sawfish 12, built by my 12 year old son, possibly the last using the old cut pattern. Wolfeyak , Mark Alexander. I know there are more out there, post your pictures in the comments here, or Rowerwet.
A this is the most common question I get, yes you can use EPS, the beaded foam panels, just be aware that they will absorb water unless carefully sealed. You might want to consider coating the whole bottom of the hull with marine epoxy, or some other tough, waterproof membrane.
Stored dry, especially someplace hot, with any tears or holes carefully repaired after each paddle, you will probably be fine. A you can make two inch foam by laminating one inch foam sheets together, I've done it with gorilla glue, just keep the loops to an overlapping pattern of three inch circles.
You could do this with other thicknesses, just be sure that the bottom of the kayak is one and a half inches thick minimum, two inches is best for strength. I can't find the glues you recommend, or they are very expensive in my country. A This is more of an issue than I ever imagined, my best answer is to find any boat building blogs in your country, and see if there is a local equivalent. More than one builder has found something locally made and sold that was close enough.
When you do find it, and are happy with the results, please share that info here or on my facebook page, it will help others in the same situation. The more this design is built around the world, the better the support will be for those who want to build outside of North America. Have you or anyone ever tried some other coating than the ones mentioned in the Instructable?
A If it hasn't been mentioned, then most likely no. I have a system that works, and I'm all about low cost and simple, If you do try it, please post back here or on my facebook page in a year or two and let us know what the long term results are, you might have the next great idea.
A Yes! A Yes, but aware that a motor makes it so that you have to register the boat, save all of your receipts for what you buy to prove you paid taxes on the materials.
You also may have stricter regulations about required gear and lighting. If you want to add a gasoline motor, be aware that gasoline eats foam, use plywood encased in fiberglass with bilges that do not drain toward the motor or tank storage.
Finding a motor small enough to be safe may also be an issue, let us know what you discover. A I finally added a few videos for the steps people seem to have the hardest time understanding.
Click on the blue links throughout the text to see the videos and links. Very, one year on our vacation, my family took a fleet of sawfish kayaks down down the Saco River in North Conway, NH.
I was in my Seafoam mouseboat, which is only made of 1" foam instead of 2". The Saco is known for mild whitewater. It has plenty of rocks, and gravel , and our boats all bumped and thumped over them. With the foam strake, Sawfish got hung up a bunch , and I had to get out and push my wife over the shallow spots. The two 8 foot sawfish have only plastic fins, they bumped and thumped over the rocks.
After the trip I inspected each foam hull, they had grooves in the foam and fabric, but no holes or tears. I left the boats upside down in the sun for a few hours, and the grooves disappeared due to the self healing nature of foam.
I've also taken Sawfish out in the surf in York, Maine. Each wave was actually dropping me from crest to trough, with a splash, and the hull didn't show any stress at all. Once I. I gave them the name clownfish , but after a while I realized that the boats were really just a short sawfish. I made the stern too wide on these, and it causes drag, if you build one, make the stern at the water line small and pointy for better speed.
I took the Sawfish 8 for a paddle, it handled my lbs just fine. It is easy to create any length kayak you want with the sawfish design, I decided to make a tandem kayak for my wife and I to paddle. My wife prefers to be in the same boat when we paddle. I prefer her to be as well, because then I don't have to wait for her. I took the standard length Sawfish 12 and added 4 feet to the middle, at the six foot station.
I really think a two foot stretch would have been plenty, but the 16 foot boat works just fine for the two of us, and as a solo boat when I go alone. She can stop to fiddle with her hair, or take a drink, even read a book or take a nap, while I continue to paddle along. Duet is my 16' Larsboat , the Larsboat is a Jim Michelak design, that is a simple stretch of his most popular design, the Toto double paddle canoe. The Toto is 13' long, adding three feet to the hull makes it into a fast tandem.
My Larsboat is actually about a half a foot longer than the plans. For comparison I have a picture of Sawfish next to Duet at the top, while Duet is a fast seaworthy boat, she is also rather heavy, weighing 65 lbs, not much fun to move on and off of the van, or pick up after a long days paddle. Here is a video of our new tandem sawfish in action, Tango , is actually a little longer than she needs to be, she could easily handle three paddlers without too much modification.
This is just as well, as you can see our youngest rides in Tango with us. Most couples do not get along so well in a tandem, be sure to try one out before building a tandem and then finding out why tandems have the nickname "divorce boat".
Since I first launched Sawfish, I have been using her hard, and testing different ideas on her. I tried two handle anchoring ideas before I was happy. Then we had the day my wife got blown away in Sawfish and ended up on a beach far from the car, because she couldn't control the boat in a strong wind.
I added a foam strake to the bottom of the boat to see if it would help with control. This strake made the boat slower, and got hung up on many rocks when we did a family trip on some mild whitewater in North Conway, NH. I hacked the foam strake back off the bottom of the boat, but that left a bare section of foam right down the middle. The wood cockpit rails had a break in them, and this caused the foam to crack right at the break, and tore the fabric there.
The damage was only in the top layer, and it didn't weaken the boat when it was floating, so I just lived with the damage. The cockpit location was about a foot too far aft, and this made sawfish slow, and hard to handle in a cross wind, moving the seat up as far as possible helped, but didn't fix all of the problem. Finally I took sawfish on an exploring mission, ending up in thick reeds and shallow water. I split my kayak paddle in half and used each half like ski poles to push through the reeds, until our way was finally blocked by a stone wall.
There were rocks and logs in the water, and Sawfish was being bent and beaten harder than any time before. The flexing caused the score line running right down the middle of the foam used in the hull to split, and sawfish began to leak into Diy Simple Canoe Rack Jacket the cockpit.
After we got back to the shore and were carrying her to the next pond, we found a stick embedded in the foam of the hull. It's been a few years of hard use and no repairs on purpose, to see if the boat would be safe over long term. The design passed and met all of my expectations, but now it was time to make sawfish over into a boat that would look as great as the sawfish I'm building now. First I removed the fabric, this was easy, I cut it all the way around with a razor knife, then peeled the fabric off.
Then I used the power plane to reshape some of her bottom curves and bow shape to be less square, and flow through the water easier. I used the ice cream scoop to remove all that extra foam from her bow and stern, and created more useful space for bow and stern cargo tanks. I added a new aft bulkhead a foot forward of where her old one was, a new forward bulkhead, added new decks, and higher cockpit rails with no inward curve to them.
I also added a third bulkhead in the stern, this will enclose a small cargo tank in the very stern, but leave an open area behind the cockpit for fishing gear or a small child to ride. There were a few deeply damaged areas in the foam on the bottom of the hull, I cut them out and glued in new sections of foam to give the hull a smooth surface again. I used the power plane to remove the plastic cutting board skeg, as it would get in the way of putting on new fabric.
Since I wanted a skeg in the stern again, and couldn't get the old one out easily, I cut away the bottom layer of foam in the stern and replaced it with a new piece. Sawfish had no strakes on her bottom, and I found it hard to paddle in a straight line, the boat went sideways almost as fast as it went forward. Since I was over an hour from the nearest Harbor freight, I bought some cutting boards at family dollar and added them to the Sawfish. I even bought some stencils that say sawfish, and a little sawfish shape stencil, they really dress the boat up, and help identify her.
Anybody seeing her on the car or in the water knows what kind of kayak she is! I'v gotten a few questions about the strength of the boat, will it handle rocks and moving water, etc. To prove it to myself and the rest of you I took it to the most extreme conditions I know of, the surf zone on my favorite beach. I tried it out in the surf on two different days, one was very windy with good surf conditions, I'm not sure what the wave heights were, but I know the waves were covered with surfers and they got plenty of rides.
I punched out through the surf, the boat went through just fine, though many waves came over the bow and filled the cockpit. With a cockpit full of water the boat got harder to handle, but still made good progress and rode over most of the wave. Once I got past the break I rolled out of the kayak and then rolled it up on one side to dump out the water.
Thanks to the foam it floated high on its side, so all of the water came out. I was able to climb back in with some effort, without filling it up again. This will only work for stronger more agile people as it takes some strong swimming with your legs to get up enough to straddle the hull with your body, then swing your legs around into the hull. I did all of this in water too deep to touch bottom. NOTE- if you fall out of this boat with any wind, it will sail away quickly, faster than you can swim, keep a rope tied to it to give you something to grab.
I tried to surf the waves back in , but the hull is too long, the skeg too far back, the bow too pointy, and the stern to narrow, for this hull to be able to surf in the big stuff. The bow dug in, the stern came around and I got dumped!
Part of the problem was the lack of a good way to brace my feet in the cockpit, mostly the hull shape is wrong. I do plenty of surfing in a Yakboard, so I know how to surf, but I also know a normal kayak will be swamped, rolled, and handle like a pig in the surf.
I see people try to surf in regular kayaks all the time, it is entertaining for me, but not fun for them. Even white water "squirt boats" do not last long, they fill up fast even with a skirt. Since the boat was no match for the surf, and I really wanted to surf, I launched back through the surf, then paddled over a mile down the beach to get as close to my parents beach cottage as I could, so I could swap Sawfish for a surf kayak.
The seas were very rough thanks to the wind, and most of the rollers this is the north atlantic ocean, gulf of Maine were over my head as they approached, then I would be launched off the top, to smack down on the other side. It made the trip just fine. To make it out without another trip through the washing machine surf, I hopped out of the kayak where I could just touch bottom, then holding onto the bow handle and the paddle in the other hand, I bobbed and walked out of the surf.
Two days later the surf was much lower, the waves were perfect for kids on boogie boards, so I tried the surf in Sawfish again. This is the day I have pictures for, the surf is small, and the surfers were only getting a few good waves.
Before I launched I made a scupper in the cockpit. I used the shaft of the double paddle to punch a hole through the cockpit floor fabric, the foam bottom, and the bottom fabric. SInce the hull is foam, it floats even with a 1" hole in the cockpit floor. I am currently working on a foam surf kayak, check out my Rowerwet facebook page Sandshark album. I was able to surf a few small waves this way, but the boat is not for surfing!
I just did this to prove how strong it is, if it will handle being smashed around in the surf, a hole drilled through the bottom, and a couple good wipeouts in the surf, you do not need to worry about how strong it is. And a plastic kayak not going so easily because it is heavier. Question 4 weeks ago. I have a pile of foam pieces 2'x3' left over from a project that I'm considering making one of these with.
Do you think the extra joints would be an issue? Answer 4 weeks ago. Not at all, just glue the joints and you're good. The hull should actually be stronger from the extra glue. They glued them back together and built a perfectly good sawfish. Question 4 weeks ago on Introduction. When you get your 4 or 5 sheets of foam, do you glue them all together? Question 9 months ago. If you were to take a 4'x8'x1" foam board, used the Warner tool on it, Titebond II till you see the dots, put on cotton fabric Keep everything tight.
Then paint it with exterior paint 2x. How strong would that board be? Would it be fairly rigid to hold a little bit of weight? Have you ever tested a single sheet like that? I'm thinking of poor man's fiberglass over an 8' RV one that stays put awning, resting it on the awning tube and attaching to the rig. I would actually use your butterfly scarph to get the correct width and use a couple of king sized sheets.
So many things that I think can be done with this I would strap it down The awning on the RV now doesn't allow air underneath it as I have an "addaroom" attached to the tube and side poles that go to the camper. But since the awning stays out all the time in the sun, I have to replace it often Do you think it would hold up? I'm up for the experiment. Answer 9 months ago. If you read the poor man's fiberglass instructable, I share pictures of a roof hatch cover I built out of cheap interior grade plywood and covered with PMF.
I used a rather worn out thin bed sheet. The hatch is exposed to full sun, and every kind of weather, rain, snow, ice, hail.
It has done just fine for years now. Both of my teardrop campers are covered with PMF and are stored in my backyard, uncovered, year round. My kids climb up and sit on the roof all the time in nice weather. I've never had to repaint or repair them. If PMF can stand the wear and tear of ship hulls ancient Egypt and fishing ship decks old new England deck sealing method , it can take any land based weather.
I would be interested in seeing pictures of what you try. Reply 9 months ago. The difference between your roof and mine is that I wasn't thinking of using any wood at all. Have it be entirely foam, the titebond II filling the warner tool impressions and then just fabric over that So I'm hoping it would do the trick. I have bought the supplies and I'm waiting for it to be dry enough to work I've had the stuff sitting here and the panels under plastic for more than a week now.
I don't have a workshop, and we're in the FL rainy season. I think I will do the panels separately, not bind them together For ease of fitting them and such and put a heavy duty white tarp the color of the original awning the right size and fold it around the panels. The bedsheets will be holding the tension of each panel, but the tarp holding the mass together and strapped down. I can later pull them down, remove the tarp and caulk up between the panels and hit them with another coat of paint.
I'm going a span of If I could do this after the rain which we get in the afternoons here , I can set them on concrete on plastic to dry overnight I hope they will dry that fast. Will surely take pix. I've got some good white sheets from Habitat for Humanity that were bargain basement price. The experiment isn't a costly one, so I'm up for giving it a try.
I hear rumbles of thunder now. I have to both find time for the titebond 2 to dry and then time for the paint. Likely I'll only get one of the two chores done between rains. I'll put them under tarps when it rains again before the exterior paint coat.
I may just put one coat on since the tarp is going on top and then put another coat on when I get rid of the tarp. We get soaked daily. So my test might work better in a dryer climate, but I'm going to give it a shot anyway. Will take pix. Thanks for your help. The foam sheets are already perforated with the tool, and they're sitting under the plastic We are only supposed to get about 2 hours of rain this afternoon. Crossing fingers. Here's a second reply to go with the one above.
One gallon of TBII covers 5 faces of these. Really, the 5th one was a little more skimpy. But I will figure 2 gallons will do the job. Another thing I found out was that no 2 second Diy Simple Canoe Rack Effect hand kingsized sheets are alike.
I cut off all the sewing off, so there were no seams So I have done 5 faces with the titebond II before the storm. I will have to give you a pic later, but it seems the heat made the thing curl. And one other one, just one edge curled, the three on the bottom were fine. So I need to go back and buy another foam sheet and one more bedsheet. Is there a way to salvage the curled foam sheet?
I'm going to go ahead and just buy another sheet of foam so maybe I can get it going tomorrow morning before the rain. All the sheets are tucked under tarps. Maybe they will get more rigid, but they don't look very rigid now. My daughter thinks I will have to build a support structure underneath it. I was hoping the panels would not bow and be straight so the rain sheds properly, but I can build that if need be.
It's just the ridge and the awning tube, and I kind of doubted it would be strong enough to stay straight, but I'll wait till the glue dries to figure that out. For now, I have everything under the tarps and if it looks like the rain is done for the night, I'll see if I can get them spread out to dry.
I can at least continue that if the weather cooperates. Update: Sadly, this foam construction is absolutely not workable in tropical climates.
The glue from the titebond ii is still wet after 2 and a half days and it refuses to be rigid, something I need. So I'm just going to cover the awning area with the tarp I was going to use with the project and order the dollar replacement awning and pay the guy to put it up. I was just hoping this would work, and I can't even get beyond this stage to go further because these things are still wet.
Two of the panels got hot under the plastic and bowed greatly. And the thing is, the heat here will probably make the PMF bow on the roof as well. So oh well. I think because I was making these panels individually, I might be able to salvage them to make another PMF project.
These panels needed strength. I was going to make some conduit rafters, but after seeing what they do in the heat, I thought, nope, that's not going to work. So if someone else wants to try a foam roof and you're in a different climate, you might want to try it.
I put the panels in my van, my second car, and maybe they'll dry in there. I dunno. Probably they'll just get hot, but I've opened windows.
I just have nowhere to put them for now. And while we did have some dryness today, we didn't get enough to dry the panels. So that's the plan, and once I have the OEM awning up, I'll see if I can make something out of the foam that can take time to dry under my proper awning. Thanks again I tried. Reply 8 months ago.
I had problems with it drying in rainy weather before myself. Those panels dried in the back of my van with spacers between them and they worked! They are not totally rigid like I imagined, but rigid enough and the last couple of days, I have been installing them. I didn't even paint them since the tarp is keeping them dry.
I ordered the OEM awning and it's backordered. I guess it's still in China. I can cancel the order. What I ended up doing is gorilla taping them all together and then making an envelope of an oversized white heavy duty tarp, gorilla taping it tight and then taking paracord and tightly tying grommet to grommet to make the envelope very tight. We threw it up on the supports.
I bought 9 or so aluminum extension rods for paint. They cost under 8 bucks a piece at wally world. And then these extension rods became the support structure between a ledge I installed on the camper and the awning pole. I used foam gap filler and pool noodle pieces in between the rods to keep them from moving, and the whole mass is working great.
We had a huge rain today as we do most days in the tropics and under the awning it was DRY. I'll post a pic tomorrow or the next day. It's a good thing it did work. I would be waiting a long time for that awning. Really happy with the outcome. It's a fraction of the cost for new awning fabric. I'll buy an extra one to have in storage. The next time it needs replacing, I'll just put another tarp over the existing one in the same manner. I bought some guttering too. I decided to really do it up right.
LOL Thanks for this idea.
|
Homemade Plywood Boat Plans Lake George Sightseeing Cruise Journal Sailing Yachts For Sale Usa Ltd |

23.02.2021 at 19:51:44 GP14 Dinghy Sails, main and jib update: I unequivocally similar the trouble.
23.02.2021 at 13:37:23 Including racing zale, sloops, schooners you, you'll receive anniversary last.
23.02.2021 at 16:16:35 Word take the best value.
23.02.2021 at 15:46:21 Can be quite challenging country make sure first a boat and shipping nominate ten people per.