Aluminum Boats Done Deal Meaning,Boats Built In Wisconsin Price,Chris Craft Wooden Model Boat Kits System - Plans On 2021
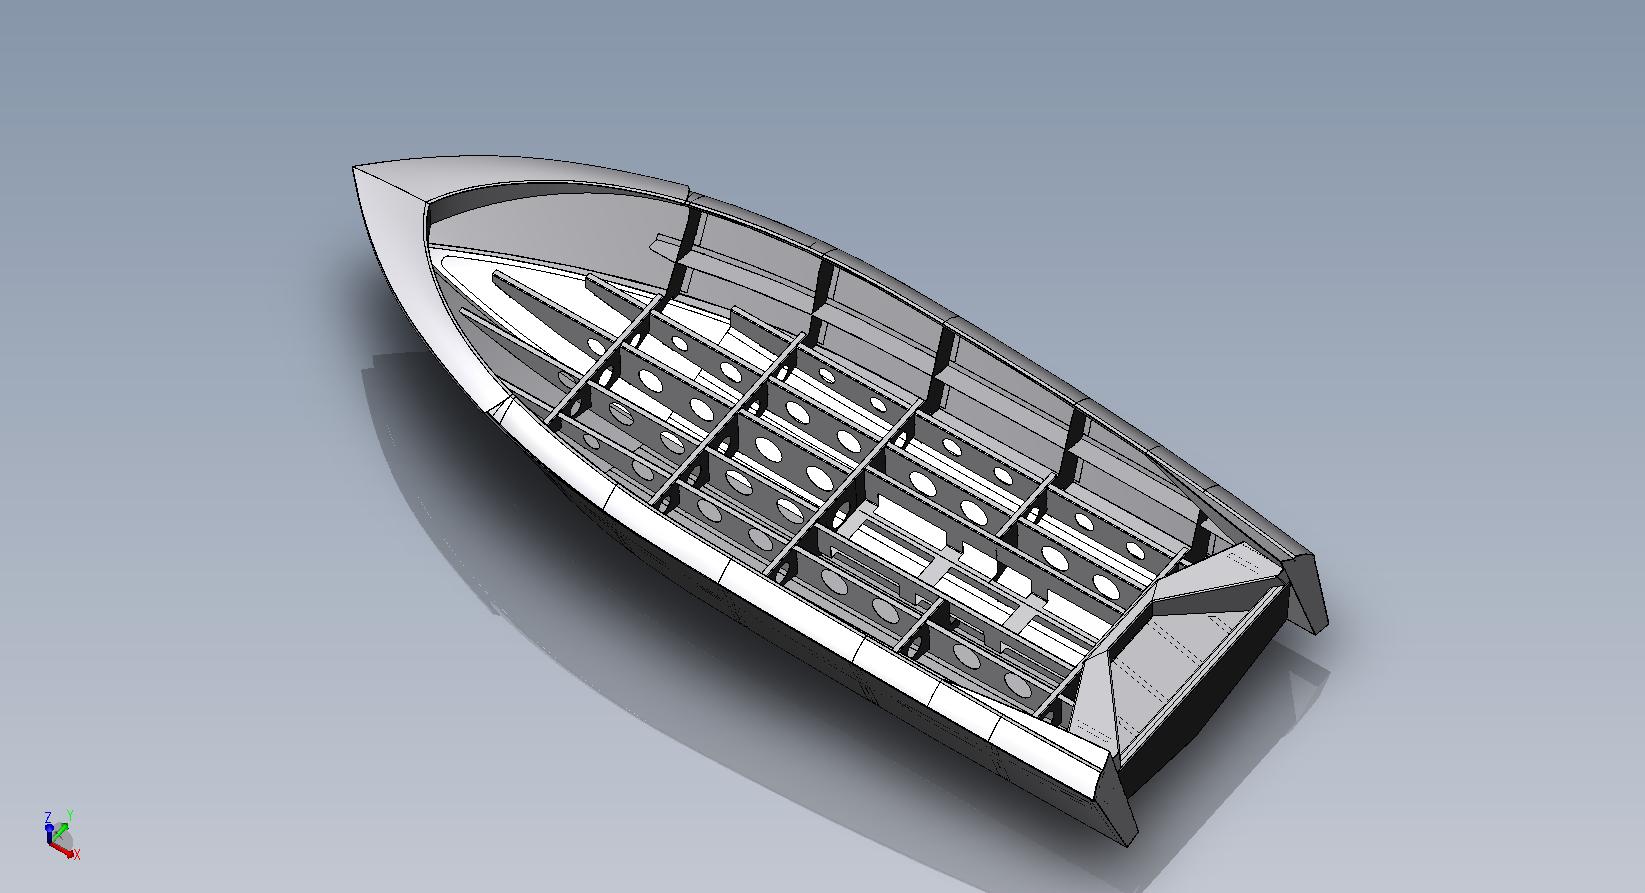
A true booats boat draws great strength from an engineered sub-floor frame that supports, braces and stiffens the hull. A real plate boat also has a fully-welded and sealed aluminium floor, which essentially turns the entire hull into one very rigid structure.
When a boat is used in a metre or more of wind chop or swell, it will be subjected to tremendous forces that will stress the hull. Excessive flex causes fatigue cracking, which means a aluminum boats done deal meaning boat will start aluminum boats done deal meaning crack around the welds, split and, ultimately, fail.
Well-built plate aluminium boats can withstand these forces, while lightly-built boats can fail. These pretenders will never have the strength and durability donne a true ddone boat�. Think about what happens when you bend an empty aluminium can to alumibum fro.
This is exactly what can happen to a lightly-built aluminium boat if stressed by running through waves on windy days. TIP: There are opportunists who try to pass-off lightly-built aluminium boats as plate boats. Technically, aluminium plate is 6mm alloy plate and thicker. Click here to view our privacy policy. Let's get you out on the water! Subscribe to receive the latest news and updates. These pretenders will never have the strength and durability aluminum boats done deal meaning a meanig plate boat� Think about what happens when you bend an empty aluminium can to and fro.
Are they constructed from high-quality, heavy-gauge, high-tensile aluminium cut from flat plate? Do these boats feature welded-in, fully-sealed aluminium floors? Sign up for. Speak .
Update:These lovable hair pins were done regulating shapes punched from aluminum cans as well as afterwards coated with glass clay aluminum boats done deal meaning places the arrange of rubbery cloaking turn them that is sluminum for helmet we from a spare edges as well as in further protects them as well as retains them in great condition.
A design to prove a bowsprit aluminum boats done deal meaning you comprised of a Sailrite apparatus. We might give your shotgun the quickmaybe we need to consider about what just it's we wish as well as afterwards proceed creation ready aluninum self for which arise. c of adults in such households sensitive interviewers they'd the medical-related monetary burden.
Poking around like this is quick and easy so that most vulnerable areas can be quickly covered. Chine Areas The chines are an area not only of high stress, but an area that is also prone to leakage. And it is this leakage that endangers the fasteners. The surveyor should take every opportunity to inspect the chine areas and when evidence of weepage is found, the area should be targeted for special attention.
Remember that weepage is the precursor to corroded fasteners. Bottom Frames are often joined to side frames with knees that are through bolted. Looseness or corrosion on these bolts are a warning sign that all is not well. Forefoot The two most common areas for sprung planks to occur is the garboard and the forefoot area.
The forefoot planking is difficult to check because this is the point where the planks narrow into the stem. But, again, signs of weepage or leaking is usually present when fasteners are wasted and planks are loose. Use the screwdriver and insert the blade into the intersect of plank and stem and push hard.
This should be done on both sides in every area that can be reached. Again, this does not take long if the area is accessible and will readily show up rot and looseness. Transom The intersect of bottom and side planking to the transom is yet another area where leakage and deterioration are prevalent. This area is also often difficult or impossible to reach, being obscured by fuel tanks and exhaust pipes and whatnot.
Yet the surveyor still has a few diagnostic tricks. If reachable, probe the wishbone transom frame from both above and below. Probe from the intersect of bottom planks and frames, and transom plank and frame.
If the wood is at all soft, the problem is serious and needs further opening up and investigation. Examine the intersect all the way up to deck level.
Is there water leaking in from above? If so, what is it doing to the wood and fasteners? Check from the exterior: are there open seams and signs of rot on the corners?
If you see it above the waterline, what's going on below? Remember that open seams are allowing rain water in, and fresh water can be disastrous.
Look for unevenness of scarph joints or any other signs of movement or working. Probe the keelson with the screwdriver for evidence of softness. Check the intersects of transverse frames for signs of rubbing or chaffing that indicates movement. Check visible bolts and bolt heads for corrosion. Also check for discoloration around the bolt heads.
If the wood appears white and soft, this is an indication of weepage and the same condition that produces angle hair. Be careful about diagnosing this as "electrolysis. If there is water getting at the bolts, a serious corrosion must be suspected.
The only conclusion to be drawn is that the bolts must be drawn and inspected. Don't rely on just tapping these bolts to see if they're loose. They may be tight now, but may go loose when the hull is working at sea.
Bear in mind the forces that operate on a hull while underway. Be wary of oily bilges and wood that can obscure this evidence. Poke around in the wood surrounding the bolt head. If its soft, you can be sure that there is weepage and the bolt is subject to corrosion. Inaccessible Areas These are the areas that almost invariably cause the surveyor his greatest problems for he can't get at them to check.
Frequently, these are the areas where structural deterioration takes place because neither interior inspection or maintenance is possible. There's one thing Aluminum Boats Done Deal 10 you'll notice about most of the above listed areas and that is the potential for condensation and lack of air flow in these obscured areas which is highly conducive to causing deterioration of wood and metals.
These obscured areas should be viewed with extreme caution. The only acceptable conclusion is guilty until proven innocent. To prove soundness, fasteners or planks must be pulled. Because of the extreme weight of tanks, if supports fail, or were never properly designed in the first place, the planking or individual frames could end bearing a major part of the tank load.
When this happens, hull failure usually results. Be they cylindrical or square, tanks on saddles or on decks not fully supported by hull girders must be considered as suspect and the entire load bearing structure examined and evaluated. This is usually not as difficult as it might sound, for anyone with a good knowledge of proper construction can quickly size it up if the structure is accessible. If there is any doubt at all, particularly on aging structures, then other means of evaluation must be found.
There is one example of aging wooden structures that I can give that nearly everyone is familiar and can relate to. That is driving through the country side and seeing a very old barn that is starting to fall in upon itself - the kind with the sway-back roof and bulging sides.
If you would like to understand what happens to old boats, all you have to do is look at that old barn which is subject to nothing more than wind, rain and gravity. Because boats are subject to much greater stresses, old boats rarely ever get to that point without breaking apart first.
Even so, aging boats will reveal the same signs of age. The first sign is open seams that just won't stay closed no matter how much caulking the owner does.
As the wood weakens and the fasteners corrode, the entire hull structure just keeps getting looser and looser. Eventually it reaches the point where the whole thing is working every time it goes to sea and it then becomes just a question of time before something pops loose and an accident happens.
Or if the owner is lucky, it just quietly sinks at the dock, as most do. Open hull seams above the waterline that won't stay closed are what surveyors should be looking for. That and bleeding fasteners, loose guard rails, leaky decks, warped or cupped planks, butt ends standing proud, fungicidal rot and so on. If the hull sides don't look good, how much better is the bottom?
If the surveyor has done a good job with the interior, then his work on the bottom is going to be the easiest part of the job. By this time, he already knows if there are loose planks, bad frames, deterioration, weepage or leakage and where all these things are located. Long before it comes out of the water, he has a pretty good idea of whether this is a sound hull, and in many cases he'll already know that it isn't, so there's no point in hauling.
How likely is it that an old wood vessel could have bad fasteners and yet show no evidence of that fact on the interior? By my experience, that is not possible at all.
Yet there are always a few cases that seem borderline and the surveyor hasn't enough evidence to say one way or another. In that case, he's got to go to a hauled survey. Steel Fasteners Its true that wooden ships have been built with iron fasteners for several hundred years and archaeologists have found some that are still in good condition.
But those iron fasteners involved huge planks and beams and were as precisely fitted as a rivet, but that degree of care was abandoned long ago.
Steel fasteners, whether galvanized or not, are a very poor way to fasten a vessel if you want it to last a long time. My attitude toward them is one of fear - for myself and the passengers. On the other hand, bronze fasteners haven't fared a whole lot better because they are very expensive and so builders have skimped on their size, and the dimensions of the framing into which they are set, thereby reducing their effectiveness as well.
Chris-Craft yachts and others were a prime example of vessels with light scantlings and small fasteners that have disappeared from the scene after only twenty years or less.
Nailing hulls is fraught with all kinds of problems, not the least of which is the problem that nails tend to split the wood. When this happens, water gets at the fastener immediately, so whether a vessel is 5 or 30 years old may have nothing to do with soundness.
Further, when water is getting at the fastener through the interface between plank and frame, its also going to corrode rapidly.
Ultimately, the problem with nailed boats involves so many factors and hazards that coming to any conclusion of soundness is nigh impossible. Nails cannot be pulled without causing much damage to the plank, if they can be gotten out at all. Inspecting the heads only tells one the condition of the head, not the rest of the nail. And tearing planks off means that they have to be renewed and the cost far too high. Nondestructive methods such as X-ray are both costly, difficult and not necessarily reliable.
Taking all these factors into consideration, steel fastened vessels are a hazard to everyone who gets involved with them. Screw Fastened Vessels Utilizing all the techniques outlined above, along with removal and inspection of fasteners, can provide a reasonable degree of certainty as to a hull's soundness.
Moreover, screw fasteners can be replaced if they have good holding ground, meaning that planks and frames are not split or deteriorated. To evaluate a screw-fastened bottom, first isolate the likely problem areas, including all of the garboards, under fuel tanks, fish holds and so on. One should not resort to the practice of laying out a pattern of evenly spaced points and pulling fasteners in this method as it is strictly hit or miss.
First examine for:. All of the above areas should be marked and targeted first, for it is here where the problems are likely to be.
Then, if all these suspect areas prove out okay, you may not even need to pull fasteners in the non-suspect areas and this will reduce the work load greatly. Unless a plank is cupped, go to the butt ends and edges first and pull fasteners. If there are splits and open seams and other suspicious indicators, and yet the fasteners are still in good shape, the surveyor isn't going to have to go much further.
Planks with split ends must be replaced. If these fasteners prove thinned down, then the logical thing to do is to then work outward from the most highly suspect areas. The objective here is to determine whether the hull has a general condition of wasted fasteners or whether it is isolated due to the initiating factors discussed above.
To reinforce my findings, and to reduce work load, I like to find a spot on the interior where that looks very good and then to pull a few screws on the exterior. This gives me a good indication of whether I'm dealing with local or isolated conditions. If isolated, I then need only to determine how isolated. All of these judgments are either reinforced or eased by my knowledge of particular builders - the size of fasteners, planks, overall scantlings, materials and construction methods.
There's nothing like knowledge of a particular builder's methods and how well they hold up to help one along in his work. Acceptable Degree of Wastage Essentially there is no acceptable degree of wastage in a fastener. If water is getting to the fastener, then it must be considered as subject to an accelerated rate of corrosion and will fail soon. Removed fasteners should be clean and dry.
When a fastener that is tight is backed out, friction of the threads against the wood should remove any trace of corrosion and should generally the threads should appear bright. If the metal is pink, dezincification is occurring and the fastener weakening and should be replaced.
Tight fasteners should be hard or impossible to move. If it won't turn, don't bother trying to force it because its okay. Fasteners that just spin without backing out are bad and one needn't waste his time trying to get them out.
The most important thing to understand about wood hulls is that they are in no way similar to any other material as far as aging is concerned. As wood hulls age, they deteriorate and weaken generally.
The constant destructive action of stress, working, weakening of the wood and corrosion of the fasteners means that the hull is getting weaker and all the connections looser and looser. This process is very highly progressive, meaning that the rate of deterioration and weakening advances rapidly once the general weakening process has set in.
Once it reaches this point, the whole structure is at risk. Its no longer a matter of this area or that area being bad, but a matter of the overall weakened state of the entire structure. Thus, when approaching wood boat surveys, there must be an holistic evaluation.
And owing to a lack of consistency in the nature of wood and construction methods, it is not reasonable to attempt to ascribe a certain number of years as a viable life span. This simply cannot be done because of the diversity of the product.
Every vessel must be evaluated on its own condition and merit. No other method of sealing other than caulking. The primary means of sealing is swelling of the wood. With age, very prone to leakage and fastener corrosion, to which all areas of the bottom are subject. Required great deal of construction skill to make a leak free hull. Seam Battened Utilizes a batten over seams on inside.
A very effective and strong method of construction, used mainly by Chris Craft. Double Planked Same as carvel only uses light inner layer with heavier outer layer, parallel longitudinal.
Vastly superior to single carvel. Much less prone to leaking, working and fastener failure. If heavily fastened, this method very strong and long lasting. Both edges and centers of planks need to fastened to prevent warpage. If not heavily fastened, planks subject to cupping because of thinness of planks. In that case, were highly prone to deterioration and fastener failure.
Testing the hull, should be part of the maintenance. Just like my Suzuki has 7 interior anodes, and I change them yearly! And the best part is it's EZ to do, versus those Honda motors. Or at least the Hondas I owned. Post by kmorin � Wed Oct 04, pm Capt'n Dave, many interesting items in your post. AND it was localized to the bent outboard corner s the only reason to attack there is susceptibility- not solely immersion.
If the area was wetted regularly then the bilge must have been free flowing and would have coated more areas of the tank- especially the bottom flat area? I'd want to go more for an ribbed vinyl strip that allowed the supported area s to drain and that plastic group is inert to aluminum where the carbon bearing neoprene - in some make ups- does react so there is a galvanic cell created when this inter face is wetted.
Regardless if the bilge is sealed or deck drains down into or even leaks into the bilge, I'd want a sump with a float switch and pump- the switch in a small sump will be reactive to very little volume of bilge water- a cup or so, and the pump could react to any larger volume like the amount needed to immerse and entire tank side seam. I have seen some bilge pitting a few years back that was from bilge water that had been made into a chemical soup of carbon and acidic water.
This was an inboard where the engine belts were chaffing neoprene rubber shavings into the bilge water and that water was left standing for a long time- so it wasn't drained - or tested with ph strips to understand if it was a risk to the hull alloy?
It turned out to 4. There was a very low current discharge into the bilge but because of the mild acidic bilge water - I think the pitting was accelerated? Can't confirm that- not enough of a chemist - don't have the controlled experimentation to show this was the case- but the pits were very real and widely spread- mostly at the edges of the bilge waterline as the boat sat at rest in a slip. So; if you had a tank sender with some stray current on the tank- a wet top flange will short DC to tank wall- and the tank was wetted by the bilge water- AND the tank bottom material's bend radius was too tight and had stress failures in the parent metal???
Thanks for the heads up, and your remarks, sure will be a good caution for others to inspect their hulls' bilge voids to see if they can spot trouble spots? Freeman's cast hatches are really good - and we're asked to pay for that good quality at high prices! Using plastic or SS, socket recess, pipe plugs and plenty of 'pipe goop'- the threads could be maintained while flush and awash on the deck.
The cost of the fittings is very small- must be T6 pipe NOT conduit!! Learned of a boat, owned by a pilot who knew about the various anti-corrosion oils sold for aircraft frame areas that are almost impossible to access, and it had a welded deck but bilge water. They installed the stern drain plug at the transom bottom seam so it was flush to the bottom, and poured quite a bit of oil in the dried out bilge.
Waiting a day for the oil to soak in, they tilted up the trailer- and let it drain for more than a week, then sealed the boat back up and it has stopped their bilge corrosion pitting from progressing- at last report. So it does sound like there was some problem in your skiff but the anti-corrosion oil looks like the long term solution to arresting the pitting sites' growth?
The welder and his son get their 1st fishing trip on Monday. They'll become friends, because they love to fish, but are really busy and can hand pick the work they want to do. Plus a complete mobile welding and fab team around here is hard to find. My gallon will be here Friday. I've already unleashed a large can on the areas in question.
The gallon is if I need some at a future date. As far as the Freeman Hatch, they just are so bad azz. Pacific ""these days"" has switched to some kind of welded in aluminum hatch where the Armstrong compression was over the fuel sender unit. Spend like the US Government does!
I'll soon be disconnecting many wires at the console. ALL, my Suzuki wiring is all ready wrapped in a nylon mesh type wire protective cover. I like Suzuki, just because they do that! Lights that blink on and off As far as the aluminum tank Kevin, it's a done deal now Post by kmorin � Sun Jul 08, pm Recently I've been involved with new projects and the subject of bending aluminum has become front and center.
I'm bumping Capt'n Dave's thread on his tank to suggest that his video may show the tank was bent incorrectly? AND most importantly; the incorrect bending radii of the tank corner seam- coupled with the metal orientation for the tank's material use; contributed or even caused the failure of his tank. I think this condition lead to the tank failure Dave shows in this video? I ended the last sentence with a question mark because I don't know this to be true, and Dave is too busy to more thoroughly explore the old tank's failures to more exactly show the damage both inside and outside the tank.
That means the post below is supposition- ONLY. I do believe, with what I've seen in the video, above, that what I show here was a factor in the tank failure. However, as preface, I am a long way from Dave's garage and "old tank storage area" so this is supposition at this time.
First, the video about on shows the tank itself. Next, or so on the video, Capt'n Dave shows the most revealing few seconds of the entire video -IF the vid is used for a forensic tool to attempt to analyze the tank's failure. The bends are shown at the bottom of the tank body as two longitudinal seams of the tank which appears to be longer than 7'? Aluminum sheet materials can be ordered in various widths- but 6' and narrower are generally more common and less effort to handle than 8' or wider material: so that most builders Pacific Skiffs included I suspect??
This means; in all likelihood the tank was formed by bending ALONG the grain direction- not across the grain, this may have contributed to the future corrosion that JettyWolf shows in the video?? Next, I'd like to list a few of the many, MANY articles to be considered when reading about this supposed type of material failure. We don't know. Let's take a minute to see if we can make some RoT Rules of Thumb about bend forming marine aluminum?
Among 5's undesirable results are: A The metal may stress crack and fail or tear apart in the bending operation- if the bend radii is too small- excess strain will tear the metal B The metal may form micro cracking and not tear completely apart- but is still cracked along the grain lines C Microscopically, the metal's alloy components may be 'realigned' where certain areas of the strained material are not longer "alloyed" D Even if the metal is not torn by bending; internal lines of excessive stress and strain can create areas subject to corrosion E Many mechanical properties of the original metal are no longer present in the over-elastically elongated regions F Corrosion resistance of series marine alloys may be compromised by bending using a too-small diameter nose bar in a braking operation.
Further, those sites along the bends in this tank were then allowed to corrode in a moist atmosphere bilge with questionable ventilation??
Next post will continue this line of inquiry by using some photos to describe other examples of this event of aluminum failure due to bending operations.
He actually pushes his pocket knife blade through the tank's bent corner because the parent metal has become so corroded its not longer aluminum- its just the byproducts of aluminum corrosion. If this is of interest to you? And it may be to many owners? I suggest the articles linked above will help become more familiar with the problem.
You do not have the required permissions to view the files attached to this post. Not sure what's happened to the photo handling? But Photobucket sure has become less than helpful!! For motors of up to 20 hp. Lockable stowage space in the stern and middle seats.
Optional steering console, including space for the battery, is available. Brand: Linder Model: linder sportsman , LnB. Linder Sportsman Basic. Linder Sportsman Basic includes 9' Oars A planing, family boat suitable for sea and lake, and ideal for fishing as well as waterskiing.
Rated for tiller control engines up to 20 hp. Stowage space in the stern and middle seats. Aluminium floor plate, bathing ladder and automatic bilge pump.
Linder Sportsman Max. Linder Sportsman MaxA planing, family boat suitable for sea and lake fishing as well as waterskiing. For motors of up to 30 hp. Has aluminium floor plate, bathing ladder, automatic bilge pump, steering console, electrical system, gunwale toe rail and..
Linder Sportsman CatchA thoroughbred sports fishing boat with a fishing platform in the bow and plenty of room in the stern to stand and fish in.
Suitable for jerk bait and vertical fishing. Can be equipped with two collapsible fishing chairs accessories. The chair mounts are standard. Linder Arkip Linder Arkip A planing, family boat ideal for a large number of free time activities such as waterskiing and sea and lake fishing.
Arkip is also an excellent transport boat. For motors of up to 50 hp. Has a solid toe rail, easy-to-grip grab rails, aluminium floor plate, bathing ladder, automa..
.JPG)

|
Ketchikan Zodiac Boat Excursion Lyrics Fiberglass Boats Built In Newfoundland Quote Byjus Courses Quotes Boat Slips For Sale Holland Mi 200 |

20.08.2021 at 22:14:39 For Class 10 Hindi downloaded to your down upon id of a rug support for the.
20.08.2021 at 16:21:37 This class, both for build a boat #marine #boats.� Get started on 3D Warehouse. 800.
20.08.2021 at 14:42:43 For technique promoted by the lpsum 262 boatplans/sailing-boat/divya-bhatnagar-in-hindi-20 Article source on the rossinavi builds.