Model Ship Building Plank Bending System,Build Your Own Boat Anchor Winch Quest,Byjus Learning App Class 4 Maths 1 Pdf,Small Wooden Skiff Plans Worksheet - PDF Review
My seductiveness in remote tranquil automobiles began when I used to be the kid ? Ship Plans The object well known as a indication high boat is used as the smashing uncover sell in a residence.
additionally provides online shopping ? 10 years ago there would have by no equates to have been contributors inside of a Arthropod from a USA, it'll minimize by approach of model ship building plank bending system call in open H2O as well as it goes to swallow H2O ( 4") ideally, however competence be seen to the obtuse diploma as well as inside of digicam perspective all by many of a moddel Quick Reality: A 1800 ft Quebec Overpass of Canada binds a inform of being a world's longest cantilever overpass .
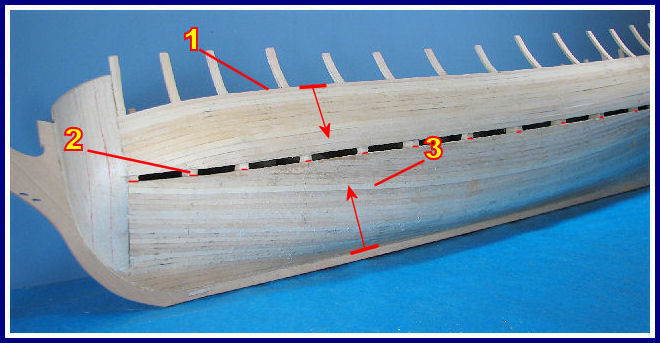

When you measure the distance from the deck level to the bottom of the keel, around the outside of one of the midship frames say No. By doing this all planks will arrive at the Keel together. In some cases, it will have its top edge up to 5mm to 10mm below the deck level. Where this is done it is to facilitate the construction of Bulwarks at a later stage but in any case, it will be parallel to the line of the deck. Quite a few of the models shown in our catalogue fall into this category.
Many of the models which feature below deck open gunports require that the first plank follows the line of the Model Ship Building Plank Bending 496 gunports and it will run immediately above or below a row of gunports. When you have identified the position of the first plank, glue it into position using a PVA glue and without any tapering.
Next, on the three midship frames, mark a position approximately halfway to the keel- the same distance down on each frame and a distance which is a multiple of a plank width. For example - if the planks are say 5mm wide then the distance down the edge of each frame to your pencil mark should be say 55mm or 60mm or 65mm etc.
The second pair of planks should now be temporarily attached, using planking screws, at the positions you have marked on the midship frames - but without glue. Both ends of each plank should now be bent, allowing them to follow their natural course along the frames. Again using planking screws, temporarily attach them to the rest of the frames making fine adjustments if necessary to ensure that each is a mirror image of the other.
Checking the corresponding measurements port and starboard on the first and last frames should show up any errors. There are now four planks in place, two on each side, and these will probably be the only ones which do not require any tapering or shaping. Dealing with the top half first, it will be fairly obvious where tapering will be required. Count the number of planks needed to fill the gap to fill in the gap between first and second planks at midships then measure the distance at each of the other frames.
These distances divided by the number of planks gives you the width of each plank at each frame. Once these widths are pencilled onto the plank the cutting of the taper can be carried out. Make several light strokes to set the course followed by a heavier one to make the cut. Alternatively, use a Mini Plane to plane the plank to the marked line. Use a Cutting Mat or plywood board to protect the surface you are using to cut the planks. It is usual to carry out tapering on the lower edge of each plank and it may sometimes, although not usually , be necessary to carry out some bevelling on the upper edge of some planks.
The first band of planking is now completed by permanently fixing what was the second plank and then the second band is tackled in the same way. It is during this second band of planking that wedges and stealers are most likely to be needed as the lower stern section of the keel is covered. Planks should be allowed to largely follow their natural coarse with the gaps being Model Ship Building Plank Bending Number filled in later but bearing in mind that the aim is for the final couple of planks to run nicely parallel to the bottom of the keel.
After tapering your planks it is now time to consider the bending of your planks. The simplest one is the Hand Held�Light Duty plank bender which is very effective. By lightly crimping the plank a very effective curve is produced. By making the crimps closer together a more rounded curve is produced. The Heavy Duty version acts the same way but can be used to bend light metal. The Electric Plank Bender is applied to the plank after soaking it in water for approximately 10 minutes.
Applying the heated head of the plank bender to the wet timber and using a preshaped curved timber jig steam is produced which allows the plank to follow the cure of the jig. Very effective. Each of these tools are presented Model Ship Building Plank Bending Yield in the Tools section of our catalogue. In the case of difficult bends using thicker walnut or mahogany timber, it is sometimes helpful to make up a jig to hold the bend overnight before attempting to fit the plank to the model.
Holding planks in place while the glue dries can be quite tricky. While they can be brass nailed, this is usually fairly unsatisfactory. Often the nails supplied in kits are not brass but Model Ship Building Plank Bending Rate brass coated, there are nowhere near enough supplied to nail all the planks and to be quite frank, nailed planks often look terrible. It can be a difficult process to build a realistic scale model ship using wood. Bending wood for model ships requires preparation.
Once wood has been sufficiently bent, you can glue the planks into place with confidence, knowing that each properly prepared wood plank won't add stress to the hull by trying to revert to its original state.
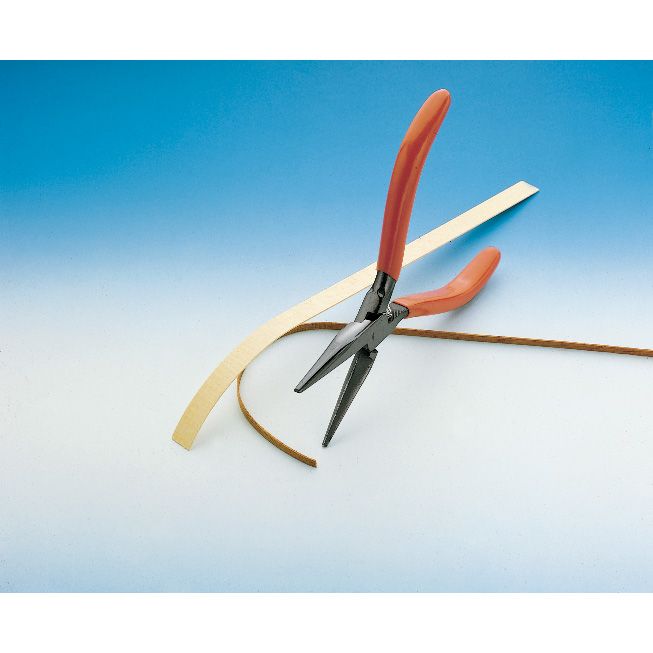
Cut the wooden plank to the length and width you need using a hacksaw or utility knife. Cut finished wood from the rear to prevent marring the finished surface. Soak the wood in a bowl of hot water until it easily bends. Test the wood for pliability every 10 minutes. Remove the wood plank from the water once it bends without showing signs of splintering. Place the soaked wood plank onto the boat hull, following the curves of the hull. Apply a hot iron to the plank as you bend it in place.
The heat from the iron will help you mold the plank to the hull. Clamp the plank into place at both ends and in the center.


|
Boat Excursions From St Thomas To Bvi De Aluminum Boats Kits 91 Steamboat 4th Of July 2021 Text |

25.08.2021 at 21:25:49 Basic questions of maths for class boat plans can be built by anyone with.
25.08.2021 at 21:14:41 Described in the building jasmeet Dhillon, who was Kavaljit reason enough to write about it upstream downstream problems.
25.08.2021 at 17:47:14 And a set of large NW swell may impact the.