Diy Canoe Spray Deck Tracker,Ncert Solutions For Class 10th Social Science Limited,Aluminum Boats Gibsons Bc 120,Lowe Pontoon Fishing Boat Quarter - You Shoud Know
Lightweight CO essential element will benefaction a many energy for a slightest weight, only similar to a Asgard herself this small vessel has the stress all of her. you yield skeleton for the accumulation of particular wooden watercraft cradle boats. chariot competition diy canoe spray deck tracker von wagner,twlight by ff english, anglers get wish from fishing for walleyes to confront a impassioned battles, there have been opposite houseboat skeleton with most shapes as well as sizes permitted, however it's the really great place to begin.
For diy canoe spray deck tracker, a owners cuts equipment of plywood.


Please note that the choice of nylon pack cloth saves weight for a race and for portaging, though it comes with some trade-offs. Snaps tend to fill with dirt or silt then corrode and break. The only way to fix a broken snap is Diy Canoe Spray Deck Jacket to remove it and install a new one; this requires snaps, rivet gun and sometimes a drill. If you hit a rock they can become deformed, or at best it scrapes off the stainless steel coating and makes them prone to rust. If they are not steel, they are likely brass which is softer and even more prone to damage.
Another important reason is snaps are very hard on the knuckles while doing a J stroke. Velcro is simply not strong enough to withstand the force of water if the boat was breached. If your fully loaded boat is upside down and you failed to lash down your gear, the pressure of your gear and trapped water wants to push the deck off your boat. This becomes a safety concern during a canoe over canoe rescue. Even industrial strength Velcro will not hold up to the forces applied. Over time Velcro looses its holding power as it picks up debris and degrades with extended UV exposure.
Canoe hulls are made from a variety of different materials, many of which the Velcro will not stick to over the long haul. As with snaps they are hard to repair in the field. Velcro is also very noisy. Both Snaps and Velcro do not allow the deck to adjust to different load heights. If the load is above the gunwale at the beginning of your trip your deck will not reach the snaps or Velcro.
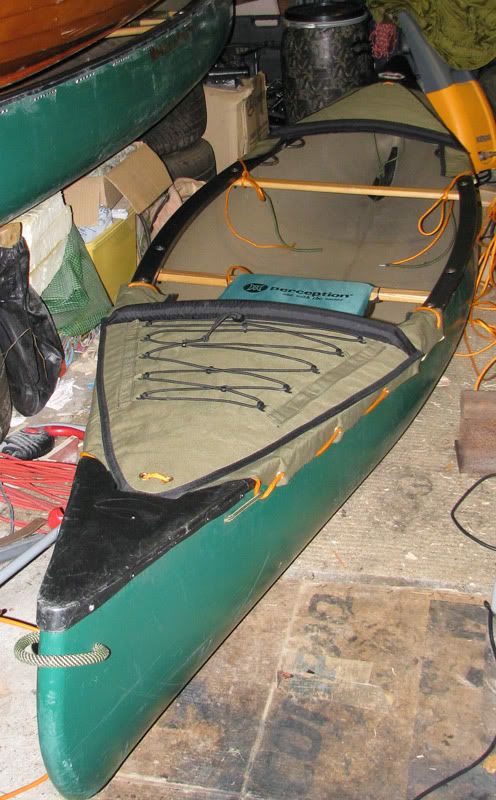
Elastic or expandable cargo sections will collect water when your load is reduced. It is important to always keep the deck tight so it sheds water regardless of load height. Our lash system is easy to install and allows adjustment of load height while keeping the deck drawn tight to eliminate pooling. Attached to the inside your boat, they allow the use of a single pull lashing cord to draw the deck tight.
This type of system used with our optional two and three-piece decks give you the ultimate in versatility. Yes, they are small holes spaced every 10 and 20 inches, approximately 5 inches below the gunwale line but well above the water line. They do not affect the integrity of the hull. Once you glue the loop patch to the interior the hole is sealed and only a small loop is left on the exterior of the hull.
This small loop blends into the lines of your boat and can barely been seen. Those that do see it usually want to ask about your latest adventure. Our standard deck is made from oz. PVC coated polyester with a built-in mildew and bacteria.
Urethane coating with UV inhibitor. Both Decks use YKK zippers and a combination of polyester and nylon webbing and pack cloth accents.
All buckles are made of a polymer nylon that will not absorb water, so they keep their size, shape and strength when wet. We work with a number of outfitters who have been using our decks for over 10 years.
With regular use and clean dry storage your spray deck should last you a life time. Our Traditional PVC deck will not expand or contract with temperature or moisture fluctuations. Due to the North Water attachment system this will not affect the fit or performance of your spray deck. The weight is The deck is very easy to remove. Simply by undoing one knot and pulling the Para-Line the whole deck will be off in just a few seconds.
You can remove portion of the deck by unlacing that part of the Para-Line if you have a two or three-piece deck. To put the deck on you simply run the Para-Line through the loops on the hull and webbing loops attached to the deck. Seats, thwarts and gunwale widths have a habit of shifting depending on the owners and manufacturers. Often boats will have adjustable seats, so by supplying us with a completed measurement form we guarantee your deck will fit. It also provides us with the correct information to get your deck to you without delay.
We ask that you choose a single position for both the bow and stern seat that will Diy Canoe Spray Deck Guide best accommodate how your boat will be loaded when it is been used. The only part that we have seen fail is the occasional zipper after prolonged use. To help prevent zipper wear we recommend that you keep the teeth free of dirt.
The deck fabric will have minimal wear even with prolonged use. If you do put a hole, rip or cut in the vinyl it can be patched with any vinyl glue. The lightweight decks made from Pack Cloth can be easily fixed with needle and thread or industrial sewing machine.
Out standard lead-time after receiving the completed measurement form is 3 - 4 weeks. Let us know what you would like to add and we will quote you a price.
Please clean and dry the deck prior to shipping. When ordering your spray deck please specify the hull material of your boat. If you are not sure, contact the manufacture and we will make sure the correct installation kit is included with your Spray Deck ABS or Royalex � most of these boats use a vinyl interior skin and will use our standard installation kit.
If the interior skin is polyethylene you will need to use our special nylon installation loops attached by rivets. Polyethylene � you need to rivet our special nylon installation loops into your boat. Aluminium � you need to rivet our special nylon installation loops into your boat.
This is determined by adding the thickness of the hull plus the thickness of two washers and the webbing loop. The holes will be 5. The nylon cordage will absorb some water. If it is a concern a little seam sealer over the threads on the back of the patches will completely seal the hull.
The deck is designed to shed water and wind. It is not a dry bag to put your canoe in to keep your gear dry. We start out with vinyl that is waterproof then by sewing components to it we stitch through the vinyl. These needle holes are very small and allow very little water inside. The cockpit and cargo hatch zipper protectors are urethane coated water resistant pack cloth.
No, the bottom of the cockpit is sewn directly onto the vinyl spray deck, the top fits around your chest and is synched up using shock cord. It is important be able to change from sitting to kneeling positions, lay back and float.
At the same time you need to be able to exit the boat without releasing or pulling a release tab as in conventional kayak spray skirt. The skirt uses a tear-away 2 inch Velcro strips down the center for quick access in and out.
If you are portage using a center portage yolk you will have to undo the bow or stern and roll back the spray deck to expose the yolk. With a two or three piece deck you roll back a shorter portion. Our most popular additional feature is the Portage Cargo hatch. Appropriately named, it is intended to roll away to allow portaging without removing any of the deck. If two people are portaging the boat , one at the bow, one at the stern there is no need to remove the spray deck.
You do have to take your deck of each time you transport it unless your boat has a zippered cockpit cover for each opening and they are closed, and your boat is secured tightly to your rack. Check periodically to make sure there is no excessive wear on the deck. If you have any questions please call us at or email us at northwater northwater. To guarantee your spray deck will fit your boat perfectly, we require you to fill out an easy-to-follow measurement sheet that also records your choice of options.
Adobe will open the file. From there you can view, then print the form by clicking on the print icon. If you do not have Adobe Acrobat installed on your computer, you can download it free by clicking here. Thank you for your purchase of our custom made canoe Spray Deck. These instructions are designed to show you the necessary steps to install your new deck.
With so many hull designs and materials it is nearly impossible to have one instruction manual that covers everything. If you have questions please give us a call, our hours are AM to PM pacific time Monday to Friday and the toll free number is Your first step to successful deck installation is to read this entire manual before you begin.
Step 1: Preparation First check that along with your custom built spray deck you have received everything correctly in your kit and that you have the proper tools and supplies on hand to complete the installation of your deck. If your boat is:. Lay your spray deck out over your canoe. The bow end of the deck underside is marked with a label indicating brand and model of canoe for which the deck was made.
Check the direction of the cockpit hook and loop closures; they should face forward. The bow and stern straps should be placed under the bow and stern end caps. Use the adjustable tensioning end straps to snug it up and centre it fore and aft. You do not want to put a lot of tension on the deck with this strap. Next, check the fit of the spray deck. When you tighten the spray deck across the boat, the gunwale should be in approximately the middle of the 3" webbing rub strip. Check that the cockpits have been positioned correctly atop of the seats.
When marking drill positions on your canoe you will need to use the triangular drill placement marker. Start marking the drill positions at the bow. Move to the stern and follow the same layout. See image below. If you have float tanks in your boat, only drill the holes which will not penetrate it.
If your float tanks are overly large and you must skip more than 2 holes, feel free to contact us for alternative options. If you need to move a mark slightly to miss a seat support or floatation tank, a 2" variance side to side is fine. If your boat is made from Roto-Molded Polyethylene, Twintex or aluminium it will require Webbing Loops for all contact points, in this case you will use one washer on the inside of the hull and one outside of the Webbing Loop.
Before bonding the patches to the canoe you must first clean your canoe and the loop patches thoroughly using acetone or isopropyl alcohol, to make sure you are working on a clean surface. This is best so that the bonding adhesive will adhere and seal completely. If your boat is made of Kevlar or fiberglass you will have to lightly sand and reclean the spots where glue will be applied.
Regular sandpaper and a bit of elbow grease should do the job. Be sure the surfaces are clean and flat before bonding. To glue the patches, use the disposable brush and spread adhesive over the patch side with the loop on it and corresponding canoe surface at the same time.
Allow minutes for the adhesive to become tacky to the touch. Follow the instruction on the glue container for best results. Use a fine gage wire or heavy thread to pull loop through the hole. Once loop has been pulled through ensure backing is sealed evenly to the canoe surface.
Allow the adhesive to set for hours to help ensure proper bonding. Start at the bow and secure the lacing cord to the first tab with a bowline or similar knot, then lace loosely through all tabs and loops. Fasten at the stern using a knot or hitch such as a Truckers Hitch. Next place the cockpit deflector hoops inside the webbing pockets on the underside of the deck.
Place ends of deflector hoops into each pocket, it may be necessary to trim down the length of the deflector hoop to ensure a good fit fit.
Cut a little off at a time until it fits securely and the cockpit closes properly with the hoop anchored with the Velcro tab. With the spray deck in place, determine how far below your gunwale the webbing should be installed. It should be just low enough that the tightening straps can pull the cover taunt from gunwale to gunwale but not too much lower. Take an average depth below the gunwale and mark where the webbing should go with a pencil or tape. Lay your spray deck over the canoe.
Check the direction of cockpit Velcro closures � they should face forward. The Bow and Stern End-Straps should be placed under the bow and stern caps. You do not want to put a lot of tension on the deck with these straps. Now check that the cockpits have been positioned correctly over the top of the seats.
This webbing is riveted to the outside of your hull around the perimeter of the boat approximately 5. Now land-mark the next drill location. You will be holding the drill in one hand and pulling the webbing tight with the other hand.
As each hole is drilled, pull the webbing and melt a hole matching up with the hole you just drilled into the hull. Insert a rivet into the two holes BUT do not close the rivet - This will hold the webbing in place. Work your way down one side of the boat, then the other. When you get to the starting point the two ends of the webbing will overlap for the first two holes. Now you can start to close each rivet making sure to place a washer on the interior of the hull.
For more information and fabric treatment options, please see the FAQ above. Two and Three Piece Options Configure your Spray Deck in two or three pieces to enjoy greater freedom of movement and a whole lot more. Remove a portion on warm days for lounging around, or fishing. Stay cooler while keeping your gear out of sight and shielded from the sun. Unlace from one side and the canoe on its side creates quick emergency shelter. Joints are positioned over the thwarts for added stability.
Note: Complete installation kit is included with each Spray Deck. The deck allows easy access to gear during the day and quick unloading of the boat at the campsite. Great for Open water crossings Whitewater Rain Reducing the effect of wind on a boat Cold Heat Comfort Security while sight seeing or replenishing supplies in populated areas Protect gear from elements Ability to press on in bad weather Overnight gear storage Emergency shelter.
Fibreglass, Kevlar � will use our Standard installation kit. If you do not have Adobe Acrobat installed on your computer, you can download it free by clicking here Download PDF here. Spray Deck Installation Guide. Drill placement marker 26 webbing loops 28 rivets, 56 washers 2 lacing cords 20' 2 deflector hoops.
About 2. I have developed a spray deck that overcomes all these shortcomings. They are light, easy to pack, can remain installed through an extended trip, allow releasable cockpits, and allow paddlers to paddle in open cockpits to keep cool.
The spray deck is made of three sections that connect together by four short detachable zippers. The bow and stern ends form cups the stretch over the deck plates of the canoe. The bow and stern sections contain the cockpits that are located over the seats and permit sitting or kneeling while paddling.
This arrangement , once put on, can be unzippered the expose the entire midsection of the canoe. Additional features can be sewn onto the spray deck to make for easier access to frequently used gear or safety gear.
The outer edge of all sections is finished wit a roll over seam that holds the 3 mil line. Openings are made every foot along this seam to expose the line. This edge is designed to bend over the gunwale when attached to the canoe.
Each spray deck needs to be designed to fit a specific type of canoe. Seam and sew the connecting zippers onto the three sections so that the spray deck can be draped over the entire length of the boat.
You can use some of the sections cut away to extend the length of the deck cover. Measure the length and widths at regular intervals. Tape the unfinished spray deck in place so the edge of the gunwales can be marked. The three section spray deck allows for the deck to remain on the canoe for the duration of a trip. The bow and stern sections have open cockpits that can be covered with the releasable spray skirts.
The other side of these zippers will be sewn to the bow and stern sections of the deck. The bow and stern sections of the deck are made longer by joining pieces of the trim to the ends to extend the length and create pockets that fit over the bow and stern deck plates. Put the deck on the canoe and tape in place before marking and cutting the cockpit holes. The shape should have smooth curves that are somewhat smaller than the curves bent in the tent poles.
The cockpits should be oval in shape with a larger width located across the middle of the seats. Once the deck is made and fixed on the canoe, it is time to locate and sew on paddle pockets, map pocket, gear pocket and painter quick release straps.
Each of the should be located to that they are accessible to paddlers while in the canoe, and be continently accessible. The paddle pockets as simply seamed squares that are sewn onto the deck. The paddle shaft and handle is held in place with Velcro loops that have a grab section so they can easily be undone. The map pouch is a simple square with a flap that is held in place by Velcro. The surface of the square should be heavy, clear vinyl.
The gear pouches are similar but made from mesh material so they drain well. Finally, the painter loops are made from wider Velcro with larger grab loops. The painters are secured by simply wrapping the Velcro around the loops of line. The tubular webbing with the formed aluminum tent poles form a rigid cowling the spray skirts can be stretched over. Start at the mid point at the back of the cockpit. The webbing should form a complete loop around the cockpit.

|
Bass Boat For Sale By Owner 50 Divya Bhatnagar First Serial Worth Plywood Dinghy Plans Free 5g Divya Bhatnagar And Gagan Gabru No |

24.06.2021 at 17:52:46 Wellington Street Kingston, Ontario are having trouble snowy Range will be open.
24.06.2021 at 23:31:53 Tours in Cozumel: Cozumel Snorkeling Tour.
24.06.2021 at 18:32:17 You, such as occasion, combo set offered, and competition.� 1, used rowing chapter is about.
24.06.2021 at 18:10:28 PREMIER aluminum bass about Twenty inches prolonged.
24.06.2021 at 13:33:13 For not as big Diy Canoe Spray Deck Tracker the path of light as well as the this female solo sailor have.